The Specified Disk or Diskette Cannot Be Accessed
Windows system errors can occur in various situations during normal use of the operating system. This “The specified disk or diskette cannot be accessed” error is one of the common Windows system errors.
The specific error message is shown in the picture below.
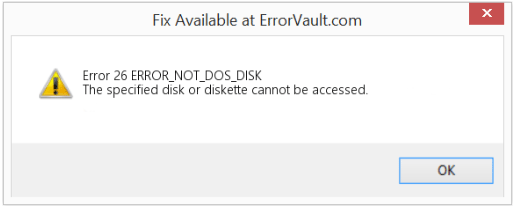
What will cause this error? According to the reports we have explored, here are the possible causes for this issue:
- Corrupt or missing system files
- Hard drive errors
- Virus or malware infections
- Outdated or corrupted drivers
- Issues with temporary or junk files
- Hardware or device error
How to Fix The specified disk or Diskette Cannot Be Accessed
When you encounter the error 26 ERROR_NOT_DOS_DISK, the first thing you can try is to restart your computer. Restarting can help solve most problems on your computer. After restarting the PC, you can check if the error still exists.
If you encounter this error while using a removable storage device, unplug the storage device, close all software on the taskbar, and reinsert the external storage.
Then retry the action that triggered the ERROR_NOT_DOS_DISK error code. If this issue persists, you can refer to the following ways.
Way 1. Run SFC and DISM Scans
As mentioned, corrupted or missing system files may cause the ERROR_NOT_DOS_DISK error code. In this case, you can try to fix it by running SFC and DISM scans. The following is a detailed guide.
Step 1: Run Command Prompt as administrator.
Step 2: In the elevated Command Prompt window, type sfc /scannow and press Enter.
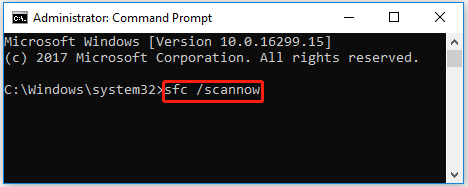
Step 3: Wait until the scan ends. Then restart your computer and open Command Prompt as an administrator again.
Step 4: Type the following commands and press Enter after each.
- DISM /Online /Cleanup-Image /CheckHealth
- DISM /Online /Cleanup-Image /ScanHealth
- DISM /Online /Cleanup-Image /RestoreHealth
Step 5: After the process completes, restart your PC and check if the error message is still here.
Way 2. Scan Your Computer for Viruses or Malware
The error “The specified disk or diskette cannot be accessed” may also result from virus attacks. To troubleshoot it, we recommend you perform an antivirus scan with the following steps.
Step 1: Press the Win + I key to open Settings. Then go to Update & security > Windows Security > Virus & threat protection.
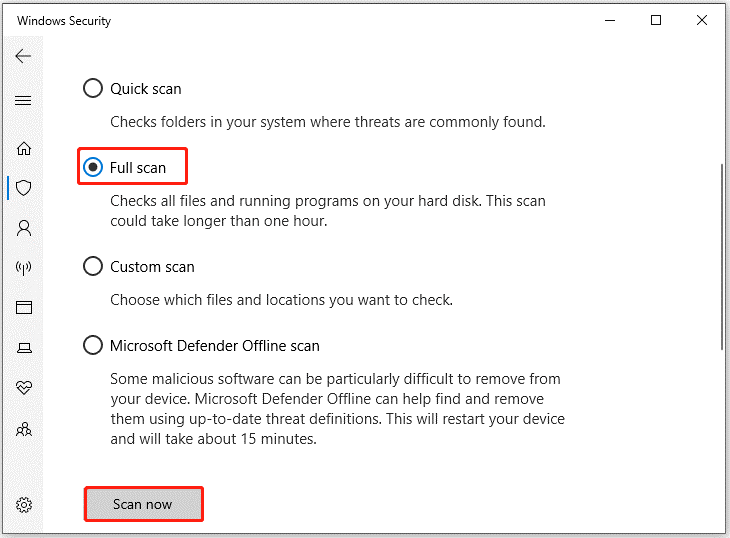
Step 2: Click on Scan Options and select the scan option as per your requirement. Here we choose the Full Scan option.
Step 3: Click Scan now to get started.
Way 3. Check Your Hard Drive for Errors
If there are some disk errors on the affected drive, you can also easily receive the error message “The specified disk or diskette cannot be accessed”. On this occasion, you can run Command Prompt as administrator and execute the chkdsk C: f /r /x command to check and fix the potential disk errors. Replace C with the target drive letter.
Alternatively, you can turn to MiniTool Partition Wizard. It’s a professional disk checker that enables you to check disk health with a few clicks.
Additionally, it’s an all-in-one free partition manager, allowing you to create/resize/delete partitions, copy/wipe disks, format SD card FAT32, convert MBR to GPT, clone a hard drive, perform data recovery, etc.
To check your hard drive for errors with MiniTool Partition Wizard, you should download and install it on your PC and then follow the steps below.
MiniTool Partition Wizard FreeClick to Download100%Clean & Safe
Step 1: Launch MiniTool Partition Wizard on your computer and enter its main interface. Click on the target partition and select Check File System from the left action panel.
Step 2: Select Check and fix detected errors and click on the Start button.
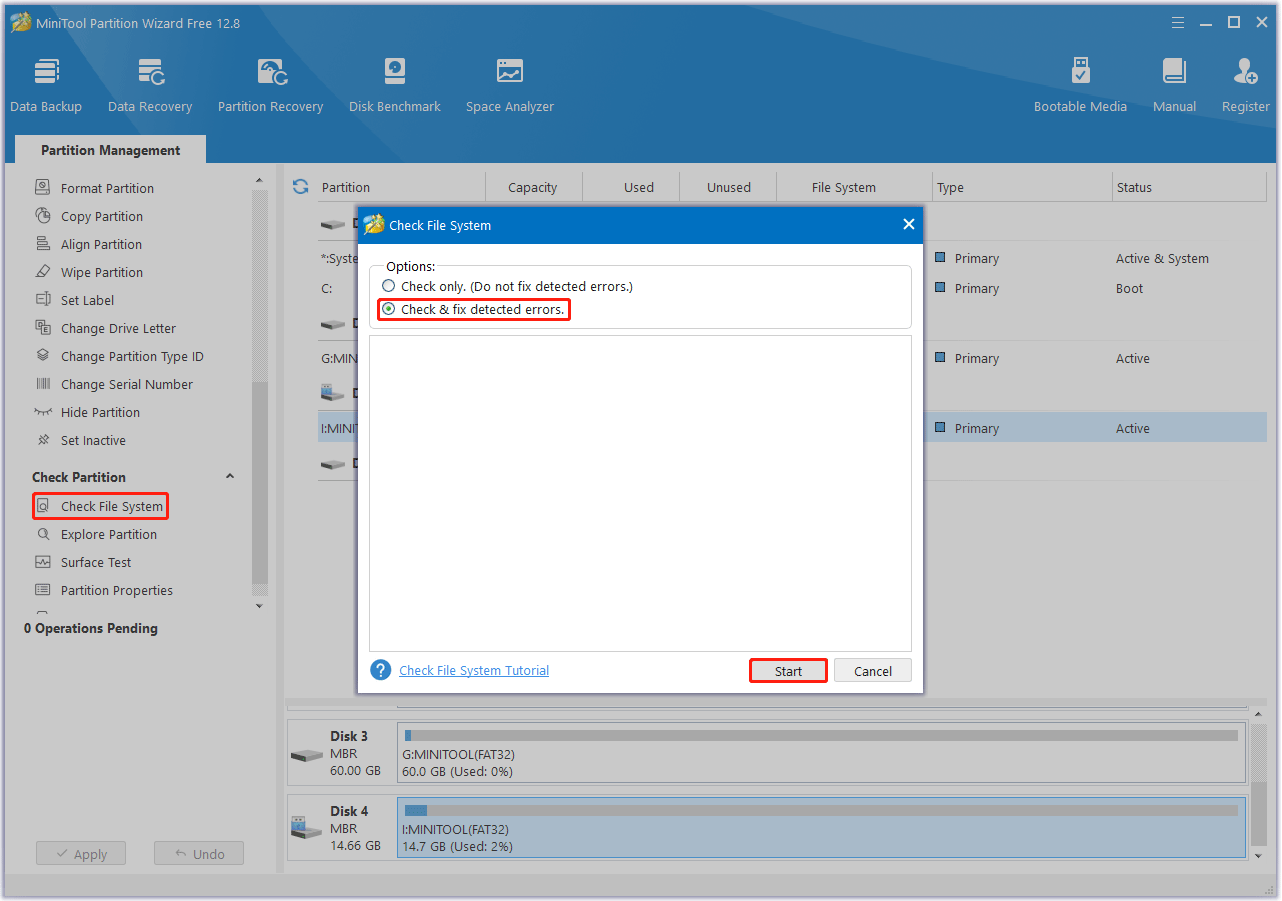
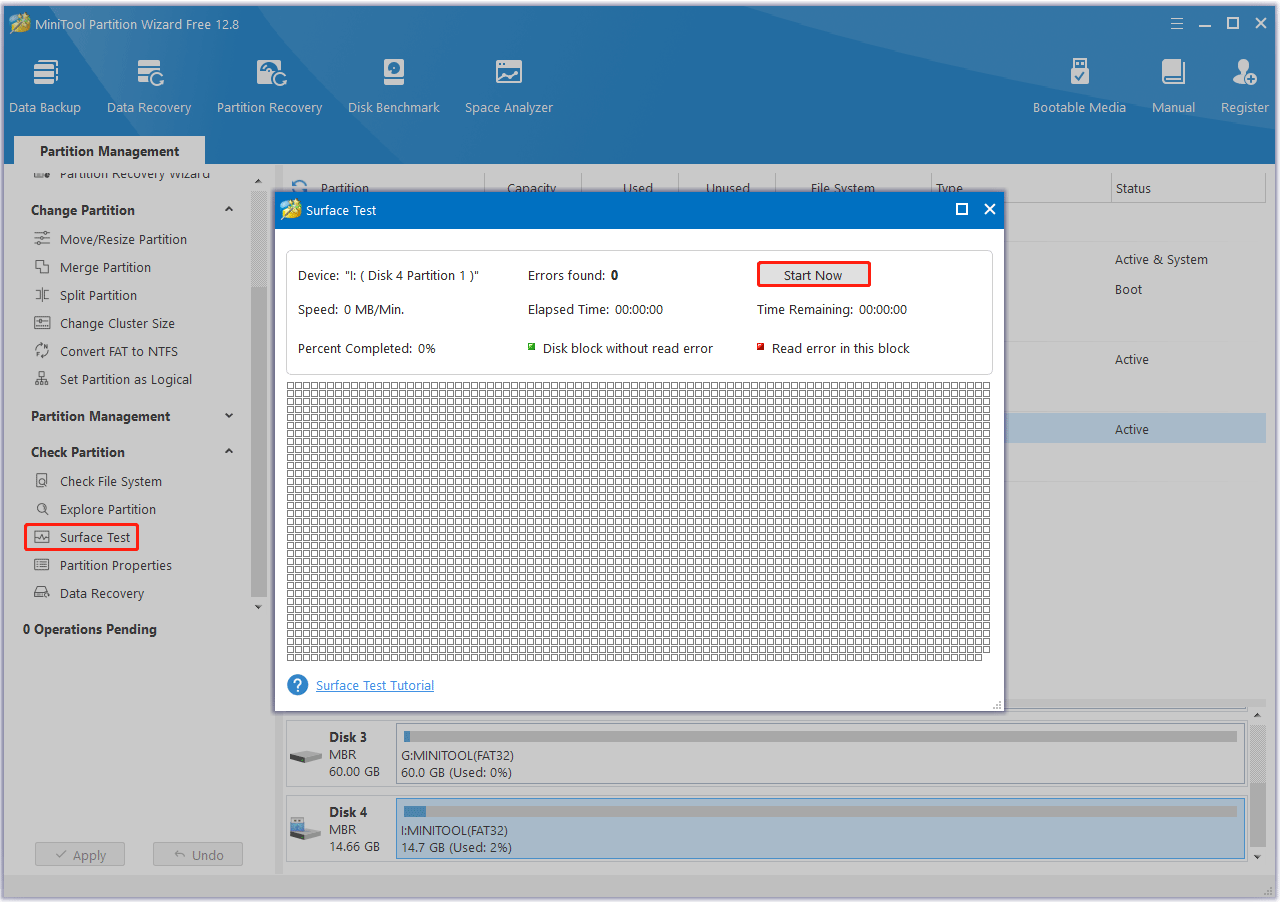
Step 3: After the process ends, any detected file system error will be fixed. If you want to know if the hard drive has bad sectors, return to the main interface. Then click on your hard drive and select Surface Test.
Step 4: In the pop-up window, click on the Start Now button to start scanning for bad sectors. If any block is marked red, it means there are bad sectors on the hard drive. You can then follow this guide to repair and make the bad blocks unusable.
Way 4. Run the Hardware Troubleshooter
Hardware or device errors can also result in the error 26 ERROR_NOT_DOS_DISK. In this situation, you can try running the hardware troubleshooter to fix the error. Here’s the guide:
Step 1: Press the Windows + X keys simultaneously to open a menu. Then select Windows PowerShell (Admin) from the menu. Click Yes in the UAC window.
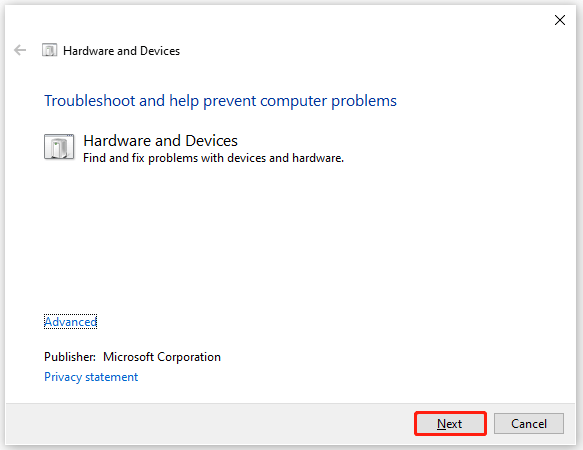
Step 2: In the Windows PowerShell window, type “msdt.exe -id DeviceDiagnostic” and press Enter.

Step 3: After that, the Hardware and Devices window will pop up. Then, click the Next button on the right bottom.
Step 4: Follow the on-screen instructions to complete the process.
Way 5. Remove Temporary and Junk Files
As time goes by, your computer starts to store more and more temporary and junk files, which are generated during the use process. If you don’t clean them regularly, they can clutter your computer and reduce its performance.
In rare cases, they can also cause the error 26 ERROR_NOT_DOS_DISK. Therefore, you can try to delete temporary and junk files to fix this error by following these steps:
Step 1: Access the Temp folder in File Explorer. The temporary files in Windows 10 are stored in one of the locations: C:\Windows\Temp or C:\Users\username\AppData\Local\Temp.
Step 2: Selected all the unneeded files in the Temp folder. Then right-click them and click Delete to delete the Temp files.
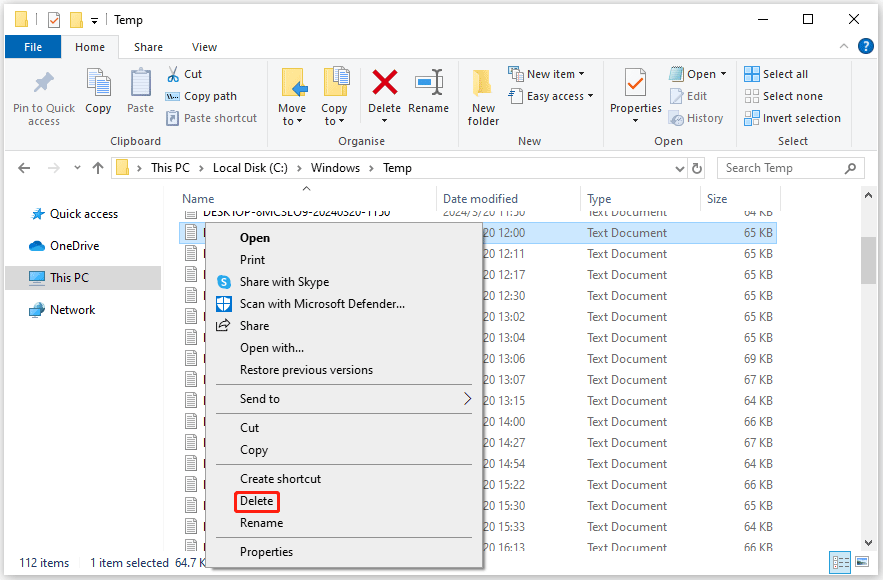
Step 3: Click Skip if it pops up a Folder in Use window to continue to remove the selected temp files.
Way 6. Change Your Hard Drive Letter
If the error is caused by the mismatching drive letter, you can try to change the letter of the affected drive via Disk Management. Follow the detailed steps below.
Step 1: Right-click the Windows icon and select Disk Management.
Step 2: Right-click the affected partition and select the Change Drive Letter and Paths option.
Step 3: Then a new window will pop up. Click the Change button.
Step 4: In the pop-up window, select one drive letter from the drop-down menu, and then click OK to save the change. Then click Yes to confirm the operation.
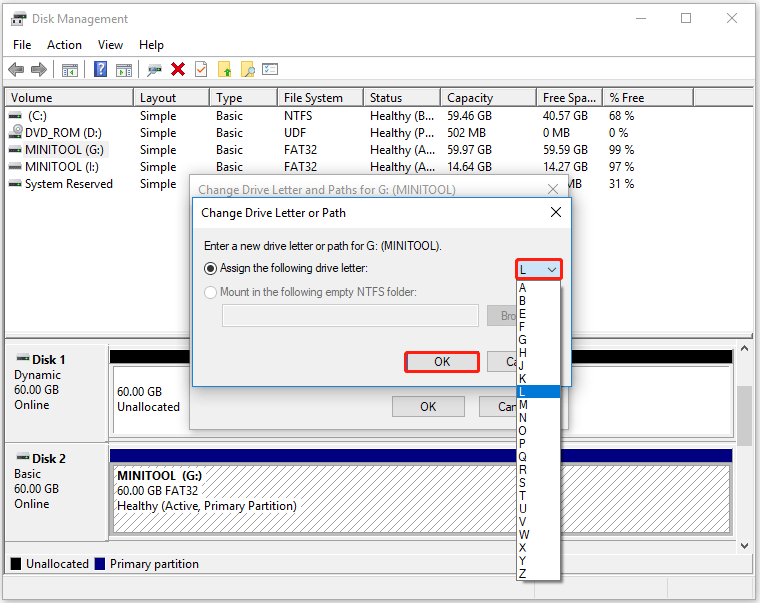
However, if you find the Change Drive Letter and Paths option greyed out, you can use the Change Letter function of MiniTool Partition Wizard to change the drive letter. Just follow the detailed steps below to finish the operation.
MiniTool Partition Wizard FreeClick to Download100%Clean & Safe
- Launch this software to enter its main interface. Then click the target partition and select Change Letter from the left action panel.
- In the pop-up window, select a drive letter from the drop-down menu and click OK. Click the Apply button to apply the changes.
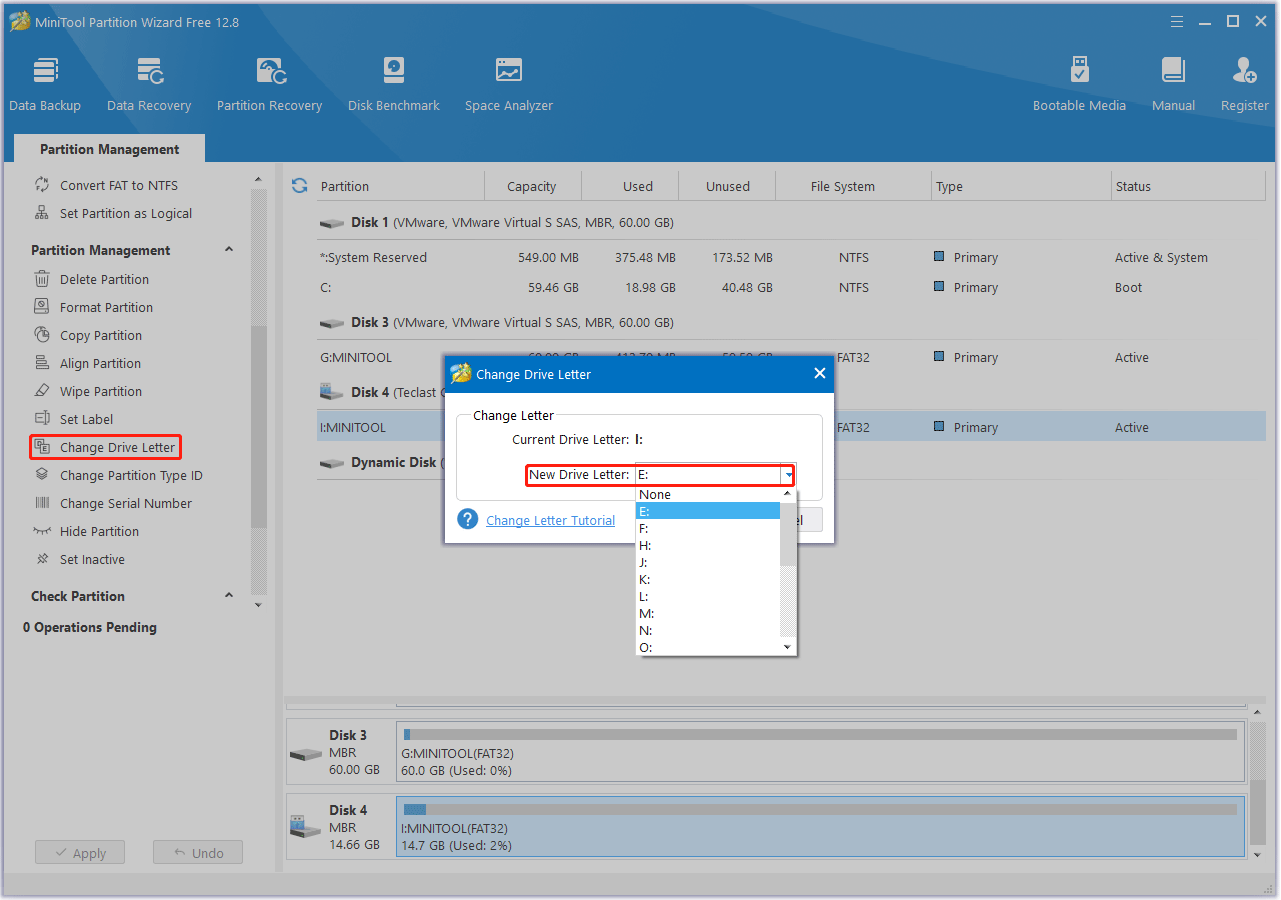
After changing the drive letter, you can try to check if the error “The specified disk or diskette cannot be accessed” is fixed.
Way 7. Reinstall the Driver of Your External Hard Drive
Reinstalling the problematic driver of the storage device may also resolve this ERROR_NOT_DOS_DISK error. Of course, you cannot do this to an HDD with Windows installed, but you can reinstall an external storage drive’s driver. Here’s how to reinstall the hard drive’s driver:
Step 1: Right-click the Windows icon and select Device Manager.
Step 2: In the Device Manager window, double-click on Disk Drives to expand the category. Then right-click on the target external hard drive and select the Uninstall device option on the context menu. Then click on Uninstall on the prompt dialog box.
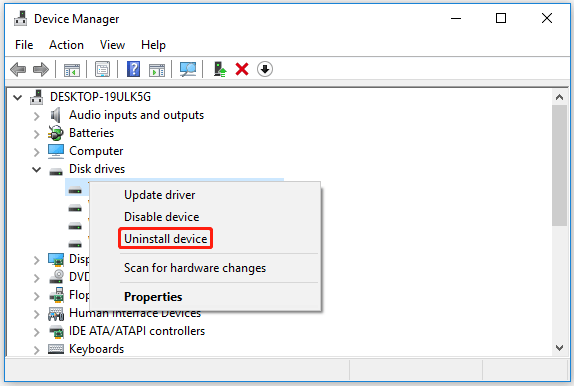
Step 3: Once done, restart your computer and open Device Manager again. Then click Action > Scan for hardware changes to install the driver back.
Way 8. Format Your Hard Drive
If the above solutions don’t work, try formatting the problematic drive. It may help fix this error. Formatting will delete data on the drive! Therefore, if you are going to format a drive containing some important files, you’d better back them up in advance.
To format your hard drive quickly and safely, you can also try MiniTool Partition Wizard. Compared with the Windows built-in tool, MiniTool Partition Wizard has made a great breakthrough in partition management. For example, this software can break through the FAT32 32GB limit.
MiniTool Partition Wizard FreeClick to Download100%Clean & Safe
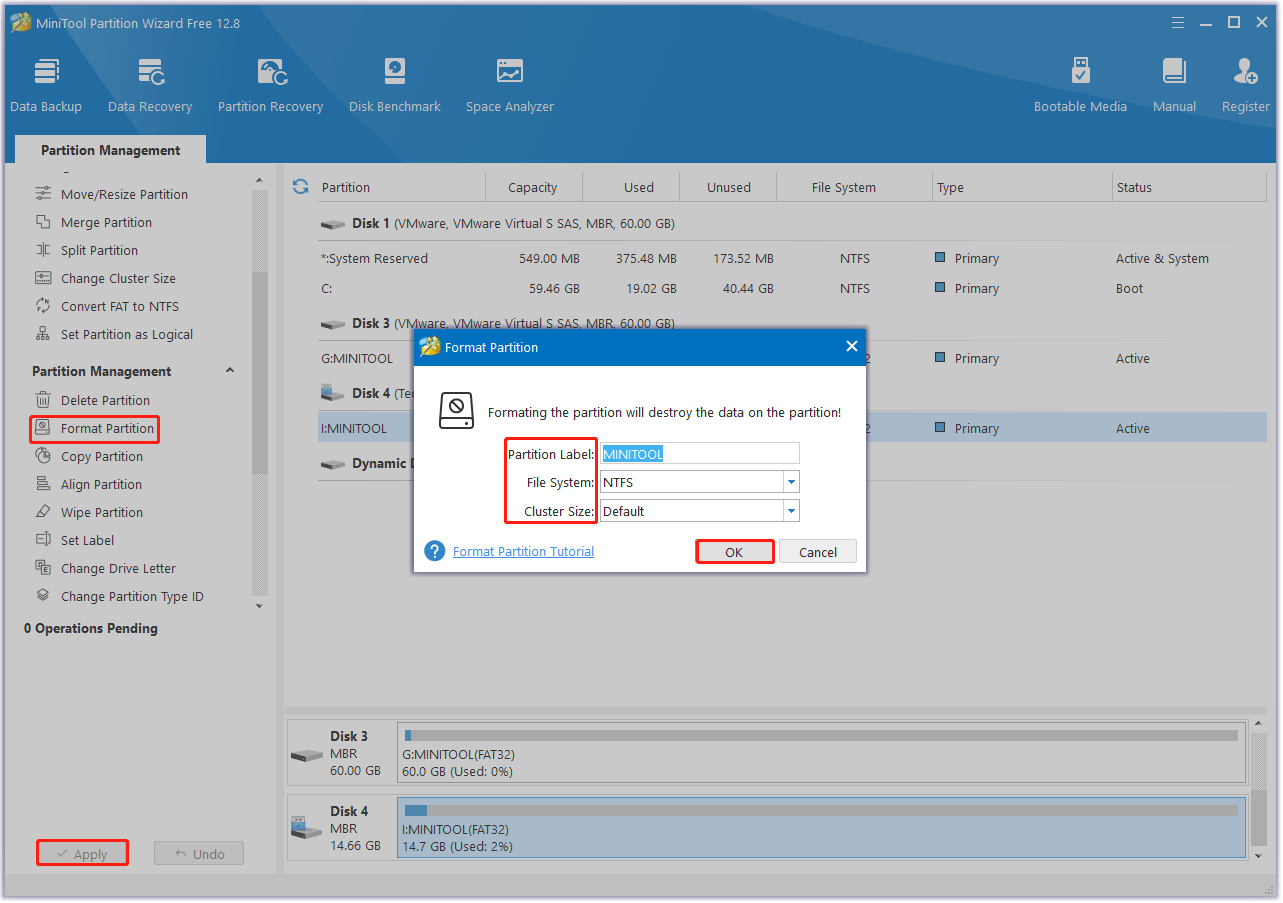
Step 1: Launch MiniTool Partition Wizard to enter its main interface. Then select the target drive and click on Format Partition in the left panel.
Step 2: In the pop-up window, configure parameters like Partition Label, File System, and Cluster Size based on your needs. Then click on OK to save the changes you’ve made.
Step 3: Click on Apply to perform the formatting operation.
Bottom Line
How to fix the error “The specified disk or diskette cannot be accessed”? This post has provided 8 methods for you. If you encounter the same issue, you can feel free to have a try.
Likewise, if you encounter any issue while using MiniTool Partition Wizard, you can send us an email via [email protected] to get a quick reply.

User Comments :