“The computer did not resync because no time data was available” is an error that often occurs on Windows Server. What causes the Windows time sync error? How to fix it? Now, let’s explore these questions together with MiniTool.
When using an external time source on a Windows Server, many users encounter an error “the computer did not resync because no time data was available.” This error also occurs when running some Windows time sync commands.
If the group policies are set improperly, you may encounter this vexing error. In addition, the incorrect parameters of Windows are also responsible for the computer did not resync because no time data was available error.
Fix 1. Change the Group Policies
The group policy is the main cause that can trigger the Windows time sync error. To fix this issue, Microsoft recommends changing the group policies. Here are 2 cases to change the group policies depending on you are on a local computer or a domain controller.
Case 1. For a Local Computer
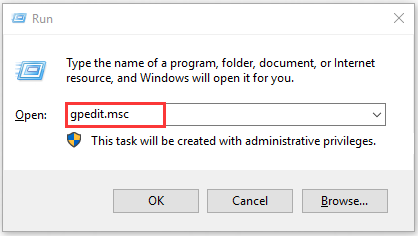
Step 1. Press Win + R keys to open the Run dialog box, and then type gpedit.msc in the box and hit Enter to open the Local Group Policy Editor.
Step 2. Select the Computer Configuration tab, and then navigate to Administrative Templates > System > Windows Time Service.
Step 3. In the Windows Time Service folder, double click the Global Configuration Settings policy and select the checkbox for Not Configured option. Then click on the Apply button.
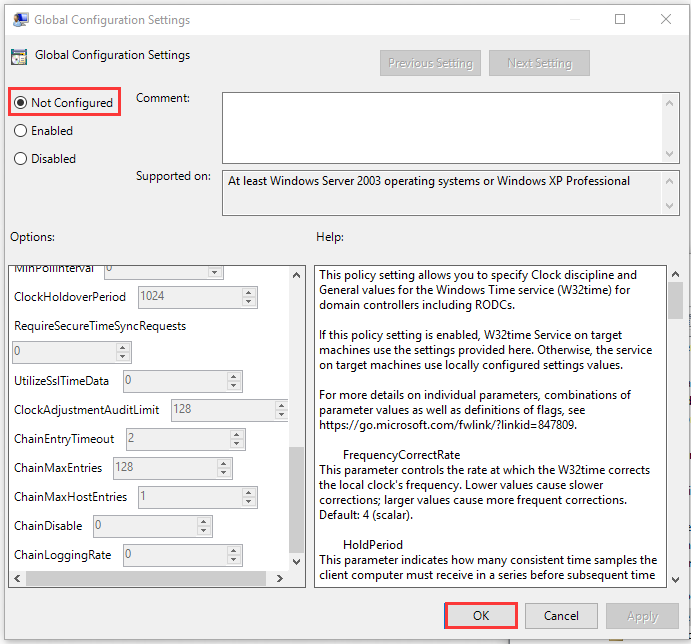
Step 4. Double click Time Providers key, and you will find 3 keys inside the folder: Configure Windows NTP Client, Enable Windows NTP Client, and Enable Windows NTP Server.
Step 5. Now, double click each key and select the checkbox for Not Configured at the top. Then click on the Apply button after the changes have been made.
Step 6. Restart your computer to make it take into effect, and then check if the computer did not resync because no time data was available error is fixed.
Case 2. For a Domain Controller
Step 1. Open the Run dialog box, and then type dsa.msc in it and hit Enter to open the Active Directory Users and Computers Microsoft Management Console.
Step 2. Right-click the folder that contains the group policy key you want to change and select Properties from the elevated menu.
Step 3. In the pop-up window, navigate to the Group Policy tab and click the object that you want to change. After that, click on Edit.
Fix 2. Edit Some Specific Registry Keys
In addition to the above method, you can try editing some specific registry keys. It can help you connect to the Windows time sync server properly. Here’s how:
Step 1. Open the Run dialog box, and then type regedit in it and hit Enter.
Step 2. Navigate to the following path through the left search bar.
HKEY_LOCAL_MACHINESYSTEMCurrentControlSetServicesW32TimeParameters
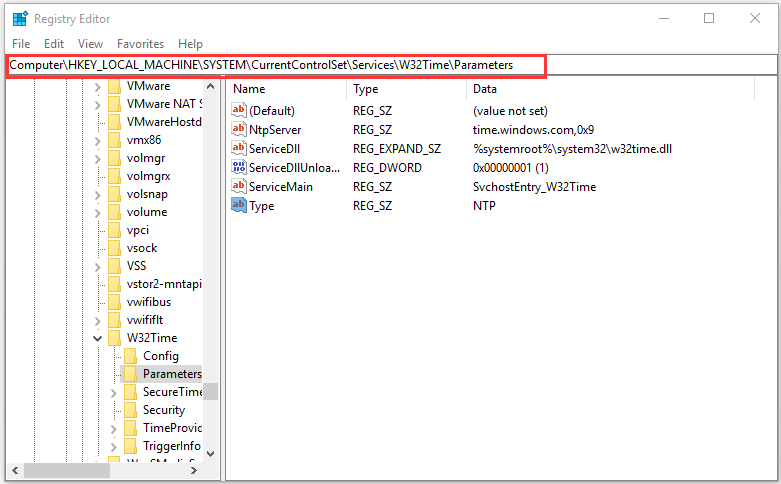
Step 3. Find the string value called Type, and then right-click it and select Modify from the context menu.
Step 4. Change the Value date to NT5DS in the Edit String window. And then click on the OK button to confirm this change.
Step 5. Restart your computer and check if the problem is fixed.
Fix 3. Run Windows Time Sync Command
Running Windows Time service command is a potential solution, which helped some users fix the problems with time sync. For that:
Step 1. Type cmd in the search box, and then right-click the Command Prompt app and select Run as administrator from the elevated menu.
Step 2. Type the following commands in the elevated window and hit Enter.
w32tm /config /manualpeerlist:time.windows.com,0x1 /syncfromflags:manual /reliable:yes /update
Now, you can check if the issue is resolved or not. If it still appears, you can try running the w32tm /resync command
Fix 4. Restart the Windows Time Service
If the Windows Time service is set improperly or has a bug, you may also encounter the error. For that, you can try restarting this service. Here’s how:
Step 1. Open the Run dialog box, and then type services.msc in it and hit Enter.
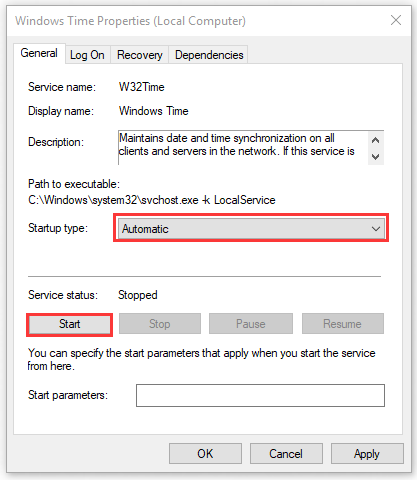
Step 2. Go to the Windows Time Service from the listed services, right-click it and select Properties.
Step 3. If the Service status is Stop, change the Startup type to Automatic and click on OK and Apply button. If the Service status is Start, click on the Stop button first and click on Start again.

User Comments :