A table of contents can give your audience a clear overview of your presentation right from the start. Do you know how to create a table of contents PowerPoint? In this post, MiniTool Partition Wizard will provide some helpful methods for you to create it.
Tables of Contents (TOC) are frequently utilized in a variety of writing styles. It is simple to locate in Word. But how do you make a table of contents for PowerPoint? A table of contents should always be provided in every professional PowerPoint presentation.
It lets your audience know what to anticipate from the very beginning of your presentation. The audience can become enthused about what they are about to hear by getting a first look at the presentation’s content.
So, how to create a table of contents in PowerPoint? Here is the tutorial.
Method 1. Manually Creating Table of Contents in PowerPoint
The first method you can use to create a table of contents in PowerPoint is very easy. You can generate an automatic table of contents by linking various slides or even another document or webpage to your TOC. Here’s the way:
- Open a PowerPoint file that you want to create a table of contents for.
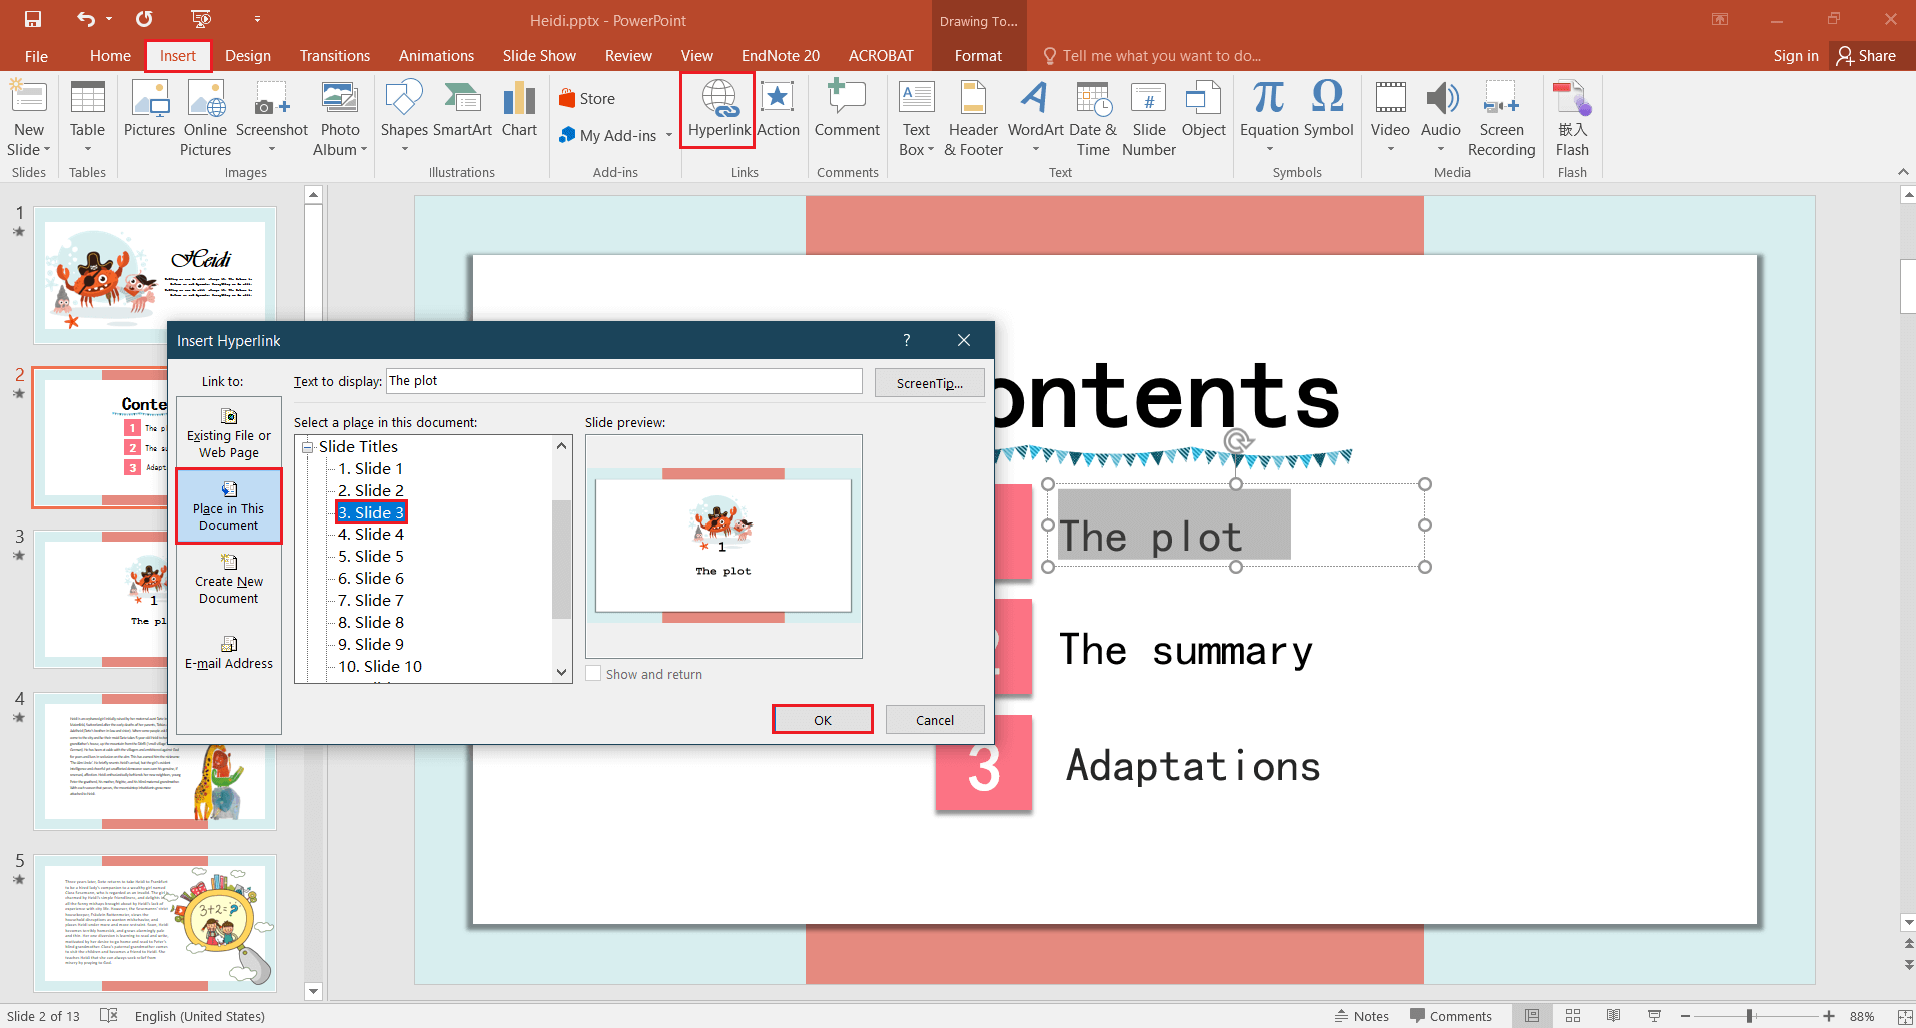
- Go to the Insert tab and select Hyperlink.
- Select Place in This Document and then click on the slide to which you want to link.
- Next, click OK. You can successfully create a hyperlink between the table of contents and the slide.
- Once you have linked all the slides, switch to Slide Show mode in PowerPoint and preview your list.

Method 2. Use the PowerPoint Zoom Feature to Create a Table of Contents
If your PowerPoint is version 2019 or later, you can utilize the Zoom tool to add a table of contents PowerPoint. These are the actions:
- Go to Insert tab, select the Zoom feature and click in the Slide Zoom option.
- From the popup window, choose the slides you want to include in the table of contents.
- Insert the thumbnail and position it in accordance with the presentation’s arrangement.
- Using the Zoom feature, you can access the slide when you play the presentation.
Method 3. Using Outline View to Fetch Table of Contents
You can also grab the outline of your slide deck to generate a table of contents based on your slide titles. Here’s the guide for the table of contents PowerPoint:
- Using the menu or the slide pane, create a slide for the table of contents.
- Go to the View tab and click on the Outline View option to see the overview of your presentation.
- Open a drop-down menu by right-clicking on the outline structure.
- Next, select Collapse from the menu and then click on Collapse All.
- After that, PowerPoint will then only display the slide headings in the slide pane.
- Select all of the slide titles and right-click to bring up the context menu.
- In the pop-up menu, select Copy to copy all the selected headings to the clipboard.
- Next, click the Normal option beside the Outline View option to switch to the normal presentation view.
- Select the slide that you created for the table of contents in step 1 by left-clicking on it in the slide pane.
- Select Paste from the context menu when you right-click on the text box. After this action, PowerPoint will then paste the outline structure from the clipboard into your table of contents.
- Next, select the one part in the table of contents and right-click it to select Hyperlink from the menu.
- In the Insert Hyperlink window, select Place in This Document and then select the slide you want to link to. Click OK to confirm your selection.
- Create the hyperlink for your table of contents’ parts one by one. Once done, you can create the PowerPoint table of contents successfully.
Bottom Line
Creating a PowerPoint table of contents is very easy. This post has provided some useful methods for you to know how to create a table of contents in PowerPoint. You can choose the one you like to create the table of contents PowerPoint.
If you are interested in MiniTool Partition Wizard and want to know more about it, you can visit MiniTool Partition Wizard’s official website by clicking the hyperlink. MiniTool Partition Wizard is an all-in-one partition manager and can be used for data recovery and disk diagnosis.

![[Fixed] PowerPoint Found a Problem with Content in Windows 10/11?](https://images.minitool.com/partitionwizard.com/images/uploads/2022/09/powerpoint-found-a-problem-with-content-thumbnail.png)


User Comments :