Do you want to switch between light and dark modes automatically? MiniTool Solution offers you the way to run Windows 10 auto night mode and switch from dark mode to light mode every day at a specific time.
With plenty of personalization settings, Windows 10 offers users two color modes:
- Light mode makes apps and desktop elements such as Start menu and taskbar display with a lighter color scheme. It is wonderful during daytime.
- Dark mode applies a darker color for desktop and apps, which works well in low-light environments.
You can turn on light mode or use Windows 10 dark mode in Windows Settings. However, if you want to switch between light and dark modes automatically according to the time of a day, you need to take advantages of Task Scheduler and PowerShell.
Let’s see how to do it!
First Move: Set Windows 10 Auto Night Mode
To switch from the light to dark system mode on schedule automatically, you can create a new task in Task Scheduler with the following steps.
Step 1: Press Win + S to open Search, and then search for Task Scheduler. Click the Task Scheduler App from the results.
Step 2: Right-click Task Scheduler Library and select New Folder… to create a new task.
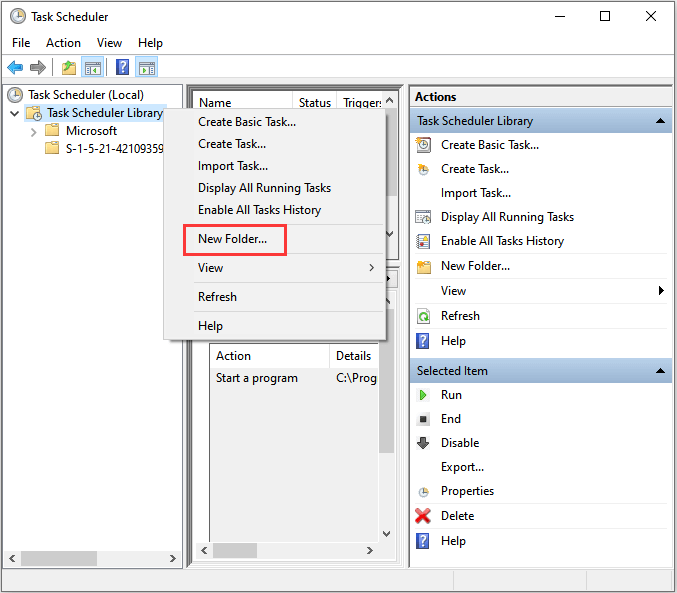
Step 3: Enter a name for the new folder (for example, MyTask), and then click OK button.
Step 4: Double-click Task Scheduler Library to expand it.
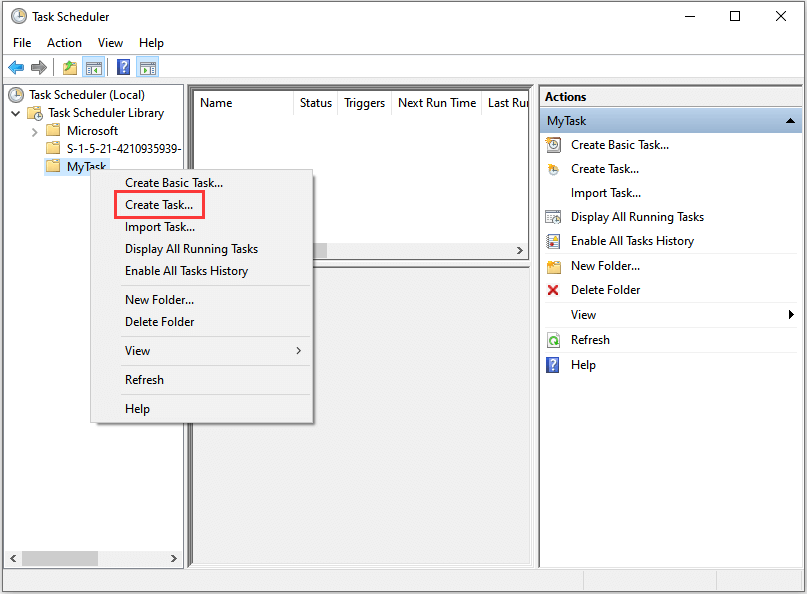
Step 5: Right-click MyTask folder, and select Create Task.
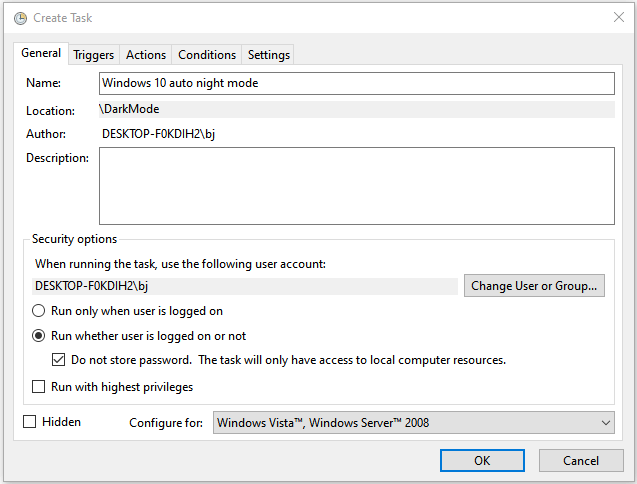
Step 6: Click General tab.
- In Name field, type a descriptive name for the task, such as Windows 10 auto night mode.
- Under Security optionssection, select Run whether user is logged on or not and check Do not store password.
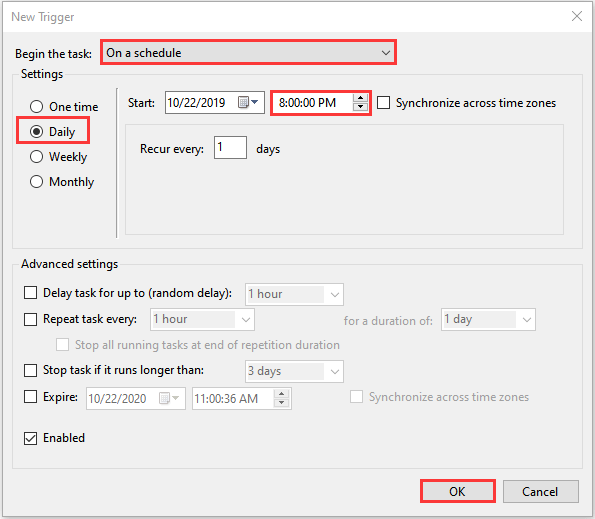
Step 7: Change to Triggers tab and click the New button.
Step 8: In Begin the task field, click the arrow and choose On a schedule to configure the trigger. Under Settings section, Select Daily and then you can set when to switch to the dark mode automatically (for example, 8:00 PM). Click OK when it’s done.
Step 9: Click Actions tab, and select New button.
Step 10: In Action field, choose Start a program. Under Settings section, copy and paste the following path: %SystemRoot%system32WindowsPowerShellv1.0powershell.exe.
Step 11: In Add arguments (optional) field, copy and paste this PowerShell command:
New-ItemProperty -Path HKCU:SOFTWAREMicrosoftWindowsCurrentVersionThemesPersonalize -Name SystemUsesLightTheme -Value 0 -Type Dword -Force; New-ItemProperty -Path HKCU:SOFTWAREMicrosoftWindowsCurrentVersionThemesPersonalize -Name AppsUseLightTheme -Value 0 -Type Dword -Force
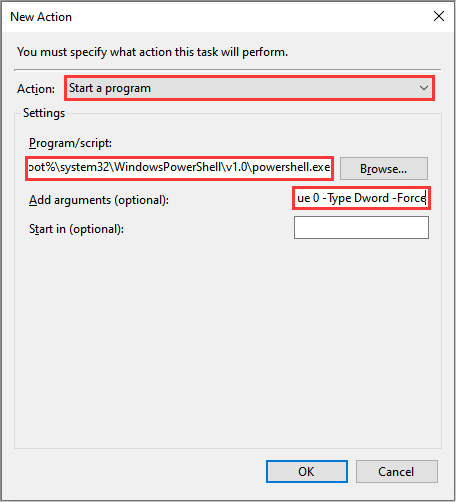
Step 12: Click OK to save changes. Then Click Settings tab and check Run task as soon as possible after a scheduled start is missed. Click OK to confirm the changes you have made.
Now Windows 10 auto night mode has been set and it will run every day at the time you specified.
Second Move: Set Windows 10 Auto Light Mode
To switch between light and dark modes automatically, you can use these steps.
Step 1: Open Task Scheduler. Then right-click MyTask folder and choose Create Task.
Step 2: Specify the settings in General and Trigger tab by taking reference from Step 6-8 above.
Step 3: Click New button in Actions tab.
Step 4: Choose Start a program action. Then copy and paste the path to Settings section: %SystemRoot%system32WindowsPowerShellv1.0powershell.exe.
Step 5: Copy the following path to Add arguments (optional) field:
New-ItemProperty -Path HKCU:SOFTWAREMicrosoftWindowsCurrentVersionThemesPersonalize -Name SystemUsesLightTheme -Value 1 -Type Dword -Force; New-ItemProperty -Path HKCU:SOFTWAREMicrosoftWindowsCurrentVersionThemesPersonalize -Name AppsUseLightTheme -Value 1 -Type Dword -Force
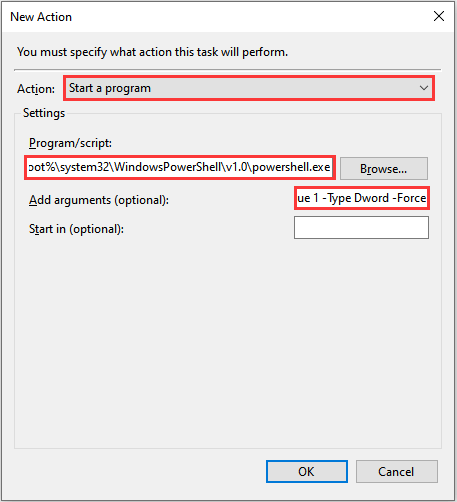
Step 6: Click OK and check the Run task as soon as possible after a scheduled start is missed in Settings tab.
Step 7: Click OK to keep the changes.
Now Windows will switch between light and dark modes automatically at the time you set.
When you don’t need this feature any more, you can delete the task you create in Task Scheduler.


User Comments :