SU-42481-9 is one of the common errors on PS4, and it has been reported by plenty of PS4 users. If you are experiencing the same problem, this post is what you need. Here, some solutions from MiniTool are listed together with the detailed instructions.
Perhaps you have encountered the error SU-42481-9 on your PS4. This annoying PS4 error might occur when you are downloading or installing updates on the console. You receive the PS4 error SU-42481-9 probably because your PS4 has corrupted temporary files or the update files are bad. Of course, there might be other reasons for this issue.
To fix the problem, you can move on with the solutions listed below.
Method 1: Power Cycle PS4
Power cycling PS4 is always a good solution if your PS4 runs into certain problems. By doing this, all the configurations will be recreated before starting up. So, if you are facing the error SU-42481-9, don’t hesitate to power cycle your PS4.
Just shut down your PS4 console, unplug all the power cable from the outlet, and press and hold the power button on the PS4 for 30 seconds to make sure all the power is drained. Then, plug everything back after 4-5 minutes and power on your PS4 to check if the issue has been fixed.
Method 2: Update Your PS4
If the error still exists after power cycling PS4, you might need to update your PS4. Just refer to the steps below.
Step 1: Make sure that your PS4 is connected to the Internet and go to PS4 Settings.
Step 2: Choose System Software Update.
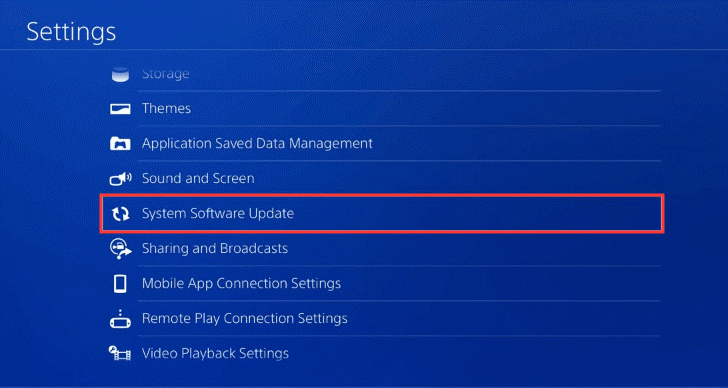
Step 3: If there are any updates available, select Next and then Update to download the updates.
Then, follow the onscreen instructions to complete the updating. Once it’s done, restart your PS4 and check if the error SU-42481-9 is gone.
Method 3: Rebuild Database
If your PS4 database is corrupted, you might also receive this error. In this case, you can go to rebuild your database, which will remove the corrupted data while do no harm to the normal files. This feature is accessible only in the Safe mode. Let’s see how to do that.
Step 1: Turn off your PS4.
Step 2: Press and hold the power button until you hear the second beep.
Step 3: Connect PS4 controller with a USB cable and press PS button to enter the Safe Mode interface.
Step 4: Choose Rebuild Database.
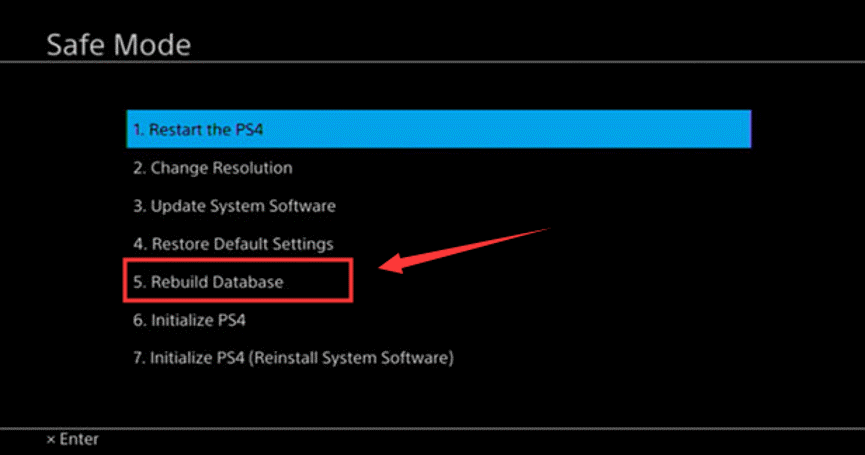
Wait patiently until the process is completed. Then, you can get out of Safe Mode and check if the PS4 error SU-42481-9 is resolved.
Method 4: Initialize PS4
If all the methods mentioned above doesn’t work to fix the problem, you might need to factory reset your PS4. This is a last resort as it will remove all your PS4 data. So, you have to back up your data at first and then perform PS4 initialization. Here’s a simple guide.
Step 1: Prepare a FAT/exFAT-formatted USB drive with enough capacity and connect it to your PS4.
Step 2: Go to PS4 Settings > System > Back Up and Restore > Back Up PS4. Then, follow the instructions on the screen to back up data.
Step 3: Disconnect the USB drive. Back to PS4 Settings and choose Initialization.
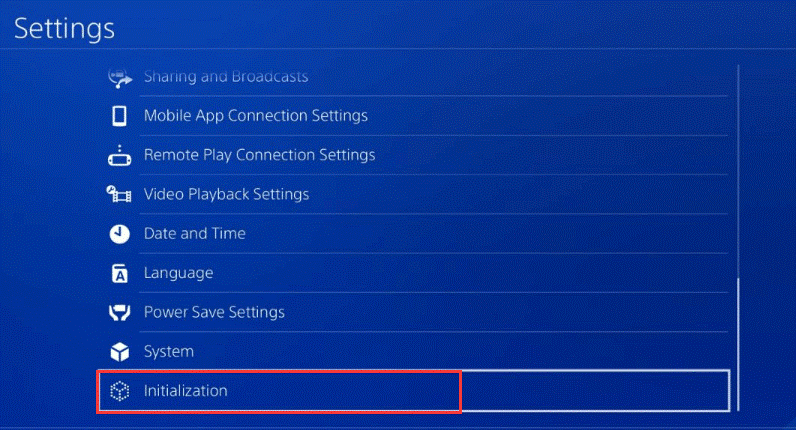
Step 4: Go to Initialize PS4 and choose to perform a Full initialization.
After that, connect the USB drive to your PS4 again and restore the backup. Now, the PS4 error SU-42481-9 should be resolved completely.

![[Effective Guide] How to Effectively Fix PS4 Error NW-31449-1](https://images.minitool.com/partitionwizard.com/images/uploads/2020/01/nw-31449-1-thumbnail.jpg)
User Comments :