When attempting to stream content on Twitch, a lot of users receive an error message saying “there was an error fetching your channel information”. Are you trying to fix StreamLabs OBS error fetching channel information? Now, let’s explore the troubleshooting methods together with MiniTool.
StreamLabs OBS error fetching channel information is reported to occur on Windows 10/8.1/7. According to an investigation, StreamLabs OBS won’t open when accessing a problematic account via StreamLabs OBS connection.
In addition, other possible reasons including corrupted Twitch cookie, Stream language, OBS-plugin files, and missing Visual C++ Redist can trigger StreamLabs error fetching channel information.
Fix 1. Sign Out of the Problematic Account from Twitch
If you receive the error message “there was an error fetching your channel information”, then the first and simplest way is to sign out of your problematical account and back into StreamLabs. To do so, follow the steps below:
Note: You need to do the operation directly from the Twitch account instead of the StreamLabs application.
Step 1. Open the Twitch.tv webpage and sign in with the account that’s used to link in StreamLabs. On the site, click on Log in button at the upper right corner.

Step 2. After you logged in successfully, click on the Account icon at the top right corner and click on Settings.
Step 3. Click on access the Connections menu, and then scroll down to the Other Connections tab and click on the Disconnect button next to StreamLabs.
Step 4. After that, back to the StreamLabs and reconnect your Twitch account to see if the StreamLabs OBS error fetching channel information is fixed.
Fix 2. Reset the Streaming Language
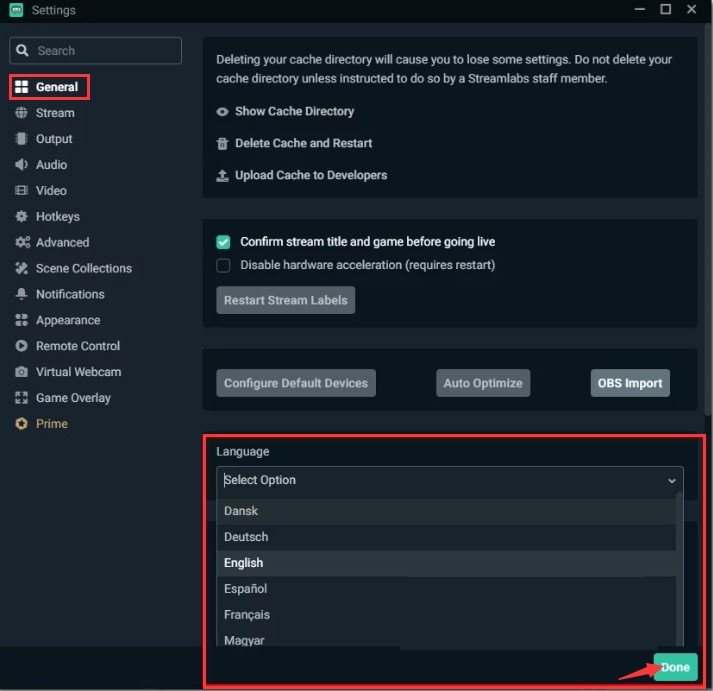
In some cases, StreamLabs error fetching channel information can be resolved by using a different language and then changing it back to the previous one. Here is a simple guide to change StreamLabs language.
Step 1. Launch your StreamLabs application and log in with the Twitch account that you experience the error.
Step 2. Click on the Settings icon at the bottom of the left corner. In the Settings window, go to the General tab from the left side and select a different language from the drop-down menu.
Step 3. Click on the Done button to save the change and exit the StreamLabs app.

Step 4. Relaunch your StreamLabs app, and then go to the Settings window and change the language back to its previous value.
Now, you can try another streaming attempt and check if you still receive the “StreamLabs OBS error fetching channel information” message.
Fix 3. Clear Twitch Cookie
Sometimes the corrupted Twitch cookie might be responsible for StreamLabs not working. To fix the issue, you can try clearing the entire cookie folder from your browser. If you just want to clean the specific Twitch cookie, you can search them on your browser. Also, you can refer to this post “How to Clear Cookies on Chrome, Firefox, and Edge” to fully clear Twitch cookies.
Fix 4. Install Visual C++ Redist 2017 Package
When the needed Visual C++ Redist files are missing from your computer, StreamLabs OBS won’t open. Now, you can follow the simple instruction to install a correct Visual C++ Redist version.
Step 1. Click here to visit the official Microdot website and find the Visual C++ Redist 2017 x64 package.
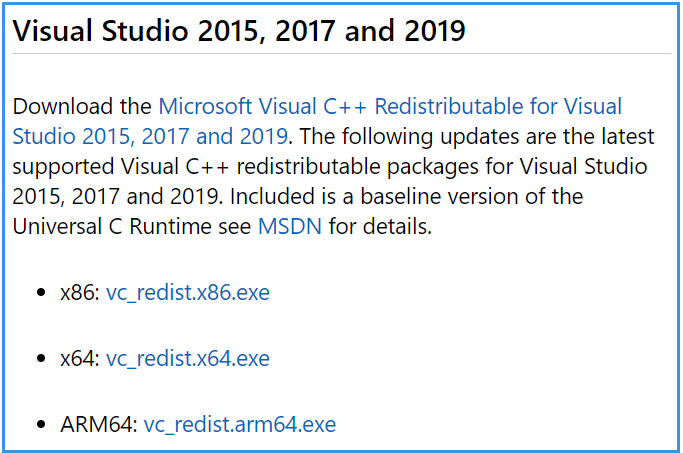
Step 2. In the official webpage, scroll down until you reach the Visual Studio 2015, 2017, and 2019 section. Download the vc_redist.x86.exe version if your Windows is on 32-bit or download the vc_redist.x64.exe if your Windows version is on 64 bit.

Step 3. Once the download completes, double click the exe file and click on Install. Then follow the on-screen instructions to complete the installation of the Visual C++ Redist 2017 package.
Fix 5. Delete the Leftover OBS-plugin Files
The StreamLabs OBS error fetching channel information message also pops up after you uninstall the OBS-plugin from StreamLabs. This is because the left-over OBS-plugin files may get corrupted. So, we recommend you delete the frontend-tools.dll file.
Step 1. Press Win + E keys to open the File Explorer and then locate the following path that stores the StreamLabs.
C:Program FilesStreamlabs OBSresourcesappnode_modulesobs-studio-nodedistributeobs-plugins
Step 2. Inside the obs-plugins folder, right-click the frontend-tool.dll file and select Delete.
Step 3. Once the file is deleted, reboot your computer and launch StreamLabs to see if the issue still persists.
Fix 6. Bind the StreamLabs to Your IP
If you still receive the error message “StreamLabs OBS error fetching channel information”, then you can try binding the StreamLabs to your computer’s IP. Here’s how to do that:
Step 1. Read this post to know your IP address and then copy the IPv4 address.
Step 2. Launch the StreamLabs application, and then click on the Settings icon and click on the Advanced tab from the left pane.
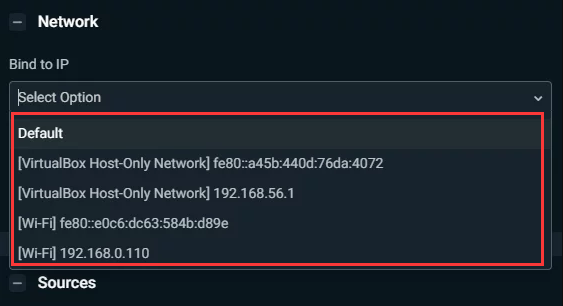
Step 3. Scroll down the right pane to the Network section and expand the drop-down menu under the Bind to IP section. Here you can select the IP address that you have copied in Step 1.

Now, you can try streaming again and the StreamLabs error fetching channel information should be fixed.

![How to Stop Saints Row 4 Crashing Windows 10 [Top 6 Solutions]](https://images.minitool.com/partitionwizard.com/images/uploads/2020/12/saints-row-4-crashing-thumbnail.jpg)
User Comments :