This article will show you how to fix Steam service error appeared on your computer when launching Steam. If you don't know how to fix the Steam service error, check out this post from MiniTool for solutions.
Sometimes you may encounter various Steam problems such as Steam content file locked, Steam disk write error and so on. And these days, some users report that their Steam component is not working. When launching Steam, the following error message appeared:
“The Steam service component is not working properly on this computer. Reinstalling the Steam service requires administrator privileges.”
Have you encountered the same issue? Steam service is vital for the normal operation of Steam. If the Steams service component is not working on your PC, you can follow the fixes below to resolve the Steam service error effectively.
Fix 1. Run Steam as Administrator
If Steam doesn’t have enough permission to perform a certain action or access a certain file, you may receive the Steam error message. At this time, the simplest fix is to run Steam as administrator.
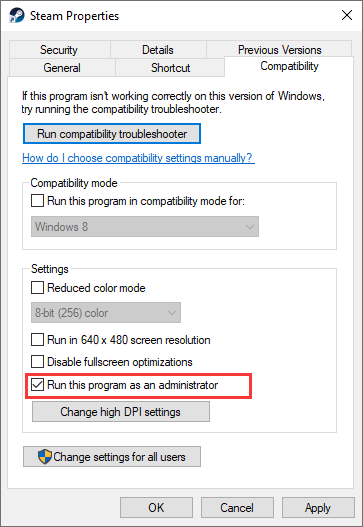
Step 1. Find the Steam shortcut on your desktop. Right click it and choose Property from the pop-up menu.
Step 2. Switch to the Compatibility tab in the Properties window.
Step 3. Check the box next to the Run this program as an administrator option.

Step 4. Click Apply and OK to save the change. Then you can close the window.
Then you can launch Steam again to see if the Steam error has been fixed.
Fix 2. Repair the Steam Client Service
The Steam client service can sometimes break, which may lead to Steam component not working issue. Luckily, this can be repaired by using commands. The following steps will help you reset the Steam client service and fix the Steam service error.
Now follow the steps below.
Step 1. Input cmd in the Windows 10 Cortana search box. You can also press Windows + R key on the keyboard to bring up the search box.
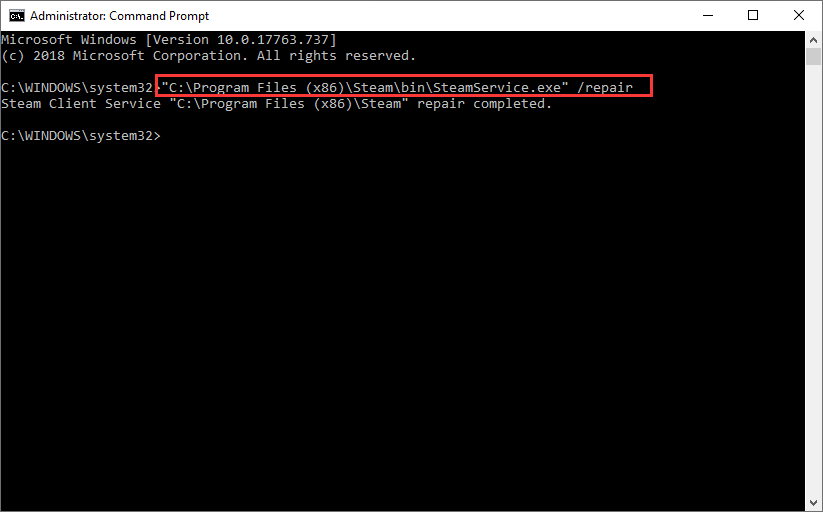
Step 2. Choose the best match Command Prompt and choose Run it as administrator.
Step 3. Right click the Steam shortcut on your desktop and choose Open file location from the context menu.
Step 4. Click the address bar at the top and copy the path. The default path should be C:Program Files (x86)SteambinSteamService.exe. Run the following command with your default path. Make sure you replace it with your own path when running the command:
“C:Program Files (x86)SteambinSteamService.exe” /repair

Step 5. Then you can re-launch Steam to check if the Steam service error has disappeared.
Fix 3. Check Steam Service Startup Types
You can check and change the Steam Service startup type to Automatic to make sure the Steam service is running every time you launch Steam. Here’s how to check Steam service startup types.
Step 1. Press Windows + R keys on your keyboard to bring up the Run box.
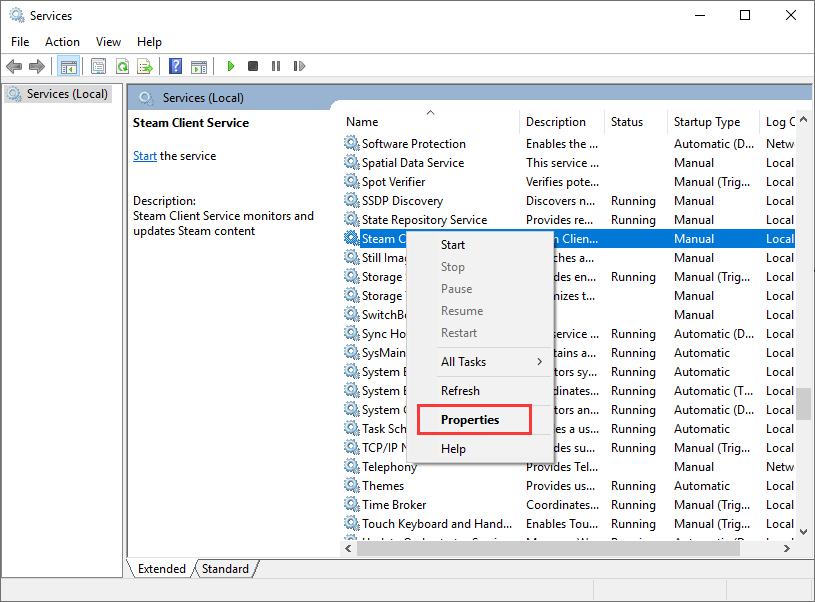
Step 2. Type services.msc in the Run box and hit Enter.
Step 3. Find the Steam Client Service in the services list. Select Properties from its right-click menu.

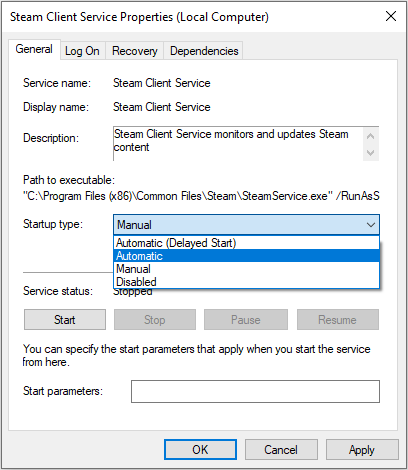
Step 4. If the service is started, stop it by clicking the Stop button under the Service status.
Step 5. Make sure the Start type is set to Automatic. If not, switch it to Automatic.

Step 6. At last, click Apply and OK to allow the change.
Now you should fix the Steam service error after trying the above fixes. If you come across the Steam service error, try the above fixes immediately.


User Comments :