Steam is one of the most popular game platforms on Windows PC. To make a good looking Steam profile, you might need to replace the Steam profile picture with your favorite image. In this post, MiniTool Partition Wizard provides a step-by-step tutorial.
About Steam Profile
Steam is a video game digital distribution service developed by Valve. It was first released on September 12, 2003.
It was used to provide automatic updates for the games from Valve. Nowadays, it has been expanded to include games from third-party publishers. Available on various platforms including Windows, macOS, Linux, iOS, and Android, Steam is popular around the world.
In addition to games and updates, Steam also offers community features like Steam cloud storage, friends lists and groups, as well as the in-game voice and chat functionality.
When you create a Steam account, you will get a profile. To help your friends find you on the Steam Community, you might need to set your profile name and details that provide additional information like your real name.
Your profile name and avatar represent you throughout Steam. If you don’t want others to see your profile, you can adjust the profile privacy settings. There are three states of profile privacy in Steam: Public, Friends Only, and Private. Each state has additional subcategories to control how you appear to other members of the Steam community.
Besides the privacy settings, you might also concern about the outlook of your Steam profile. How to make a good looking Steam profile? You need to change Steam profile picture, the profile background, and the theme.
How to Change the Steam Profile Picture
Don’t worry if you don’t know how to change Steam profile picture, as here is a step-by-step tutorial for you.
Step 1: Open your Steam client by double-clicking the shortcut on the desktop and log in to your account.
Step 2: Click your username or avatar and select View my profile from the dropdown menu.

Step 3: On the following page, click Edit Profile.

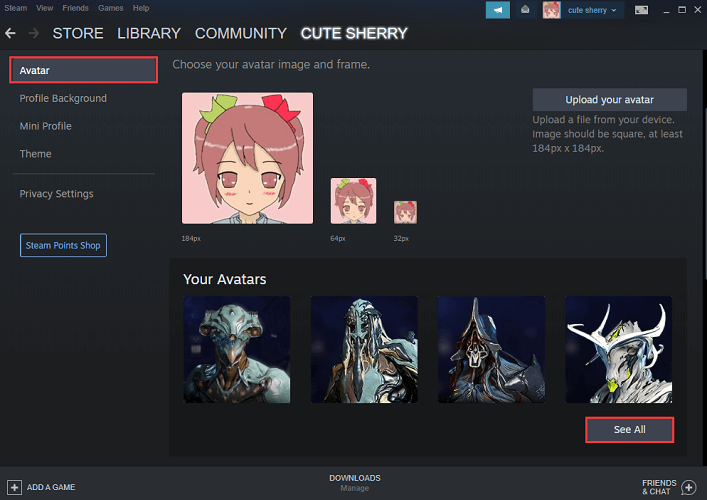
Step 4: In the left pane, select Avatar to view your current Steam profile picture. Scroll down and can see your game avatar images in Steam under the Your Avatars section. You can click See All to view more images.

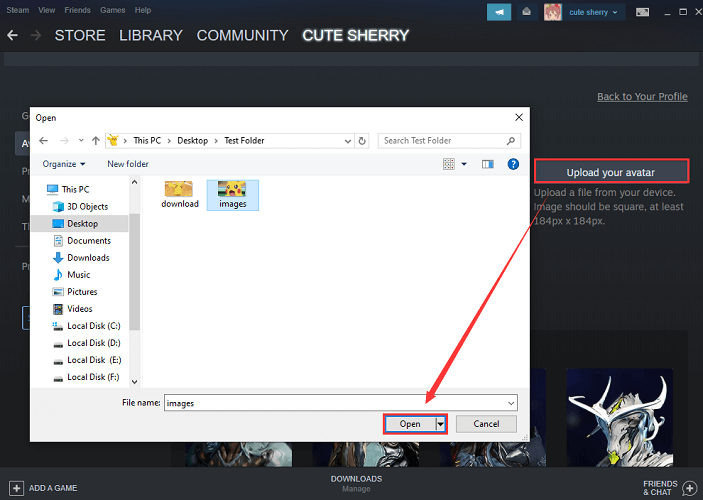
Step 5: If you don’t like these images, you can upload one from your PC. You just need to click the Upload your avatar button. Then select a picture and click Open.

Step 6: Select the area you want to include in the final avatar and click Save to apply the changed Steam profile picture.

After saving the changes, you can view your new Steam profile picture on the homepage of Steam.
If you can’t change Steam profile picture with the Steam client currently, you can visit the official website of Steam and log in to your account to change the profile picture. And the steps are similar.


User Comments :