Snap Camera is a free-to-use camera application for Windows PCs. You can use it to apply different filters to images. But when using the app on a computer, many users reported encountering the no available camera input Snap Camera error. The issue mainly occurs when using the apps in Google Meet and Zoom.
Well, how to fix Snap Camera no available camera input? Please keep reading.
Way 1: Restart Snap Camera
When you encounter this Snap Camera no available camera input problem, the first thing you should do is to force restart the application. Here are the steps you need to perform to force restart Snap Camera.
Step 1: Press the Ctrl + Shift + Esc key to open the Task Manager.
Step 2: Right-click on Snap Camera and select End task.
Wait a few seconds, then restart the application and check if the problem is resolved.
Way 2: Clear Snap Camera Cache
Like any other application, Snap Camera also stores cache data. It contributes to a faster and smoother user experience. But if these cached data get corrupted, you will face different problems, including Snap Camera no available camera input. Therefore, it is recommended that you clear the application cache regularly. Here’s how to do it.
Step 1: Open Snap Camera on your computer.
Step 2: Click the gear icon in the upper right corner.
Step 3: Scroll down to the bottom and find Cache & App Use, then click View.
Step 4: Check the Cache box and click Clear selected. You can also mark all options to ensure you have freed enough memory space.
Restart the Snap Camera and check for the problem.
Way 3: Grant the Required Permissions to Snap Camera
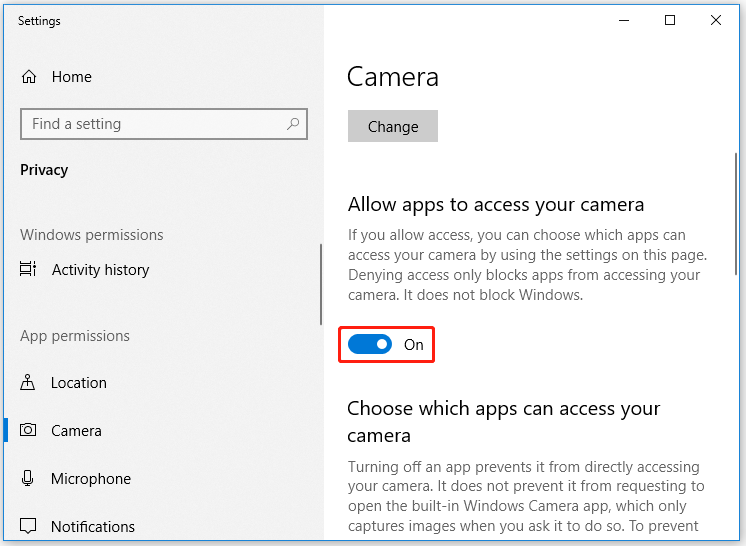
Another possible reason for Snap Camera not working or not detecting the camera is that Snap Camera cannot access your webcam. Here is the workaround:
Step 1: Type the camera in the search box and click Camera privacy settings.
Step 2: Under Allow apps to access your camera, make sure the option is turned on.

Step 3: Under Choose which apps can access your camera, find Snap Camera and switch the toggle to On.
Way 4: Update Camera Driver
An outdated camera driver can also cause this Snap Camera no available camera input issue. Therefore, you should download the latest camera driver update to fix the problem. Here are the steps to do this.
Step 1: Press the Win + X key and select Device Manager from the list.
Step 2: In the Device Manager window, double-click Cameras to expand the option.
Step 3: Right-click the installed Webcam and select the Update driver option.
Step 4: Follow the on-screen instructions to download the latest Camera driver.
Way 5: Update Snap Camera
Not having the latest Snap Camera could also be one of the reasons. Therefore, it is recommended to update the application to solve the problem. Here’s how to do it.
Step 1: Launch Snap Camera, and then click on the gear icon.
Step 2: Click the Check for updates option on the left panel of the screen.
Way 6: Disable VPN
A VPN (Virtual Private Network) is prohibited when using Snapchat or Snap Camera, so if you use a VPN, it’s best to turn it off. Using a VPN can also cause temporary network blockages. So be sure to disable it and log into Snap Camera again.
Way 7: Clean Install Snap Camera
If these methods above fail to solve the Snap Camera no available camera input issue, you can perform a clean install. The steps are as follows:
Step 1: Press the Win + R key to open the Run dialog box. Then type appwiz.cpl in it and press Enter.
Step 2: Right-click Snap Camera and select Uninstall.
Step 3: Download Snap Camera again, and then follow the on-screen instructions to install it on your computer.
Once done, restart your computer and launch Snap Camera to check if the issue gets solved.


User Comments :