Are you bothered by the error “Skype can’t connect”? It is annoying as users can’t use the Skype client due to this error. Don’t worry. In this post, MiniTool Partition Wizard puts together some methods to solve this problem and you can have a try.
It is convenient and popular to contact friends, family members, and colleagues via Skype. This program enable users to host a video meeting, make a phone call, and send messages and pictures to each other. However, some users report that they received an error “Skype Can’t Connect” in application on Windows PC.
You may ask: why can’t I connect to Skype? Generally, this issue could happen due to various factors, and some of them are listed below.
- Skype server status issues.
- Outdated Skype version.
- Overloaded bandwidth.
- Outdated or corrupted network adapter driver.
- Antivirus or malware attack.
When you encounter this issue unfortunately, you can try the following solutions one by one to troubleshoot the problem.
Solution 1: Check the Server Status
If you are unable to connect to Skype, the first thing you need to do is to check the Skype server status. You click here to go to the Skype status page and make sure the all the services are normal. If there is any problem, you just need to wait until the developers solve the problem or contact with the support team of Skype.
Solution 2: Update Skype
To make sure Skype can work properly, you should always keep the application up-to-date. Otherwise, you might encounter certain problems. To solve “Skype can’t connect” error, you can also try updating Skype. You can go to the official website to download the latest version of Skype and then install it on your PC.
After that, you can open it and check if the error disappears. If this doesn’t work, you need to try the next solution.
Solution 3: Scan for Virus and Malware
“Skype can’t connect” error could also be caused by virus or malware. You should run a full system scan to troubleshoot the problem with Windows Defender, your third-party antivirus program, or anti-malware tool.
After dealing with virus or malware, you can open your Skype again to check if the error has been fixed. If you don’t find any threats, you can continue to troubleshoot the problem with the following solution.
Solution 4: Allow Skype Through Firewall
In some cases, the Firewall might prevent Skype from connecting to the network. To solve the problem, you can try allowing the program through Firewall. You just need to:
Step 1: Exit Skype completely.
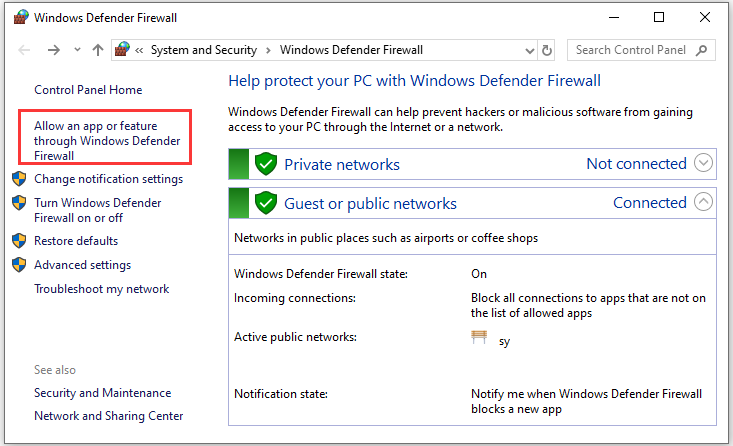
Step 2: Go to Control Panel > System and Security > Windows Defender Firewall.
Step 3: Click Allow an app or feature through Windows Defender Firewall.

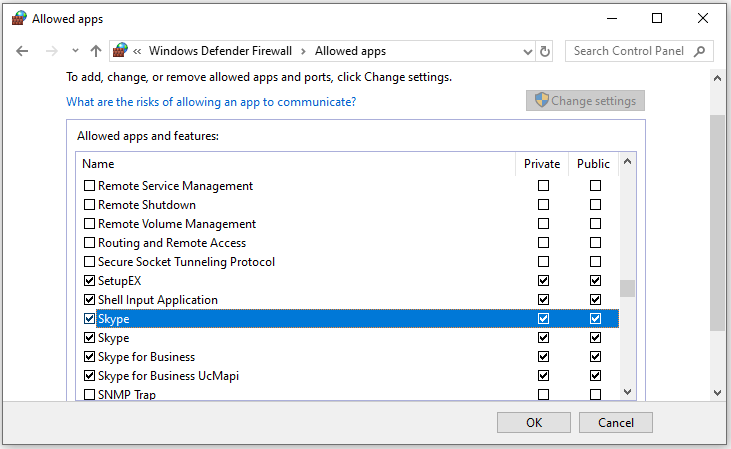
Step 4: Click Change settings. Then check the Private and Public boxes for apps and features related to Skype.

Step 5: Click OK to confirm the operation.
Solution 5: Update Network Adapter Driver
As mentioned, outdated or corrupted network adapter driver could also lead to the Skype connecting issues. Therefore, you need to keep the driver up-to-date.
Step 1: Right-click Start button and select Device Manager.
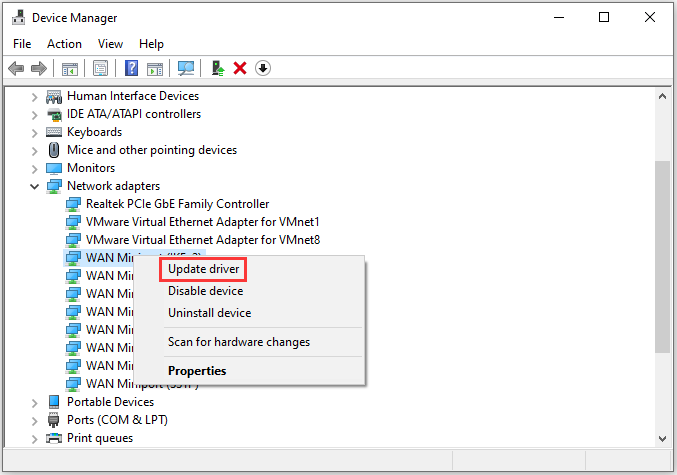
Step 2: Double-click Network adapters to expand the category.
Step 3: Right-click the adapter for the network you are using currently and select Update driver.

Step 4: Select Search automatically for updated driver software and follow the onscreen instructions to finish the process.
After installing the latest driver software, you should restart the PC.
Solution 6: Refresh Network Settings
You might also need to check your network usage, if there are many programs using your network, your bandwidth could be overloaded, which leads to the error “Skype can’t connect eventually. Therefore, you should close all network-heavy apps and programs. You might also need to refresh the network settings, and here is the tutorial.
Step 1: Press Win + R to invoke Run window.
Step 2: Type cmd in the box and press Ctrl + Shift + Enter to run Command Prompt as administrator.
Step 3: In Command Prompt, input the following commands one by one and remember to press Enter after each.
- ipconfig /release
- ipconfig /renew
- ipconfig /flushdns
- netsh winsock reset
- netsh int ip reset
After executing these commands, you can restart your PC and try using Skype. If the error appears again, you might need to reinstall Skype. You can refer to the following post to uninstall Skype: How to Uninstall Programs on Windows 10? Here Are Methods.


User Comments :