Skype is a piece of popular communication software that you use on your Windows 10 to make video and audio calls. And Skype heavily relies on the sound card of your PC to give you a great user experience. Therefore, it may trouble you a lot if you run into the “Skype can’t access sound card” issue.
You may wonder why Skype can’t access your sound card. Well, this error can be caused by the following reasons:
- A recent Windows update
- The outdated sound card drivers
- The corrupted installation of Skype
After knowing the reasons behind this error, you may also wonder what to do when Skype can’t access your sound card. In the following content, we list some solutions that may help you solve this error. Just keep reading.
Method 1: Allow Skype to Access the Microphone
In some cases, the permission to access the microphone may be reset after a Windows update. Hence, when you are facing the “Skype can’t access sound card Windows 10” issue, you should turn on the needed permission first.
Step 1: Press Windows + I to open Windows Settings and then select Privacy.
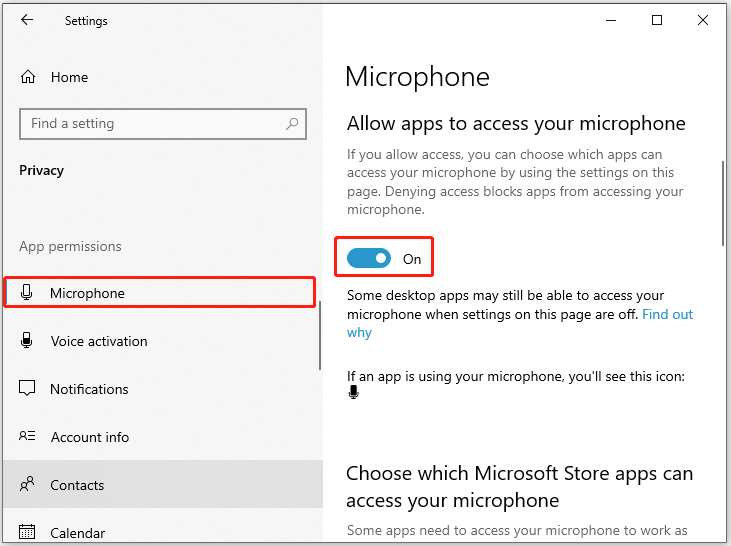
Step 2: Go to the Microphone tab. Then turn on the toggle under Allow apps to access your microphone.

Step 3: Scroll down to find Skype and then turn on the switch after this app to allow it to access your microphone.
Method 2: Run the Hardware and Devices Troubleshooter
The “can’t access sound card Skype” error may happen due to a hardware issue. Therefore, you can also try to fix it with the Hardware and Devices troubleshooter. To do this, follow the steps below.
Step 1: Press Windows + R to open the Run dialog.
Step 2: Type msdt.exe -id DeviceDiagnostic in the text box and then press Enter.
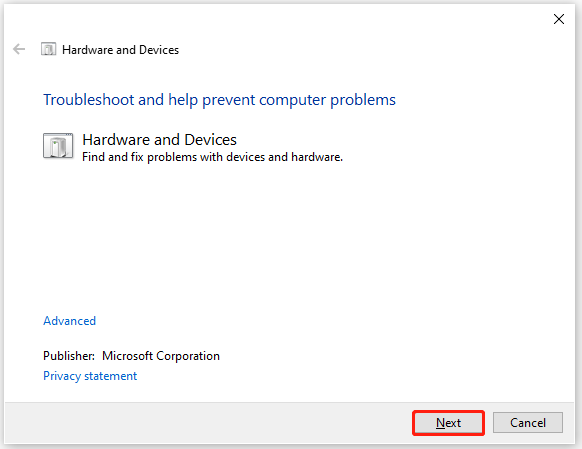
Step 3: After you open the Hardware and Devices troubleshooter, click Next to run this troubleshooter.

Step 4: The troubleshooter will begin detecting problems related to your hardware and devices. If any problems are found, follow the on-screen instructions to repair them.
Fixed! Hardware and Device Troubleshooter Is Missing Windows 10
Method 3: Update the Sound Card Drivers
As mentioned earlier, the outdated sound card drivers in your system can also lead to the “Skype can’t access sound card Windows 10” issue. In this case, you should update the specific drivers.
Step 1: Right-click the Start icon and select Device Manager.
Step 2: In Device Manager, expand the Sound, video, and game controller section.
Step 3: Right-click your sound card drivers and then select Update driver.
Step 4: In the prompted window, select the Search automatically for driver option. Then follow the on-screen instructions to update your drivers.
Method 4: Reinstall the Skype App
If there is something wrong with the installation of the Skype app, you can also get stuck in the “can’t access sound card Skype” issue. On this occasion, it’s recommended that you remove Skype from your PC and then install it back.
Step 1: Open Windows Settings by pressing Windows + I. Then go to Apps > Apps & features.
Step 2: Scroll down to find Skype from the right side and click Uninstall under this app to remove it.
Step 3: After that, restart your computer and install the latest version of Skype from the official website.
Method 5: Update Windows Using Media Creation Tool
Updating your Windows 10 may also help you to solve the “Skype can’t access sound card” issue. If you have no idea about how to execute this operation, you can follow this post: A Complete Guide to Windows 10 Media Creation Tool: How to Use
All these solutions mentioned above are available. When you are facing the “Skype can’t access sound card” issue, you can try to fix it with these solutions. If you have any problems with the error, you can leave a message in our comment part.
MiniTool Partition Wizard is a comprehensive partition manager that enables you to create/delete/format/resize partitions, copy/wipe disks, check disk health, etc. If you are interested in this professional program, you can visit its official website to obtain more information.


User Comments :