Do you know how to share a printer on network Windows? There are 2 major cases. You can share a printer on the primary PC or to another PC. If you are also searching for the instruction, probably the post provided by MiniTool can help you.
To share a printer Windows 10, you need to set up the sharing settings for the printer. Then connect the printer to the primary PC or another PC either wirelessly or using a USB cable. In this process, make sure the primary PC is turned on, connected to the network, and connect to the printer. Now, let’s see the detailed steps about how to share printer on network Windows 10.
Case 1: Share Printer Windows 10 on the Primary PC
There are 2 simple ways to share printer Windows 10. You can either use the Settings app or Control Panel. Here’s how to do that.
Use the Settings App
Step 1. Press the Win + X keys and select Settings from the context menu.
Step 2. In the pop-up window, select Devices > Printer & Scanners.
Step 3. Double click the printer that you want to share and click on Manage.
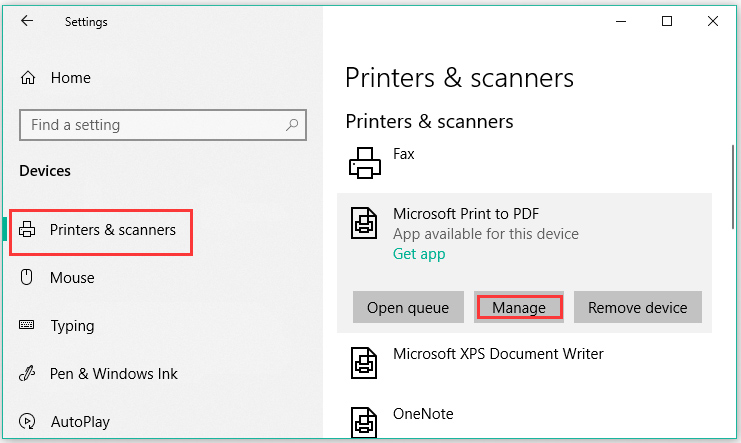
Step 4. Click on Printer Properties, then navigate to the Sharing tab.
Step 5. Select the checkbox of Share this printer, and then you can name this printer. After that, click on the OK button to save the change.
Now, you can use this name to share the printer from a secondary PC.
Use Control Panel
Alternatively, you can share a printer via the Control Panel.
Step 1. Type control in the search box and select Control Panel from the top result.
Step 2. Change the View by to Category, and then click on View devices and printers under the Hardware and Sound section.
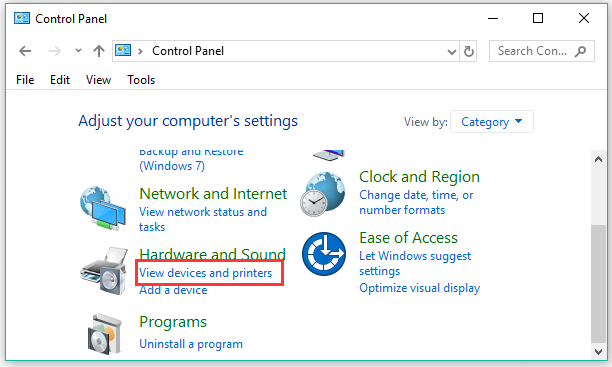
Step 3. Right-click the printer that you want to share and select Printer Properties. And then the following steps are the same as the first method.
Right now, you may know the methods to the Windows 10 share printer on the primary PC. how to share a printer in Windows 10 to another PC? Please keep going on.
Case 2: Share Printer Windows 10 to Another PC
Similarly, you can share a printer to another PC through the Settings app. To do so, please follow the detailed steps:
Step 1. Press the Win + X keys and select Settings from the context menu.
Step 2. Click on Devices > Printers & scanners one by one.
Step 3. In the Settings window, click on Add a printer or scanner on the left side.
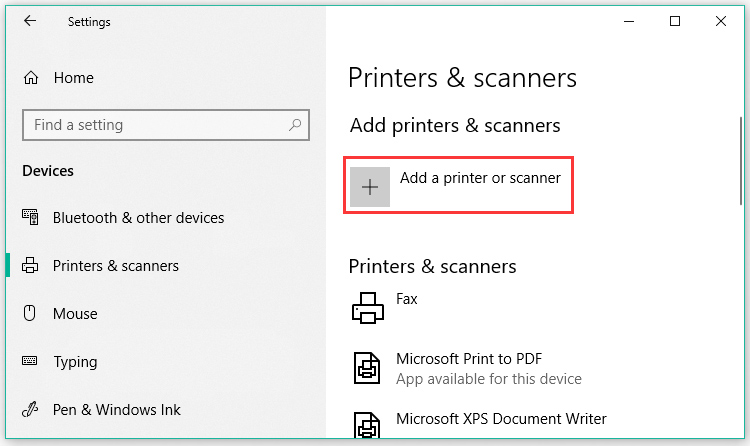
Step 4. Then choose the printer that you want to share, and click on the Add device button.
Step 5. If there is your wanted printer, you need to continue the steps below. Click on The printer that I want isn’t listed.
Step 6. Click on Select a shared printer by name in the dialog box, and type the primary PC’s device name and the share name of the printer through one of the following formats:
- \computernameprintername
- http://computername/printername/.printer
Step 7. Click on the Next button and follow the on-screen prompts to complete the installation.
After installing the printer, you should share printer Windows 10 to another PC.

User Comments :