According to user reports, the S.M.A.R.T. 0x7 Seek Error Rate appears in an HDD or SSD on their computer/laptop. Here’s a true example from the tomshardware.com forum:
I have some questions about the seek error rate SMART attribute. I have a Seagate 500Gb 7200.10 (about 3 years old) that has a high seek error rate.https://forums.tomshardware.com/threads/seek-error-rate.676180/
What Is Seek Error Rate
Self-Monitoring, Analysis, and Reporting Technology (SMART) is a monitoring system included in computer hard disk drives (HDD) and solid-state drives (SSD). Its main function is to detect and report various indicators of drive reliability to predict impending hardware failure.
When SMART data indicates that a drive failure may be imminent, software running on the host system may notify the user so that precautions can be taken to prevent data loss and the failed drive can be replaced while maintaining data integrity.
When SMART detects a problem with the hard drive, it displays a SMART error warning next to the corresponding SMART parameter: SMART Seek Error Rate.
Seek Error Rate is a SMART disk error that indicates a serious problem with the drive. This could be due to severely bad sectors, mechanical issues, or overheating and servo damage. The higher Seek Error Rate, the higher chances of drive seek failure.
Hard drives that support the S.M.A.R.T attribute include Samsung, WD (Western Digital), Seagate, HGST (Hitachi), or Toshiba. Both HDD and SSD can get stuck on this error. However, the results are different on the two hard drives.
However, not all SMART errors indicate impending disk failure or resulting corruption. If you see a warning sign next to the Seek Error Rate SMART parameter on your Seagate SSD or HDD, back up your data or clone the drive immediately to avoid permanent data loss.
Recover the Lost Data
To recover data lost due to Seek Error Rate error you need a data recovery program. As a multifunctional partition manager, MiniTool Partition Wizard provides a professional guide. Its Data Recovery feature enables you to quickly recover data from logically damaged, formatted, or RAW partitions.
The Partition Recovery function of MiniTool Partition Wizard helps to recover partitions lost due to system update, system damage, hard drive failure, etc.
MiniTool Partition Wizard DemoClick to Download100%Clean & Safe
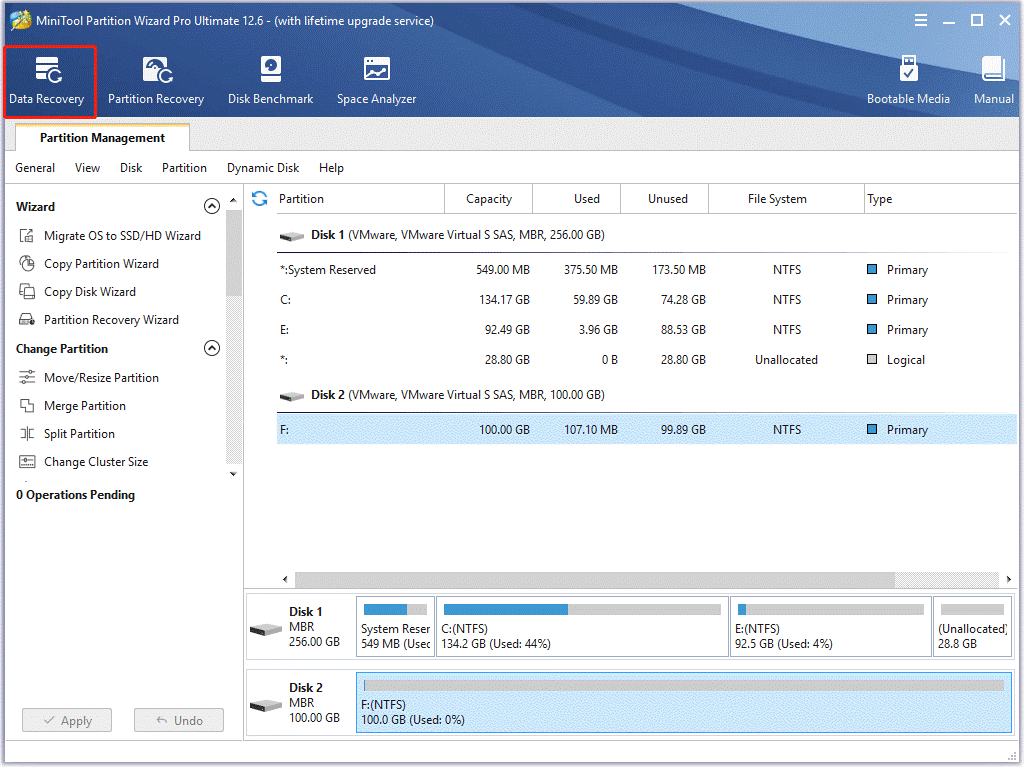
Step 1: Launch the MiniTool software to enter its main interface and click on Data Recovery from the top toolbar.
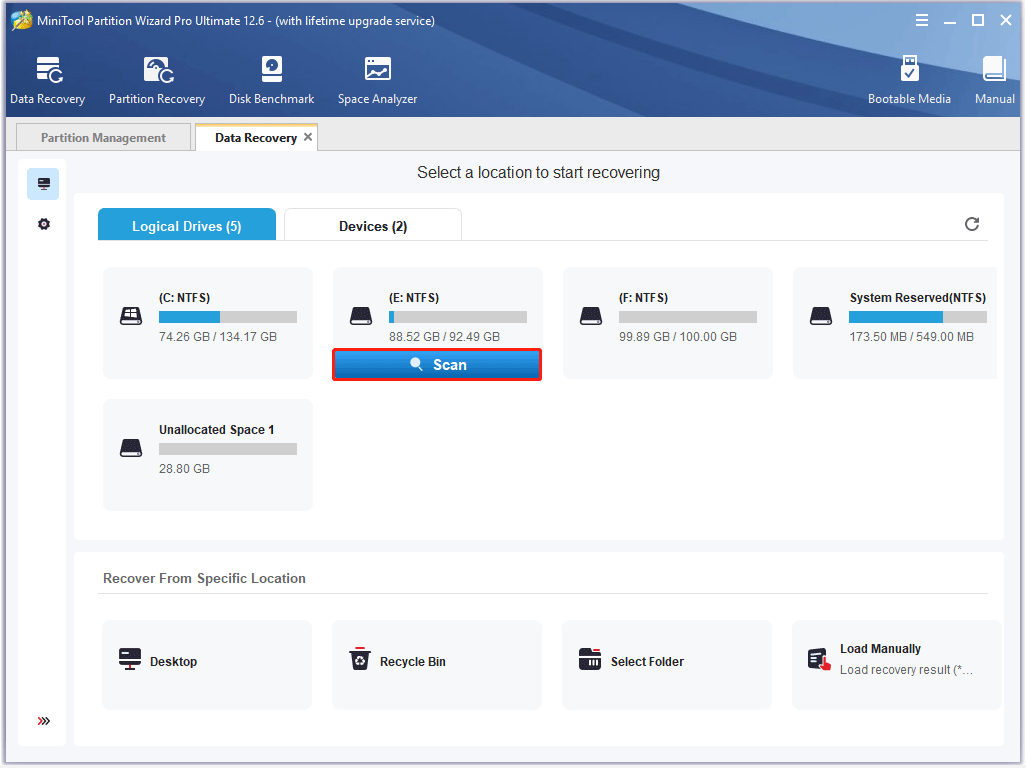
Step 2: Now, you can select the external drive where the data is lost and click on Scan.
Step 3: Then wait for the scanning process to complete. If you have found the files during the scanning, you can click on Pause or Stop to get instant data recovery. Also, you can click on Find, and then type the File name in the search bar to find it quickly.
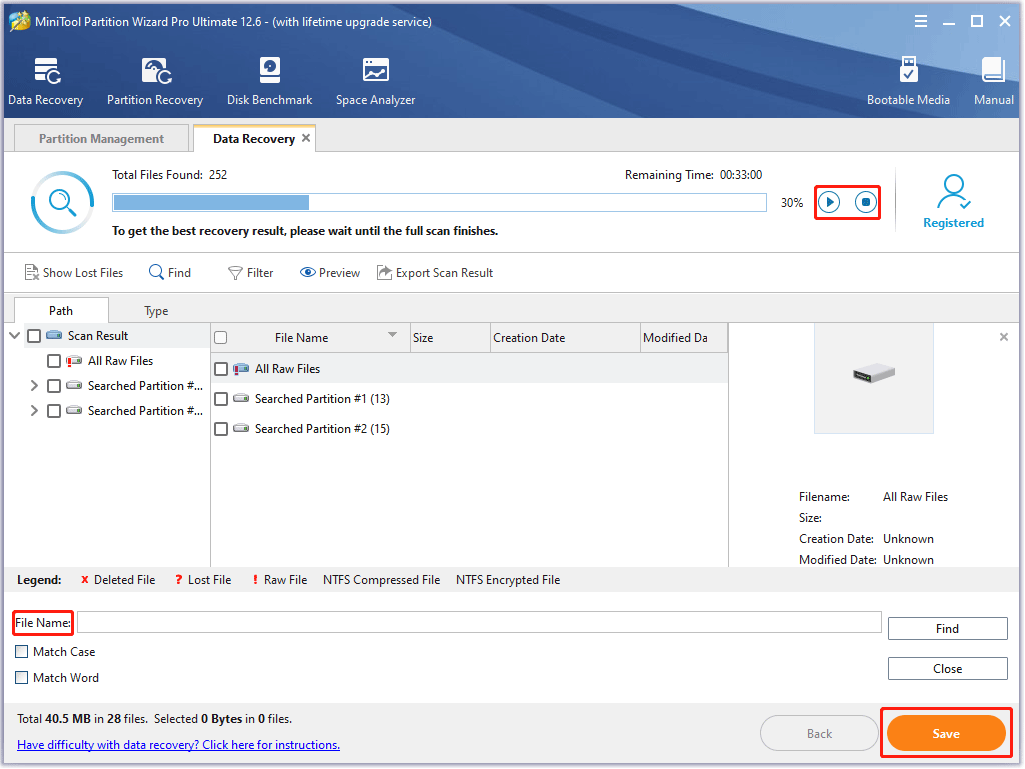
Step 4: Once the scan is complete, check all items you need to recover and click on Save.
Step 5: In the pop-up window, select a directory to save the selected files and click on OK.
It is recommended to save the recovered files on another drive. Otherwise, the lost data could be overwritten.
How to Fix the SMART Seek Error
Since Seek Error Rate indicates mechanical and electrical issues, there is no solution other than hardware replacement. But before replacing the hard drive or SSD, you may need to clone the SSD to back up the system and data on it. In this case, we recommend you use MiniTool Partition Wizard. Here is the guide:
MiniTool Partition Wizard DemoClick to Download100%Clean & Safe
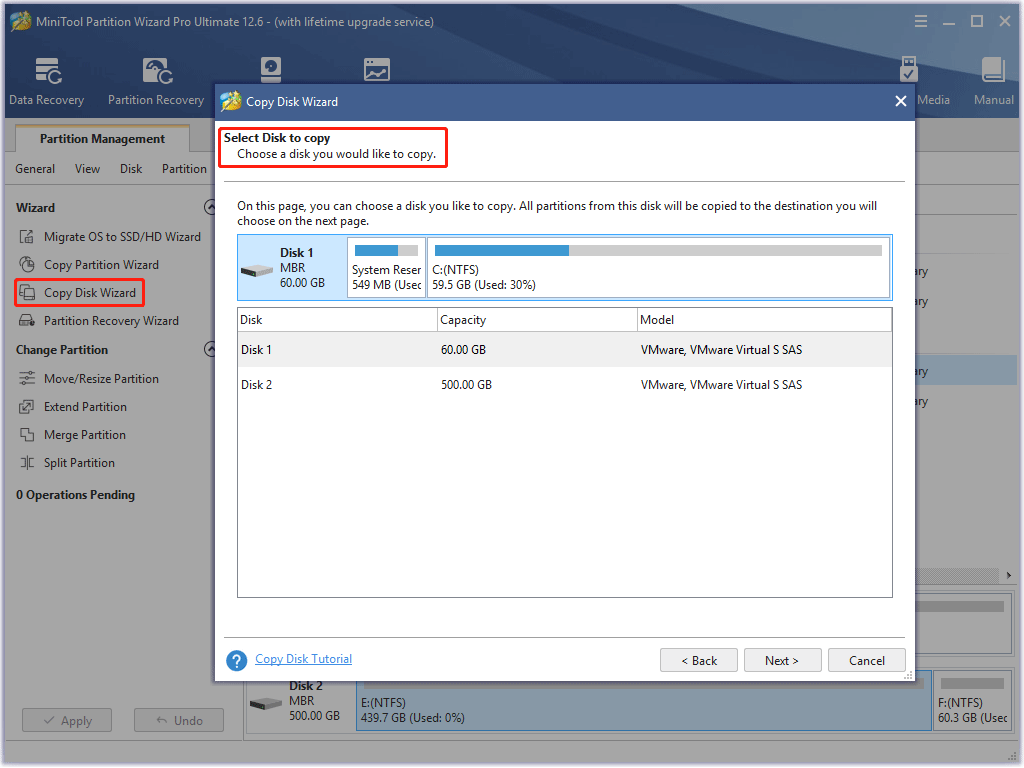
Step 1: Launch MiniTool Partition Wizard and click on Copy Disk Wizard in the left pane. Then click on Next.
Step 2: Select the hard drive or SSD that is problematic and click Next.
Step 3: Select a target disk and click Next. Then click Yes when it warns you that all the data on the target disk will be destroyed.
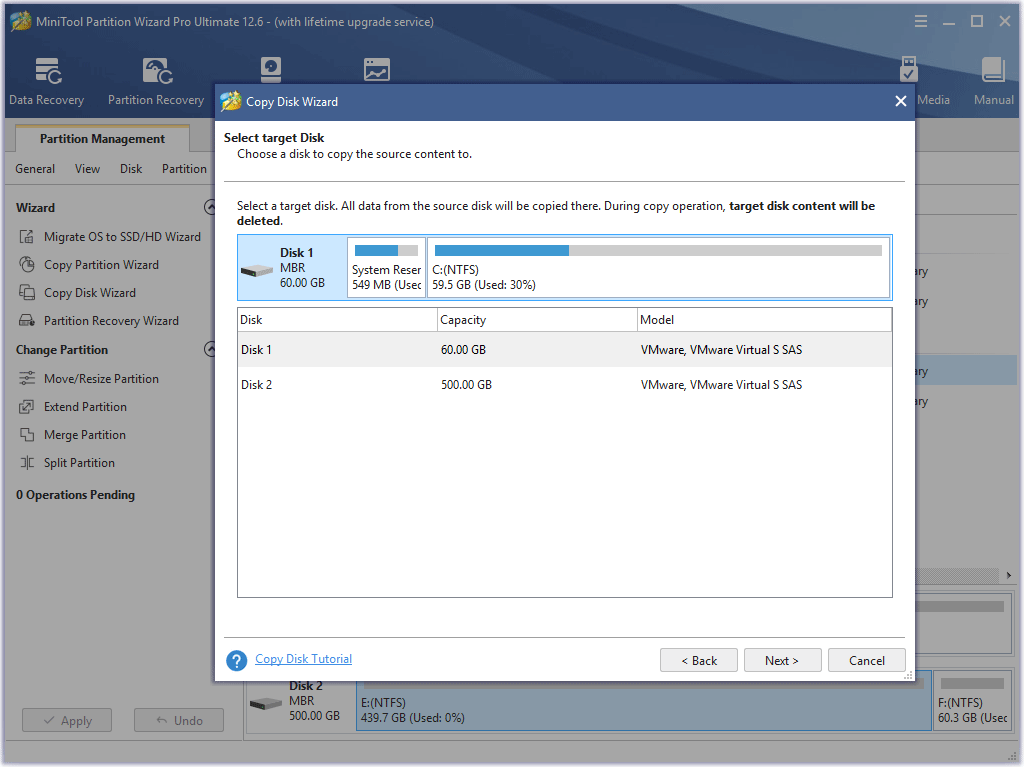
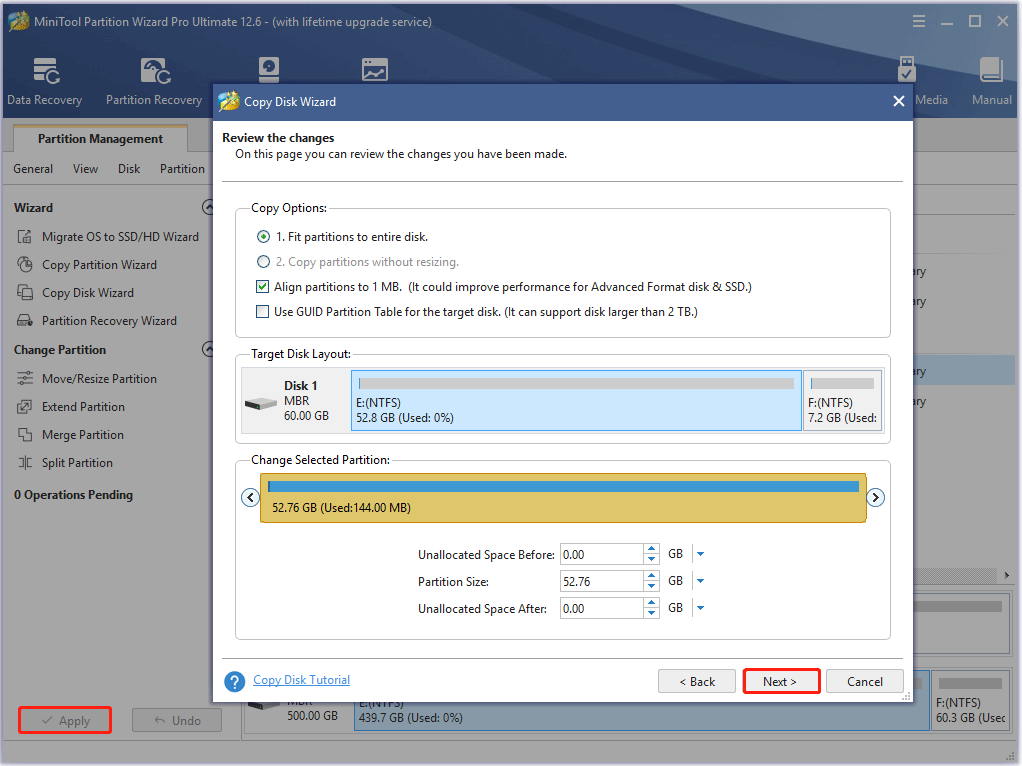
Step 4: In the interface below, you’ll see two copy options listed. Keep all to the default options and click Next.
- Fit partitions to entire disk: This method will resize the copied partitions proportionally to occupy the entire disk space of the destination disk.
- Copy Partition Without Resizing: The original partition size will not be changed. This option is only valid if the size of the destination hard disk is equal to or larger than the size of the source disk.
Step 5: Read the pop-up note carefully and then click Finish.
Step 6: Click Apply and then Yes to execute the operation.
Seek Error Rate Prevention Tips
Like other SMART parameters, Seek Error Rate cannot be resolved. Fortunately, here are some tips to prevent the Seek Error Rate and prolong the life of your Seagate hard drive or SSD.
# 1. Run CHKDSK Scan Periodically
CHKDSK is a built-in utility in Windows that can find and repair hard drive problems. By doing so, it optimizes the performance of the hard drive. It is recommended to run a scheduled CHKDSK scan with the parameter to prevent the Seek Error Rate from occurring.
Step 1: Type cmd in the search box, then right-click Command Prompt in the search results and click Run as administrator.
Step 2: In the pop-up window, enter chkdsk /r /f * and press Enter to execute the operation.
Replace "*" with your actual drive letter.
Also read: Is It Safe to Run CHKDSK on SSD | How to Check SSD Effectively
# 2. Check Hard Disk for Errors with MiniTool Partition Wizard
Although CHKDSK can be used to check the hard drive, this tool often runs into various issues like CHKDSK being write-protected, CHKDSK getting stuck, etc. So, it’s highly recommended you use a powerful disk manager – MiniTool Partition Wizard. It can help you check bad sectors but also file system errors easily and quickly.
MiniTool Partition Wizard FreeClick to Download100%Clean & Safe
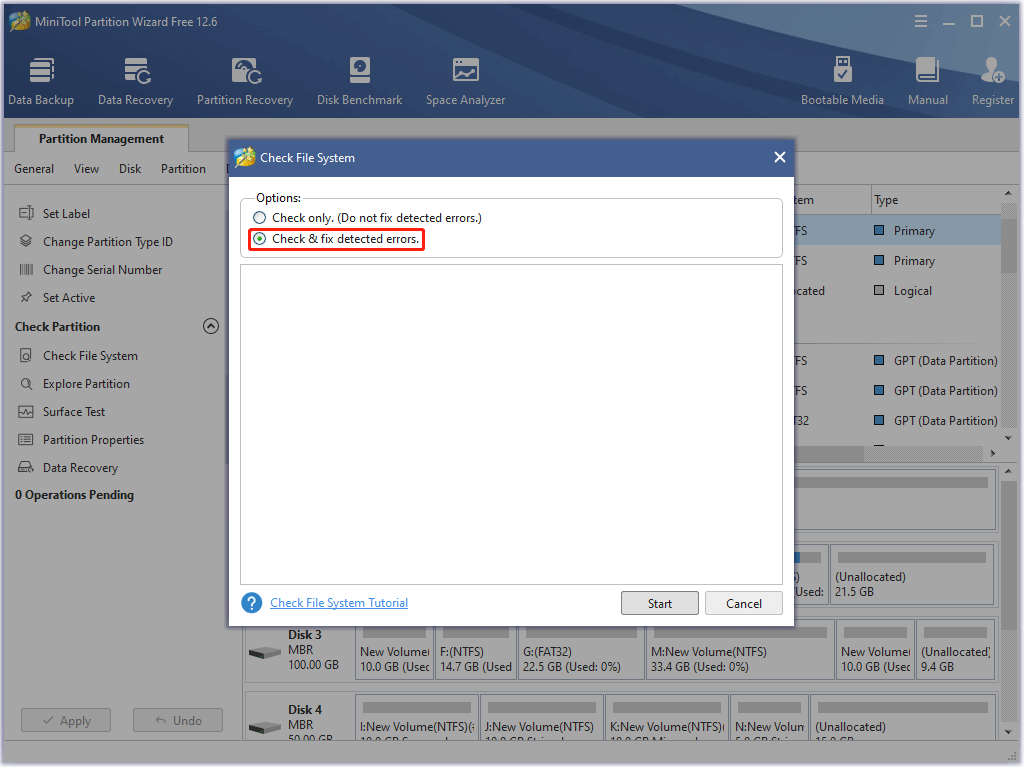
Step 1: Launch the MiniTool software to get its main interface, and then select the drive and click on Check File System from the left action panel.
Step 2: Select Check & fix detected errors and click on the Start button. This tool will check and repair file system errors immediately.
Step 3: In the main interface, select the drive again and click on Surface Test from the left pane.
Step 4: Click on the Start Now button in the pop-up window. After that, this tool will scan the whole external drive immediately and show you the test result.
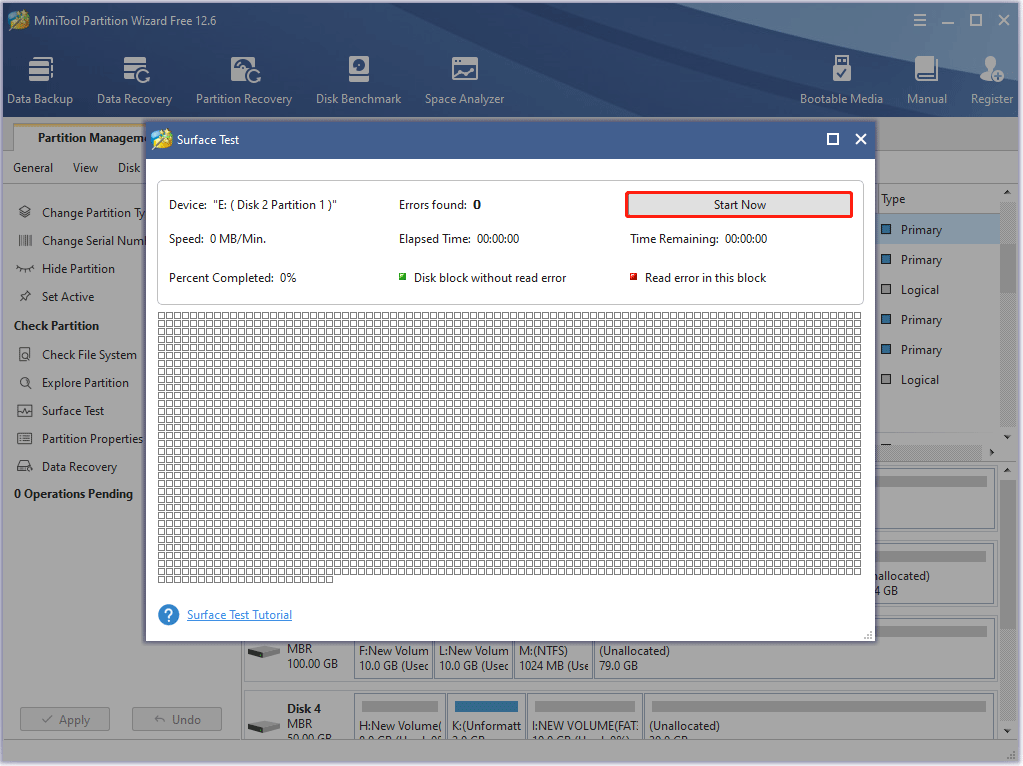
Step 5: When the hard drive error test process is completed, the disk blocks that have no read errors will be marked in green. However, if MiniTool Partition Wizard finds some hard disk errors, the blocks will be marked as red. In this case, you can either use this bad sector repair guide or consider replacing it with a new one.
# 3. Defrag the Hard Drive
Disk fragmentation, or file fragmentation, often occurs when you save files to different parts of the disk rather than contiguous clusters. Free sectors on a disk are spread across discrete parts of the disk due to repeated writing and deletion. Then the file cannot be saved to consecutive sectors.
Disk defragmentation is the process of using system software or professional disk defragmentation software to organize fragmented and messy files. This action can improve the overall performance and speed of your PC.
Given this fact, it is recommended that you defragment the drive if necessary. To do this, follow the steps below.
Step 1: Press the Win + S key, then type defrag.
Step 2: Click Defragment and Optimize Drives from the listed search results.
If you are prompted with a confirmation window, allow it to continue.
Step 3: In the Optimize Drives window, click on the target drive and click Optimize. Then follow the instructions that pop up to complete the operation.
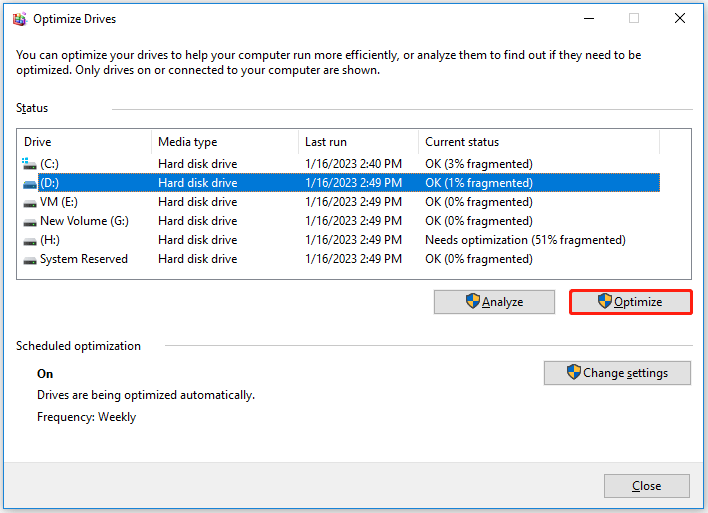
Alternatively, you can use the best defragmentation software to deal with disk fragmentation.
# 4. Monitor Disk Temperature
To ensure that your hard drive is functioning properly, you should frequently monitor its health. Monitoring the temperature of your hard drive is one way. Once you notice that your hard drive is getting hot, there are things you can do to prevent it (case ventilation) from overheating.
Using a disk monitoring utility such as Drive Monitor or CrystalDiskInfo, you can monitor key hard drive SMART parameters, drive temperature, and performance.
# 5. Keep Enough Space between Drives and Other Hardware Components
Keeping enough space between the drive and other hardware components can prevent overheating. If this state continues for some time, it may damage electronic components, read and write heads and disks, and cause bad sectors. Then it can cause drive corruption and disk errors.
Bottom Line
In conclusion, always treat SMART errors as serious warnings and back up your important files immediately. Most SMART errors indicate a mechanical failure and therefore cannot be repaired. However, if you catch them in time, you can prevent data loss.
If you have any ideas about this topic, you can leave them in the following comment zone. If you have any suggestions or need any help when you use MiniTool Wizard Partition, you can send us an email at [email protected] or leave a comment below. Thank you in advance.


![[Solved] WSL Not Working After Upgrading to Windows 11](https://images.minitool.com/partitionwizard.com/images/uploads/2023/01/wsl-not-working-in-windows-11-thumbnail.png)
User Comments :