Are you worried about malware or viruses attack? You can solve the problem with Task Scheduler. MiniTool Solutions offers you free ways to schedule a scan in Windows Defender Antivirus.
To protect your systems and files from online threats such as viruses, spyware, ransomware and so on, you can use the security solution which is available on every Windows 10, Windows Defender Antivirus.
Windows Defender Antivirus provides real-time protection to detect and remove malware, and you can schedule a scan at any day and time.
However, you need to enable it using the Task Scheduler.
Schedule a Scan in Windows Defender Antivirus with Built-in Task
Follow these steps to schedule a Windows Defender Antivirus scan:
Step 1: Click the Search icon on taskbar and. Type Task Scheduler and then choose the app.
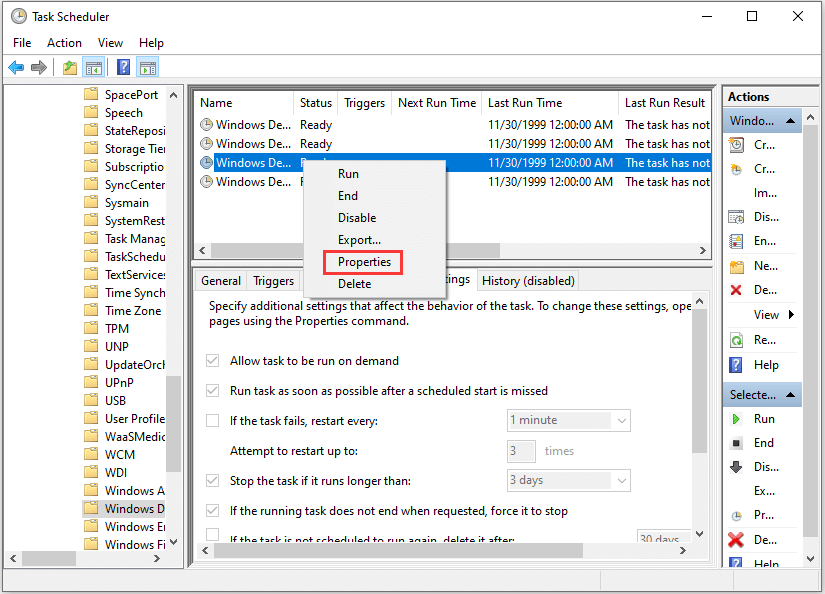
Step 2: Navigate to the following path: Task Scheduler Library > Microsoft > Windows > Windows Defender.
Step 3: Right-click “Windows Defender Scheduled Scan” and choose Properties from menu.
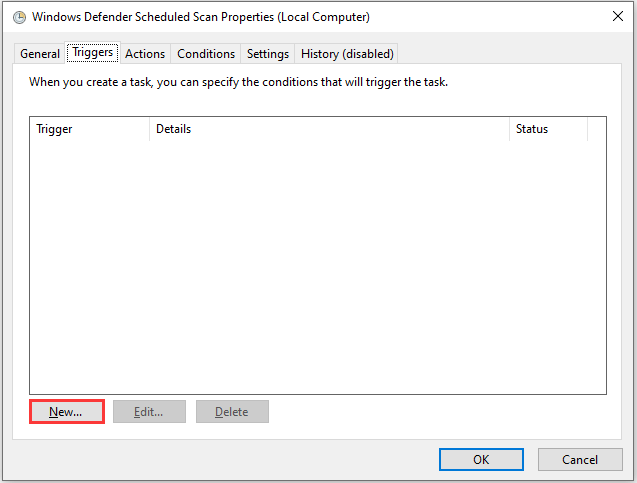
Step 4: In Triggers tab, click New… button.
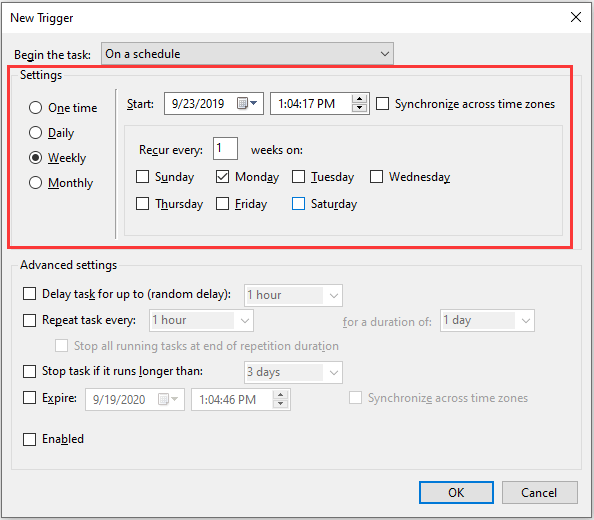
Step 5: Choose On a schedule option in the drop-down box after Begin the task.
Step 6: Then you can specify the time settings from One time, Daily, Weekly or Monthly, as well as the time to start from. For example, I choose to run the scan on every Monday, and start from September 23.
Step 7: Click OK to confirm the changes.
Step 8: To prevent affecting the battery life, you can go to Conditions tab, and check the Stop if the computer switches to battery power option under Power section. Then click OK.
Now you successfully schedule a scan in Windows Defender Antivirus, and it will run with the schedule that you specified.
Schedule a Scan in Windows Defender Antivirus Using a New Task
If the built-in task doesn’t work, you can set up Windows Defender to automatically scan by creating a new task in Task Scheduler. Try the following steps.
Step 1: Open Task Scheduler.
Step 2: Right-click the Task Scheduler Library and choose New Folder… from menu.
Step 3: Enter a name for the new folder. For example, Antivirus Task. Then click OK.
Step 4: Select Antivirus Task folder which you just created. Then click Action menu on the top of the window, and choose Create Task.
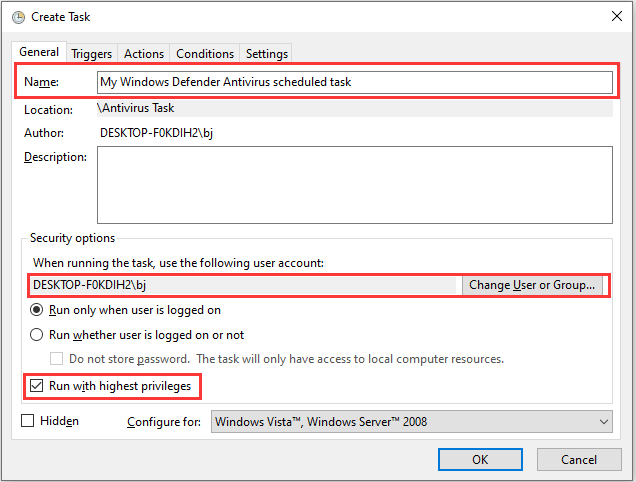
Step 5: Specify the task.
- In the Namesection, type a descriptive name for the task. For example, My Windows Defender Antivirus scheduled task.
- In the Security optionssection, you can configure which user account can run the task.
- Check the option Run with highest privileges.
Step 6: Click the Action tab and select New.
Step 7: Add the Windows Defender Antivirus program to the task.
- Choose Start a programin the Action box.
- Copy the path for Windows Defender Antivirus program: “%ProgramFiles%Windows DefenderMpCmdRun.exe“, and paste it to the box under Program/script.
- Paste the scan type “-Scan -ScanType 2”to the Add arguments
- Click OK.
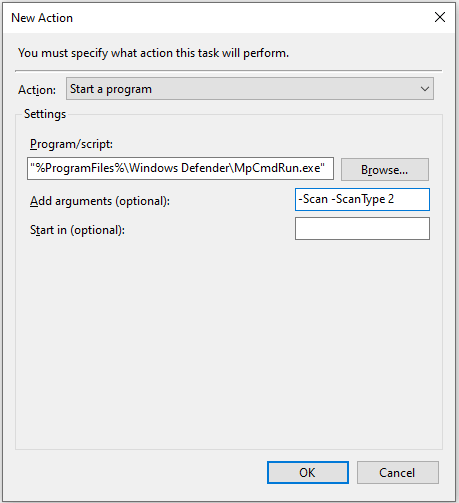
- -Scan -ScanType 1 performs a quick scan.
- -Scan -ScanType 2 is for a full malware scan.
- –Scan -ScanType 3 -File PATH/TO/FILE/OR/FOLDER is used to scan a particular location or file.
Step 8: In Triggers tab, click New… and specify the time settings. This step is the same as steps 4-8 when you set up Windows Defender to automatically scan using built-in task.
Do you get the way to schedule a Windows Defender Antivirus scan? Try it now to keep your computer safe!


User Comments :