Many Windows users encounter an error while partitioning a USB drive with Rufus. What causes the Rufus could not partition drive error? How to fix it? Now, let’s explore the answers together with MiniTool.
Rufus is a free and portable ISO burner that can be used to create a bootable USB drive using an ISO file. This software is widely used by Windows users. However, some users reported that they encounter the Rufus error while partitioning drive. Here’s a true example from the superuser.com forum:
I wanted to make a bootable USB drive using Rufus. I opened the program went with all the default options and clicked start BUT it did not work. It gave me an error. With Rufus it says "ERROR while partitioning drive". How fix my 16GB USB drive after using RUFUS?
https://superuser.com/questions/840827/rufus-nor-any-other-software-can-fix-my-16gb-usb-drive-after-using-rufus
Why Does Rufus Could Not Partition Drive
What causes the Rufus error while partitioning drive on Windows? According to user reports, this error often occurs when they attempt to partition or format an external USB/SSD/HDD using Rufus. Here is a list of possible reasons that can trigger the Rufus error.
- Faulty USB drive: It is one of the most common causes for the “Rufus error could not partition drive”. If there are bad blocks on the USB drive, Rufus is unable to partition or reformat it.
- Enabled Controller Folder Access: This feature is well-known to conflict with Rufus on Windows 10. If it is enabled, you will be unable to format USB drive with Rufus.
- Antivirus interference: Sometimes your antivirus software and even Windows Firewall can interfere with Rufus, triggering the error.
- Read-only drive: If your USB drive is currently read-only state, you may encounter the Rufus error while partitioning drive.
- Outdated Rufus version: An outdated Rufus version may not be fully compatible with your operating system and trigger the error.
How to Fix the Rufus Error Could Not Partition Drive on Windows
Here are 7 feasible ways to fix the “could not partition drive error Rufus” on Windows. You can try them in order until the problem gets solved.
# 1. Check the Drive for Errors
As discussed above, the “Rufus error could not format drive” error is often related to the USB drive itself. To rule out this situation, we recommend you use the CHKDSK tool to check the USB drive for errors first.
Step 1. Make sure you connect the USB drive to your computer properly.
Step 2. Press Win + E keys to open the File Explorer, and then right-click the USB drive and select Properties.
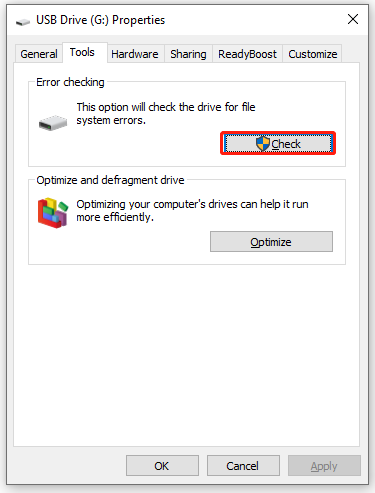
Step 3. In the pop-up window, navigate to the Tools tab and click on Check under the Error checking section.
Step 4. Click on Scan and repair drive and wait for the process to complete.
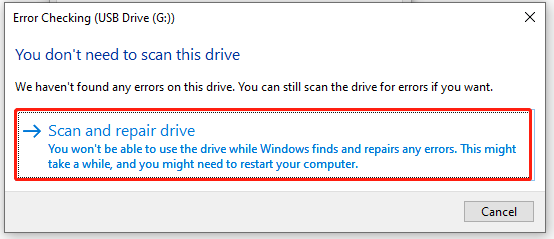
Once repaired, you can check if Rufus could not partition drive error gets solved.
# 2. Disable the Controlled Folder Access
If you could not partition drive in Rufus Windows 10, you can check if the Controlled Folder Access feature is enabled. If it is, disabling the feature can help fix the error. This method has been proven by some users to be helpful. Let’s try.
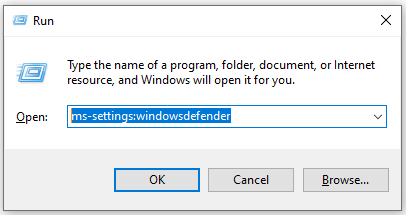
Step 1. Press Win + R keys to open the Run box, and then type ms-settings:windowsdefender in it and hit Enter.
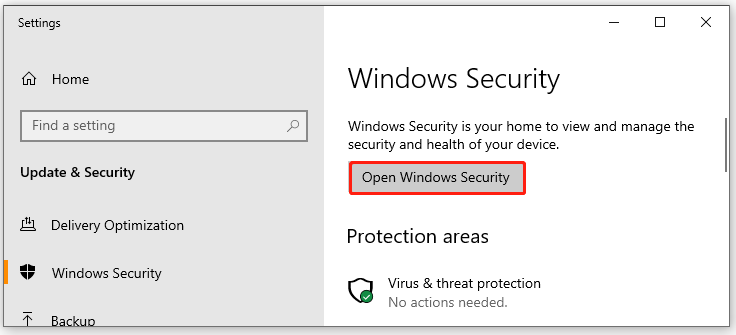
Step 2. In the pop-up window, click on Open Windows Security from the right panel.
Step 3. Select Virus & threat protection in the Windows Security window and click on Manage ransomware protection.
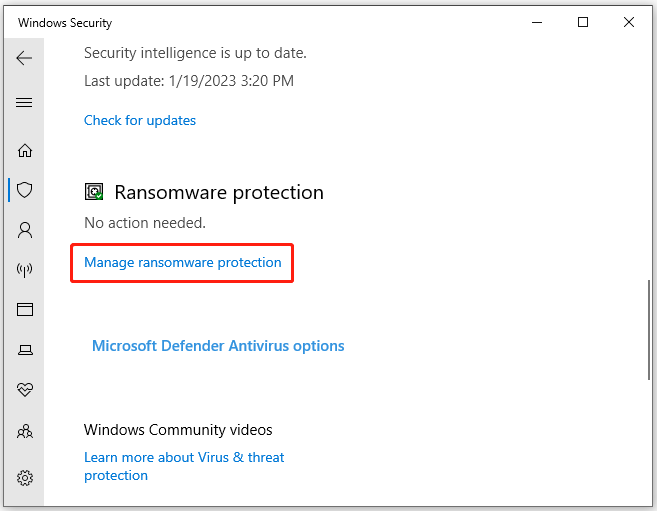
Step 4. In the Ransomware Protection section, toggle off the switch next to Controlled folder access and restart your computer to execute the change. Then you can see if the “Rufus could not partition drive” error is gone.
# 3. Check for the Antivirus Interference
Some users report that the “could not partition drive error Rufus” can occur due to some kind of antivirus interference. If you are using any third-party antivirus software, you can try disabling the real-time security option when running Rufus.
For Windows Defender Firewall, you can refer to the guide to disable its real-time protection.
If you are still unable to format USB drive with Rufus, you can follow the steps below to uninstall the antivirus software from Windows.
Step 1. Press the Win + R keys to open the Run box. Then type appwiz.cpl in it and hit Enter.
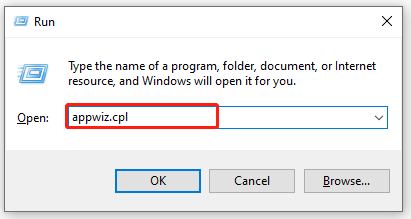
Step 2. In the Programs and Features window, select the antivirus software you have installed and click on Uninstall and confirm this operation. Then follow the on-screen prompts to complete the uninstallation.
Once done, restart your computer and see if the “Rufus cannot format the drive” error gets fixed.
# 4. Use the Latest Rufus Version
If you are using an older version of Rufus, it may not be fully compatible with your system. In this case, you can try updating Rufus to the latest version. Some users have proven that updating the program can fix the error.
For that, you can uninstall Rufus first from the Programs and Features window as we explained above, and then go to the official Rufus download page, click on the latest version of Rufus to download it and follow the on-screen instructions to complete the process.

After that, you can repeat the partitioning and check if the “could not partition drive in Rufus” error is gone.
# 5. Reformat the USB Drive
Some users from the superuser.com forum reported that the “Rufus could not partition drive” error can be resolved by reformatting the drive to NTFS or FAT32. How to format a USB drive on Windows quickly? You can use the Windows built-in tool like Diskpart or a professional USB formatter like MiniTool Partition Wizard.
Way 1. Format the Drive Using Diskpart
Diskpart is a practical command-line utility that can be used to format a drive to NTFS/FAT32 on Windows. But the limitation is that it cannot format a drive larger than 32 GB to FAT32.
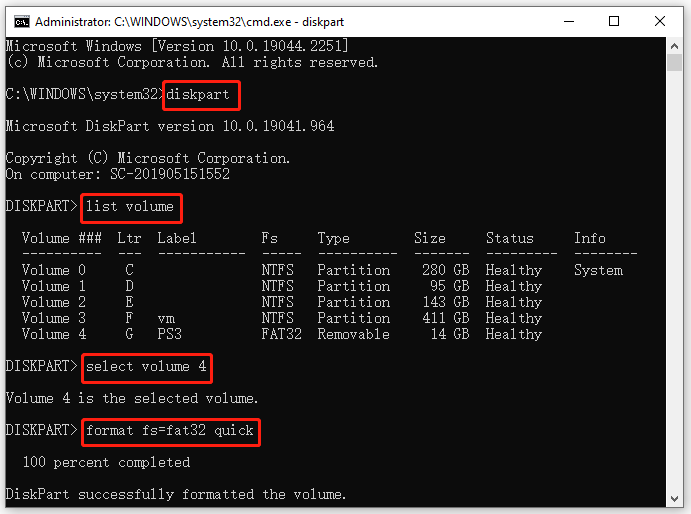
Step 1. Type cmd in the Windows Search bar, and then right-click the Command Prompt app and select Run as administrator. Then click on Yes in the UAC window to confirm it.
Step 2. In the elevated Command Prompt window, type diskpart and hit Enter to access the Diskpart utility.
Step 3. Type the following commands in order and hit Enter after each one to format the drive.
- list volume
- select volume * (* refers to the number of the volume you want to format)
- format fs=fat32 quick or format fs=ntfs quick
Way 2. Format the Drive Using MiniTool Partition Wizard
As mentioned above, the Windows tool has a limitation on formatting a large drive to FAT32. In addition, the formatting process may be stuck on some errors like “Windows was unable to complete the format”, “The format did not complete successfully”, etc.
MiniTool Partition Wizard breaks through these limitations and can be used to convert NTFS to FAT32 without data loss, convert MBR to GPT, change cluster size, and so on.
MiniTool Partition Wizard FreeClick to Download100%Clean & Safe
Step 1. Launch the MiniTool software to enter its main interface, select the USB drive from the disk map and click on Format Partition from the left action panel.
Step 2. In the pop-up window, select FAT32 or NTFS from the File System drop-down menu and click on OK to confirm it. Here you also can set the Partition Label and Cluster Size according to your needs.
Step 3. Click on Apply to execute the formatting process.
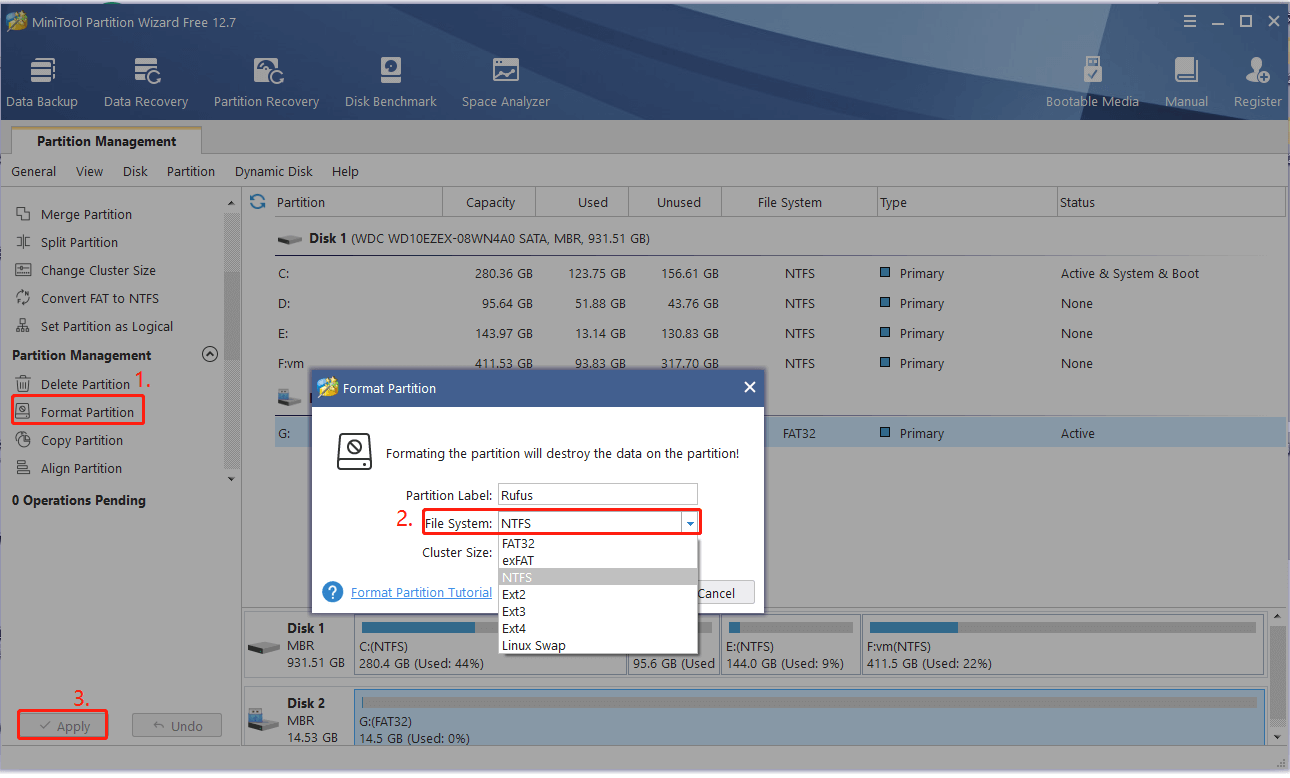
Once you reformatted the drive, you can use the Rufus again and see if the “could not partition drive error Rufus” gets fixed.
# 6. Clear the Read-Only Mode
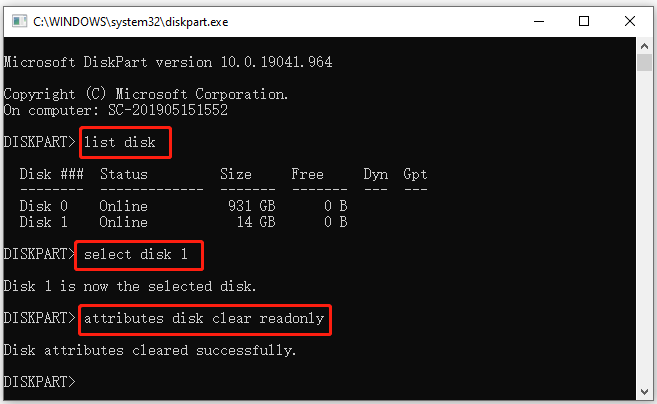
If Rufus cannot format the drive and says that the drive is write-protected, it means that the drive is in read-only mode. Here you can use the Diskpart to clear the write protection. For that:
Step 1. Open the elevated Diskpart Command Prompt window again.
Step 2. Type the following command and hit Enter after each one to clear the write protection in the USB drive.
- list disk
- select disk * (* refer to the number of your USB flash drive)
- attributes disk clear readonly
# 7. Alternative to Rufus Partition Drive
If the Rufus error while partitioning drive persists after trying all the above methods, you can try a better alternative tool – MiniTool Partition Wizard. It is a multifunctional and trusted partition manager that can help you create/extend/resize/format/align/wipe partitions on Windows easily.
Here you can use the MiniTool software to partition USB flash drive.
MiniTool Partition Wizard FreeClick to Download100%Clean & Safe
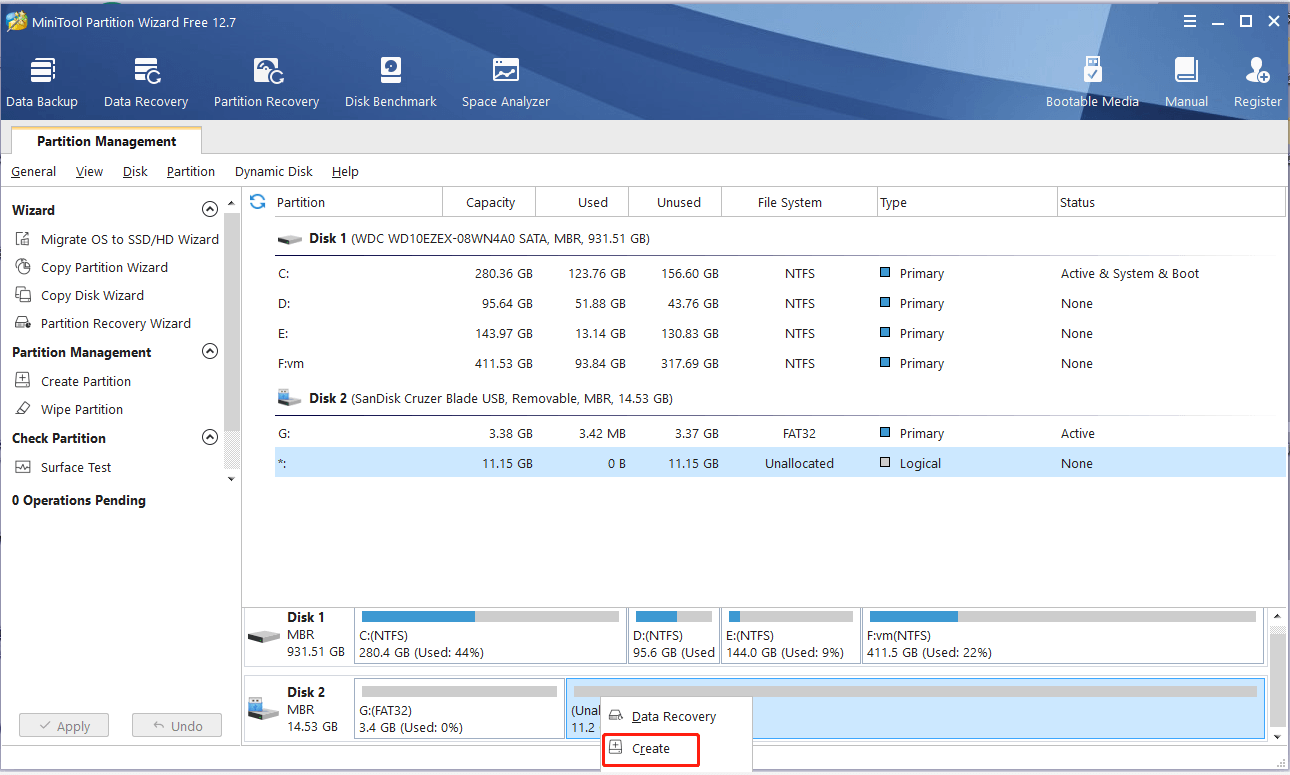
Step 1. In the main interface, right-click Unallocated space on the USB flash drive and select Create from the context menu.
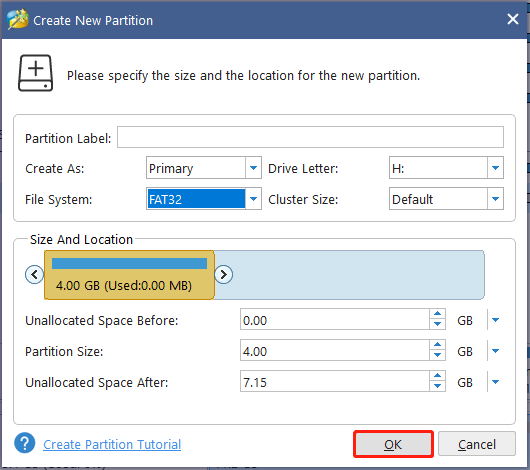
Step 2. In the pop-up window, you can set the Partition Label, select Primary from the Create as menu, select NTFS/FAT32 from the File System menu, and select a Drive Letter and Cluster Size according to your needs. Then click on OK to save the change.
Step 3. Click on Apply to execute the pending changes. Of course, you can continue partitioning the USB drive with the MiniTool software, such as extending/resizing the partition, creating another primary/logical partition, etc.
Have a Try Now
How to fix the Rufus error could not partition drive on Windows? The top 7 solutions have been illustrated above. Now, it’s your turn to have a try. If you have any other options about the topic, you can leave them in the following comment zone.
In addition, you can send us an email to [email protected] if you have difficulty using MiniTool Partition Wizard. We will help you as soon as possible.

User Comments :