Appropriate screen rotation makes it convenient for us to watch videos or read books on the computer. In this post, you can learn three efficient methods about how to rotate screen in Windows 11 from the MiniTool Partition Wizard website.
Screen Rotation in Windows 11
What is screen rotation? Screen rotation is a common feature for many electronic devices, such as mobile phones and laptops. In Windows 11, you are allowed to rotate screen to Landscape mode, Portrait mode, Landscape (flipped) mode, and Portrait (flipped) mode.
Why do you need to rotate screen in Windows 11? The reasons are various. There are two common ones. Firstly, the screen rotation brings a lot of conveniences. For example, while reading something on your computer, it will be more convenient to rotate the screen to portrait mode. Besides, screen rotation can help you restore the screen to the normal mode when you mistakenly rotate it.
How to Rotate Screen in Windows 11
Here are three efficient methods provided for you to rotate screen in Windows 11.
Method 1: Rotate Screen via Windows Settings
You can use Windows Settings to rotate screen in Windows 11. Here is the guide.
Step 1: Press Windows + I to open Windows Settings.
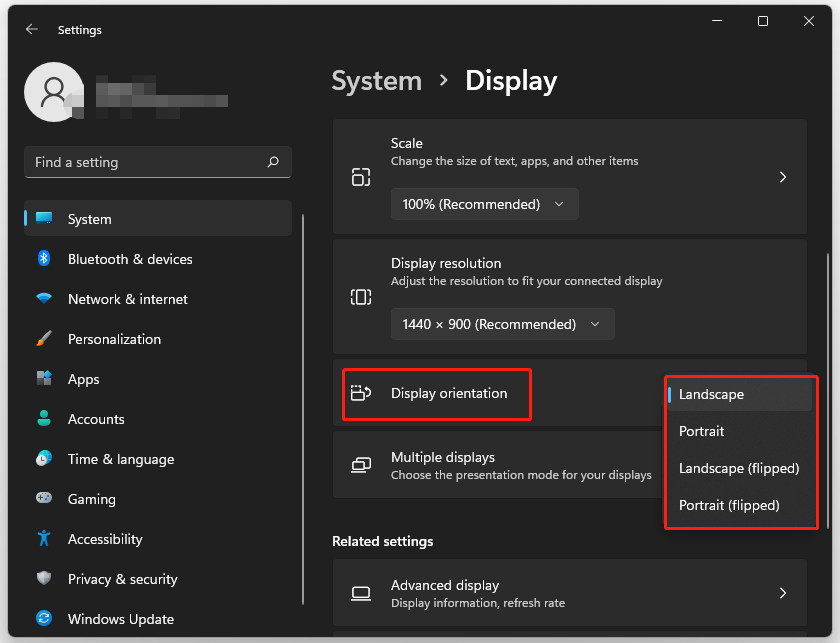
Step 2: Select System on the Settings homepage. Then click on Display.
Step 3: Under the Scale & Layout section, click the drop-down menu for Display orientation and then select an orientation you want.

After that, the screen rotation in Windows 11 is complete and you can close the Settings window. If you want the screen to rotate back to the previous orientation, you can repeat the above operations.
Method 2: Rotate Screen via Keyboard Shortcuts
Besides, there are some keyboards shortcuts that can help you rotate screen in Windows 11.
Option 1: Press Ctrl + Alt + Up arrow, and you can rotate screen to normal landscape mode.
Option 2: Press Ctrl + Alt + Left arrow, and you can rotate screen 90 degrees to the left.
Option 3: Press Ctrl + Alt + Right arrow, and you can rotate screen 90 degrees to the right.
Option 4: Press Ctrl + Alt + Down arrow, and you can rotate screen upside down (180 degrees).
It should be noted that these keyboard shortcuts are not available on all computers. It can run on most computers that use Intel graphics cards.
Besides, if your computer uses an Intel graphics card, but these shortcuts still don’t work, it’s probably because you don’t turn on the System hotkeys or haven’t set them. To set these shortcuts, you need to go to Intel Graphics Command Center. Then turn on System hotkeys or set the above shortcuts.
Method 3: Rotate Screen via the Graphics Card Control Panel
What’s more, you can also rotate screen in Windows 11 using the Graphics Card Control Panel. Here is the tutorial.
Step 1: Open the Intel Graphics Control Panel by pressing Ctrl + Alt + F12.
Step 2: Click Display.
Step 3: Change the Rotation to either 0, 90, 180 or 270.
Step 4: Select Apply to perform the operation.
Please note that above steps only work on the computers that use Intel graphics cards. If your PC uses AMD graphics, you can open Catalyst Control Centre and then rotate screen under Common Display Tasks. When your PC uses NVIDIA graphics, please open NVIDIA Control Panel from the context menu and then rotate screen in Rotate display.
That’s all for how to rotate screen in Windows 11. You can try any of them to rotate screen in Windows 11.
If you use the above methods but cannot rotate screen in Windows 11. It is possible that your Windows system is malfunctioning. You can try to restart the computer and see if you can use the screen rotation feature. In addition, it might also be because the graphics card driver is abnormal. In this case, you need to update the graphics card driver and then try to rotate screen again.


User Comments :