Have you ever encountered the Resource Not Owned error on your PC? It can cause annoying computer crashes and freezes when you encounter it. In this post, MiniTool Partition Wizard provides some useful solutions for you to fix it.
What Causes the Resource Not Owned Error?
The Resource Not Owned error is one kind of Blue Screen of Death (BSOD) error. It may result in data loss and other issues. When the Resource Not Owned error occurs, you will see one of those error messages on your screen:
- A problem has been detected and Windows has been shut down to prevent damage to your computer. The problem seems to be caused by the following file: RESOURCE_NOT_OWNED.
- 🙁 An error from RESOURCE_NOT_OWNED has caused a problem and your PC must restart.
- 0x0000000A: IRQL_NOT_LESS_EQUAL – RESOURCE_NOT_OWNED
- 0x0000001E STOP: KMODE_EXCEPTION_NOT_HANDLED – RESOURCE_NOT_OWNED
- 0x050 – RESOURCE_NOT_OWNED: PAGE_FAULT_IN_NONPAGED_AREA – RESOURCE_NOT_OWNED
- …
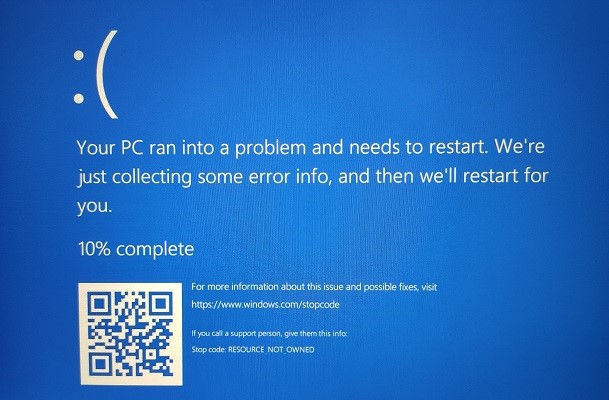
The RESOURCE_NOT_OWNED BSOD error usually happen after a fresh install of new hardware or software (Windows 10 64-bit). So, the RESOURCE_NOT_OWNED error is often related to hardware, software, device drivers, or firmware. The following are the primary causes of this error:
- System file errors or corrupt system files
- Incorrect, outdated, or corrupt system drivers
- Incompatibilities between third-party antivirus and system files
- Disk and hard drive problems
- Faulty system hardware
- Outdated Windows
After knowing the reasons for the Resource Not Owned error, you can try the solutions below to solve it.
Solution 1. Update Windows
The outdated Windows can cause many errors on your computer. The Resource Not Owned error is one of them. So, if you encounter the Resource Not Owned error on your computer, you can try updating your Windows to solve this error. Here’s the way:
- Press Windows and I keys at the same time to open the Settings window.
- Click on the Update & Security in the Settings window.
- In the Windows Update window, click on Check for updates button to let the system check and install the update.
- If a new update is available, then click Install Now and follow the instructions to update. If the Windows is up-to-date, then it will show You’re up to date message.
- Once done, check if the Resource Not Owned error is fixed.
Solution 2. Update Device Drivers
Outdated or corrupted system drivers are also the reasons for the Resource Not Owned error. If the drivers on your computer are not up to date, they may be unable to configure and work properly. So, you can also try updating the drivers on your computer to fix this error. Here’s the guide:
- Click the Search icon on the taskbar and type “device manager” into the search box.
- Then you will see Device Manager under Best Match. You need to click Open to open the Device Manager window.
- Expand those hardware categories whose hardware driver you wish to update.
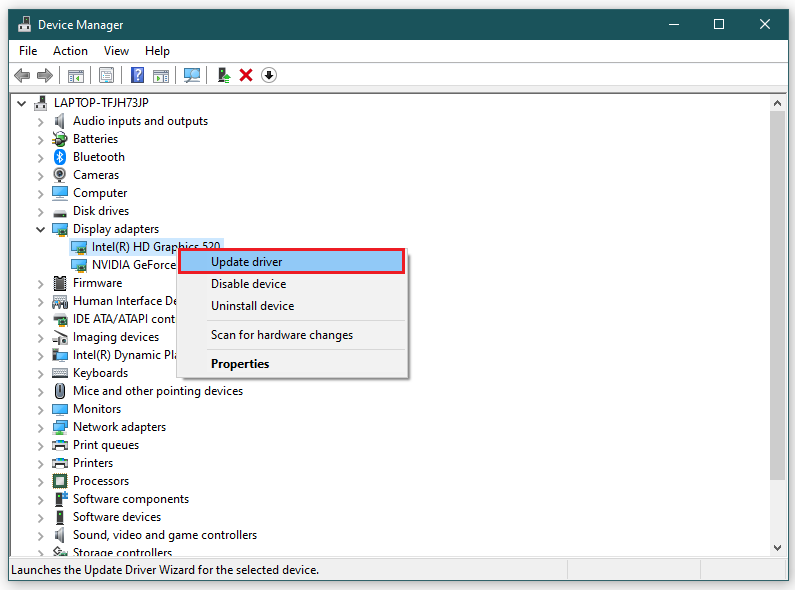
- Next, you need to right-click on that driver and then select Update Driver from the menu.
- In the next window, choose the “Search automatically for updated driver software” option. Then your computer will automatically look for and install the latest driver of the hardware from the Internet.
- Once done, check if the error is fixed.
Solution 3. Reinstall Device Drivers
If updating the system drivers does not fix the Resource Not Owned error, you can try to reinstall the drivers on your computer. Here’s the way:
- Press Windows and R keys at the same time to open the Run window.
- Type “msc” in the box and press the Enter key to open the Device Manager window.
- Expand those hardware categories whose hardware driver you wish to reinstall.
- Then you need to right-click on that driver and then select Uninstall device from the menu.
- Now, check the box Delete the driver software for this device and confirm the warning prompt by clicking Uninstall.
- Next, go to the manufacturer’s website (Intel, AMD, or NVIDIA) to manually download the driver as per system specifications.
- After that, run the downloaded .exe file to install the drivers.
- Once done, check if the error is fixed.
Solution 4. Rollback Device Driver Updates
If you encounter the Resource Not Owned error after you update your drivers, you can do as follows to roll back the drivers to solve this error.
- Press Windows and I keys simultaneously to open the Settings window.
- Next navigate to System > About, and then scroll down and click Device Manager to open the Device Manager window.
- Expand those hardware categories whose hardware driver you wish to roll back.
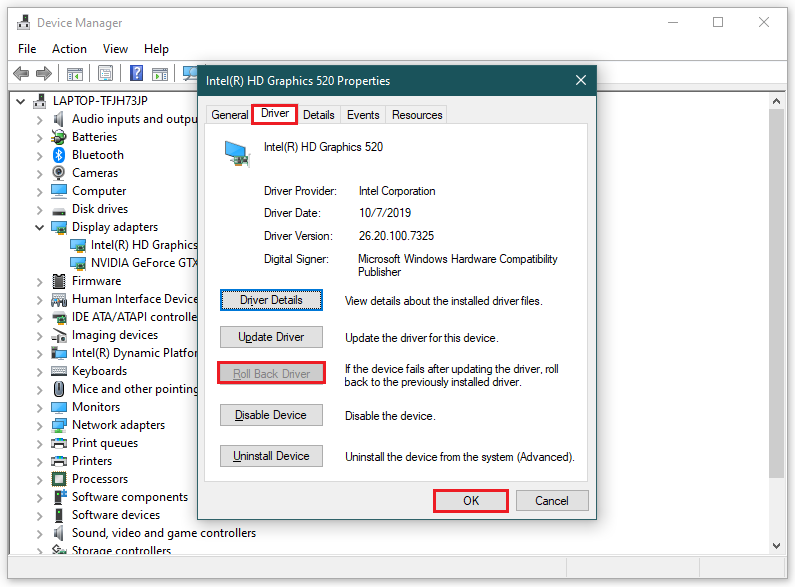
- Then you need to right-click on that driver and then select Properties from the menu.
- In the properties window, click on the Roll Back Driver button.
- After that, you need to provide your reason for “Why are you rolling back?” in the new window.
- Once done, click on Yes and OK to apply this change. Finally, restart your PC and check if the RESOURCE_NOT_OWNED error is fixed.
Solution 5. Run Hardware and Devices Troubleshooter
Faulty system hardware can also cause the Resource Not Owned error, so you can run the Hardware and Devices troubleshooter to fix this error.
The Hardware and Device troubleshooter can help you to find and fix common problems with the keyboard, printer, Bluetooth, USB, audio playback, etc.
However, the Hardware and Devices troubleshooter has been removed from the Troubleshoot page because Microsoft considers this feature to be used infrequently according to their survey. So, you need to use a command to run this tool. The steps are listed below:
- Press the Windows and R keys at the same time to open the Run window.
- Input “cmd” in the box and click OK.
- Input “exe -id DeviceDiagnostic” and press Enter key on the keyboard.
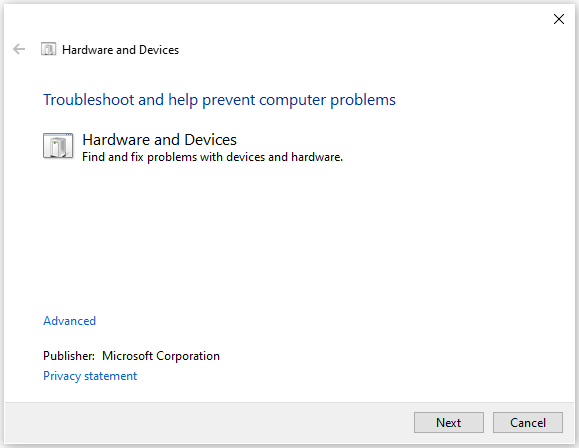
- Then you will see the Hardware and Devices window, then click the Next It will start to run the troubleshooter.
- If the system detects any problem, you can click Apply this Fix to resolve it.
Solution 6. Examine the Hard Disk Drive
The Resources Not Owned error on Windows 10 can also be caused by a corrupted disk driver on your computer. So, you need to use software or some commands to scan and repair the disk driver. Here’re two methods you can choose from.
Method 1. Check Hard Disk Errors via MiniTool Partition Wizard
MiniTool Partition Wizard is a comprehensive partition management tool that provides various functions to help you manage the hard disk, including two functions that can help you check and fix the errors on your hard disk. One is Check file system and the other is Surface Test.
MiniTool Partition Wizard FreeClick to Download100%Clean & Safe
1. Examine and Repair the Corrupted File System
The Check File System function can help you check and fix the file system problem on your hard disk.
Step 1. Launch MiniTool Partition Wizard on your computer.
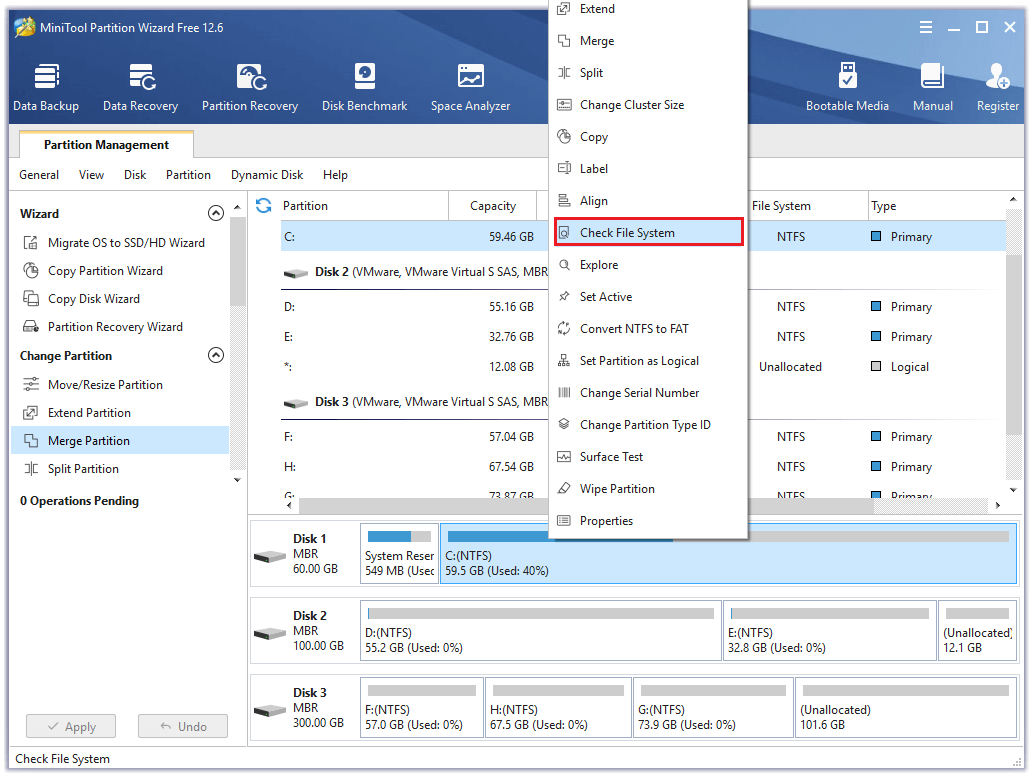
Step 2. Right-click the partition one by one and select Check File System.
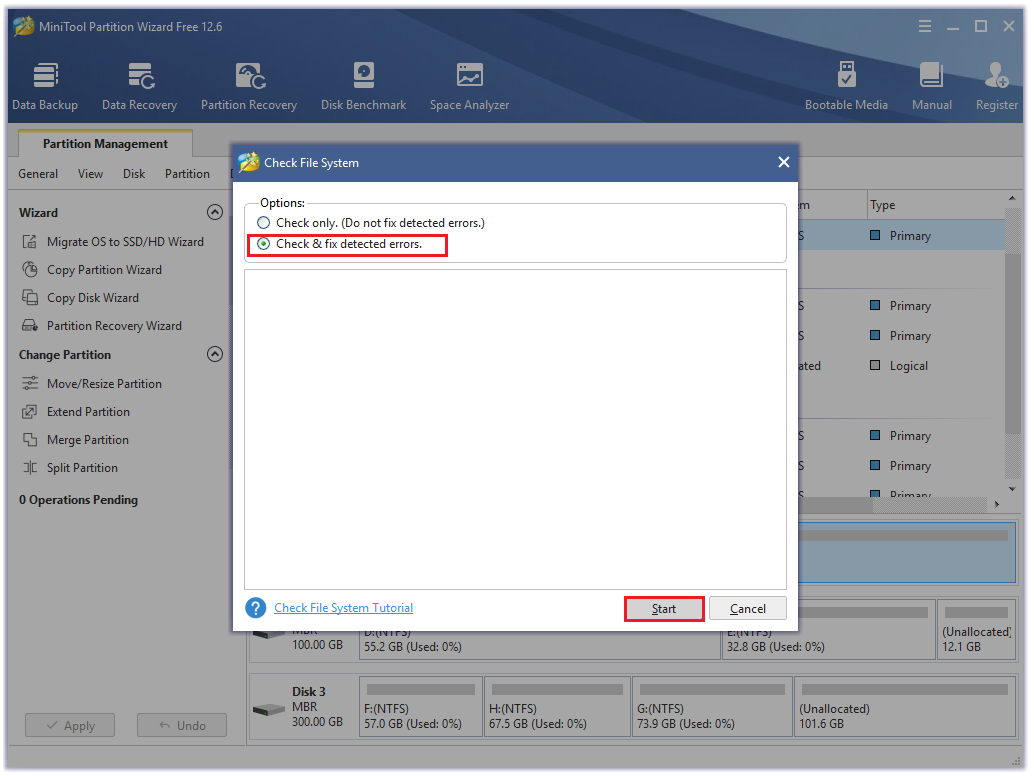
Step 3. Select the Check & fix detected errors option and then click on the Start button.
2. Check for Bad Sectors on the Hard Disk
The Surface Test feature of MiniTool Partition Wizard can help you check for bad sectors on the disk.
Step 1. Launch MiniTool Partition Wizard on your computer.
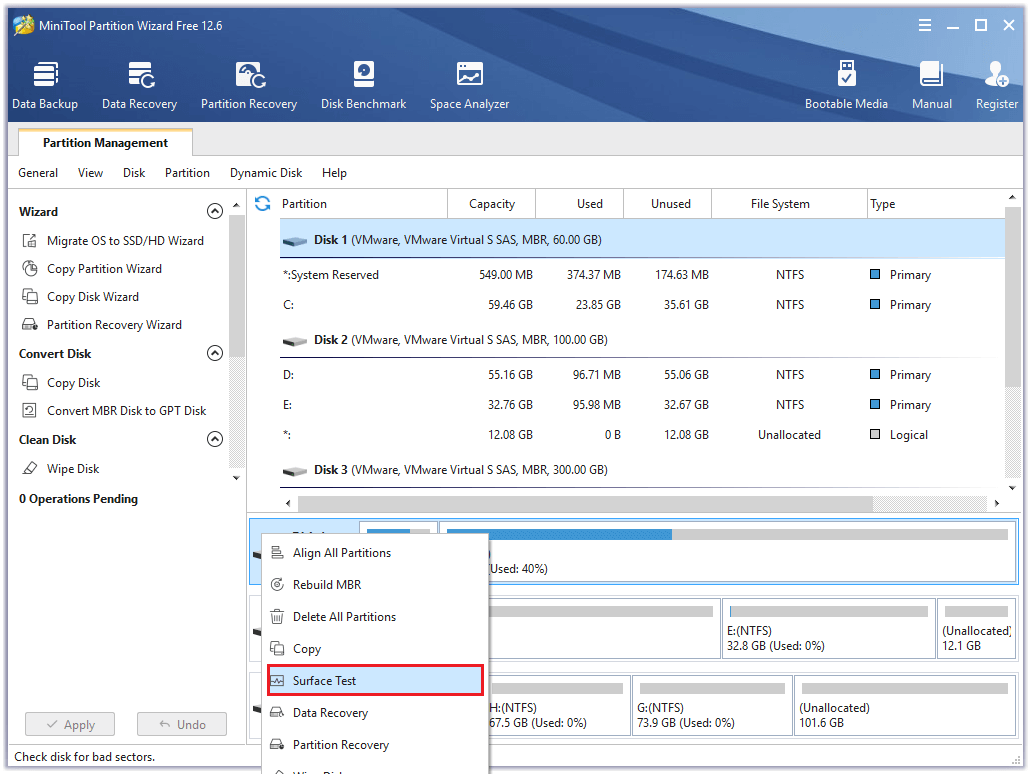
Step 2. Right-click the whole disk and then select Surface Test from the menu.
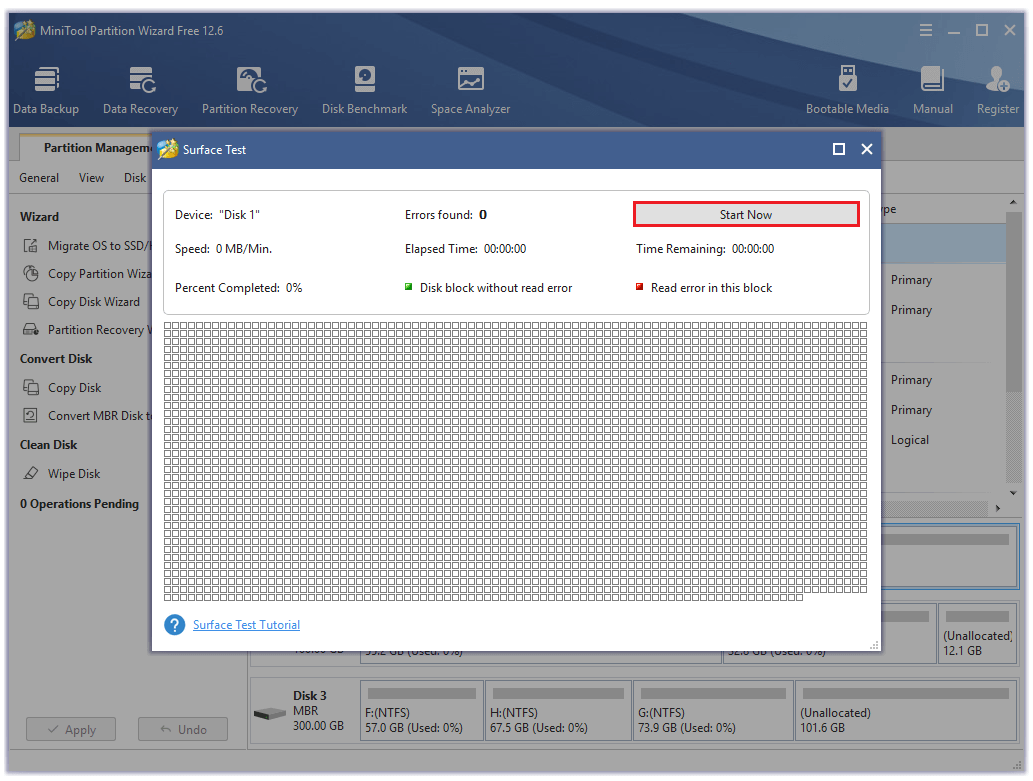
Step 3. Click on the Start Now button to start the scan process. If there are any bad sectors, they will be marked in red color.
If there are too many red blocks, you need to replace the disk. But if there are just a bit of red blocks, you can mark them as unreadable or shield them with third-party software.
Method 2. Check Hard Disk Errors via CMD
You can also use the built-in Command Prompt to check and fix the errors on your hard disk. Here’re the steps:
Step 1. Create a USB bootable media for Windows 10 and insert it into your computer.
Step 2. Next, go to the BIOS and set the bootable media as the first boot option.
Step 3. Then select the Repair your computer option at the left bottom.
Step 4. On the new page, choose Troubleshoot.
Step 5. Next, select the Advanced options and then select Command Prompt.
Step 6. Enter the following commands in the Command Prompt window and press the Enter key after entering each command line.
- Bootrec.exe /rebuildbcd
- Bootrec.exe /fixmbr
- Bootrec.exe /fixboot
Step 7. Next, you can execute additional chkdsk commands for all the disks. The commands are like this:
If you have E, F, or many other disks, check those disks, too. You just need to change the last letter in the commands below.
- chkdsk /r c
- chkdsk /r d
Step 8. Once done, restart your PC and check if the RESOURCE_NOT_OWNED error is fixed.
Solution 7. Repair System Files
If your Windows has any corrupted system files, you may encounter the Resource Not Owned error too. You can run SFC and DISM to fix this error. Both the System File Checker (SFC) and Deployment Image Servicing Management (DISM) allow you to scan and delete corrupt files.
You can run SFC first, because it doesn’t need a steady Internet connection. Here’re the steps:
- Click the Search icon from the taskbar and then type “command prompt” in the search box.
- Click Run as administrator from the right side of this window.
- Type “sfc /scannow” and press the Enter key.
- After that, type “Exit” and press the Enter key to close the Command Prompt window.
- Once done, restart your computer to check if the error is fixed.
If the error still exists, you need to run the DISM command. Here’s the guide:
- Run the Command Prompt as administrator on your computer.
- In the Administrator: Command Prompt window, type “exe /Online /Cleanup-image /Scanhealth” and press Enter key.
- Type “exe /Online /Cleanup-image /Checkhealth” and press the Enter key.
- Type “exe /Online /Cleanup-image /Restorehealth” and press Enter.
- Type “Exit” and press the Enter key to close the Command Prompt window.
- Once done, restart your computer to check if the RESOURCE_NOT_OWNED error is fixed.
Solution 8. Disable Antivirus Temporarily or Uninstall Third-party Antivirus
Sometimes, the antivirus can also cause the Resource Not Owned error. If you suspect the error on your computer is caused by an antivirus, you can try to disable the antivirus temporarily or uninstall third-party antivirus to fix it.
Solution 9. Reset PC
If all the solutions above don’t work for the Resource Not Owned error on your computer, you can suspect the error is caused by the bugs and errors in Windows 10. You can do the following steps to reset your PC.
Step 1. Press the Windows and I keys at the same time to open the Settings window.
Step 2. Now go to Update & Security > Recovery.
Step 3. Under Reset this PC, click on the Get started button.
Alt= click on the Get started button to start resetting Windows 10
Step 4. Then choose either Keep my files or Remove everything option.
- Keep my files: This option will remove apps and settings but keep your personal files.
- Remove everything: It will remove all your personal files, apps, and settings.
Step 5. Select your Windows version and click on Only the drive where Windows is installed.
Step 6. Next, select the Remove my files option and then click on Reset button to start the process.
Step 7. Follow the on-screen instructions to complete it and restore PC to an earlier date on Windows 10.
Bottom Line
The Resource Not Owned error can be caused by hardware, software, device drivers, or firmware problems. But luckily, you can find nine solutions in this post for this error. If you encounter the same error, you can choose one to fix it.
If you have any problems that bother you a lot, you can leave your comments to discuss them here. In addition, if there are any problems with MiniTool Partition Wizard when you use it, please send us an email via [email protected].

![[Solved] Kernel Auto Boost Lock Acquisition With Raised IRQL](https://images.minitool.com/partitionwizard.com/images/uploads/2022/08/kernel-auto-boost-lock-acquisition-with-raised-irql-thumbnail.jpg)
User Comments :