The pre-installed Reolink HDD capacity is limited. Do you want to do a Reolink hard drive upgrade or replacement? This post from Partition Magic offers you a detailed guide and you can have a try.
How to Choose the Best Hard Drive for Reolink
Reolink is a brand devoted to creating security products for consumers and business owners. It sells various security cameras and their supporting products.
You can use its app to view the real-time monitoring. However, if you want to play the recordings later, you need to use a microSD card, Reolink Home Hub, Reolink NVR, FTP/NAS server, or Reolink Cloud to save the recordings.
If your Reolink products include Reolink Home Hub Pro, Reolink Drive, or Reolink NVR (NVS4, NVS8, NVS12W, NVS16, NVS36, RLN4-210W, RLN4-211W, RLN4-410, RLN8-410, RLN12W, RLN16-410, or RLN36), you can install hard drives to them and then use them to save your recordings.
Sometimes, you may want to do a Reolink hard drive upgrade or replacement for the following reasons:
- The pre-installed HDD capacity is limited and you want to upgrade the HDD to a larger one or add another HDD to the device so that you can save more recordings.
- You don’t want to delete the saved recordings when the HDD is full, so you want to replace the HDD with a new one to continue recording videos.
Supported HDD Types and Capacity
To do the Reolink hard drive replacement or upgrade, you need to pick a proper hard drive for Reolink devices first. Then, you should know what hard drive is supported by them. You can read the following chart.
| Model | Slot | Capacity |
| Reolink Home Hub Pro | 1xSATA | The slot supports up to 16TB HDD. |
| Reolink Drive | 1xSATA | The slot supports up to 3TB HDD. |
| NVS4 | 1xSATA | The slot supports up to 6TB HDD. |
| NVS8 | 1xSATA 1xeSATA | Each slot supports up to 6TB HDD. |
| NVS12W | 1xSATA | The slot supports up to 16TB HDD. |
| NVS16 | 1xSATA 1xSATA/1xeSATA | Each slot supports up to 8TB HDD. |
| NVS36 | 3xSATA | Each slot supports up to 16TB HDD. |
| RLN4-210W | 1xSATA | The slot supports up to 4TB HDD. |
| RLN4-211W | 1xSATA | The slot supports up to 4TB HDD. |
| RLN4-410 | 1xSATA | The slot supports up to 4TB HDD. |
| RLN8-410 | 1xSATA 1xeSATA | For hardware version N7MB01, each slot supports up to 8TB HDD. For hardware version H3MB18 / N2MB02 / N3MB01, each slot supports up to 6TB HDD. For hardware version H3MB16 / H3MB02, each slot supports up to 4TB HDD. |
| RLN12W | 1xSATA | The slot supports up to 16TB HDD. |
| RLN16-410 | 2xSATA 1xeSATA (optional) | For hardware version N6MB01, each slot supports up to 8TB HDD. For hardware version H3MB18, each slot supports up to 6TB HDD. For hardware version H3MB06 / H3MB02, each slot supports up to 4TB HDD. |
| RLN36 | 3xSATA | For hardware version N5MB01, each slot supports up to 16TB HDD. |
2. Some Reolink users say they have successfully added an HDD larger than the recommended capacity to the Reolink NVR and the HDD works well.
Other Factors
To choose the best hard drive for Reolink devices, you should also consider other factors. For example:
- Reolink devices support SSDs, but SSDs are not recommended because the read and write life of SSDs is limited and much smaller than a surveillance HDD.
- Adding 2.5-inch HDDs to Reolink devices will be easier than adding 3.5-inch HDDs because 3.5-inch HDDs require a higher voltage.
- There is almost no eSATA HDD on sale. If your Reolink NVR device has an eSATA slot, you need to buy a SATA HDD and then place it into an eSATA enclosure.
Then, you can choose a SATA HDD according to your needs. However, some Reolink users would recommend the WD Purple series or the Seagate Skyhawk series.
Reolink Hard Drive Upgrade or Replacement Guide
After picking a proper HDD, you can then start to do the Reolink hard drive replacement or upgrade. Here are the steps.
How to Add an External HDD via eSATA Port:
- Place the SATA HDD into the eSATA enclosure.
- Connect the eSATA enclosure to the eSATA port of the Reolink NVR via a cable. The eSATA port is usually at the back of the device.
- Plug the power into the eSATA enclosure.
How to Add an Internal HDD:
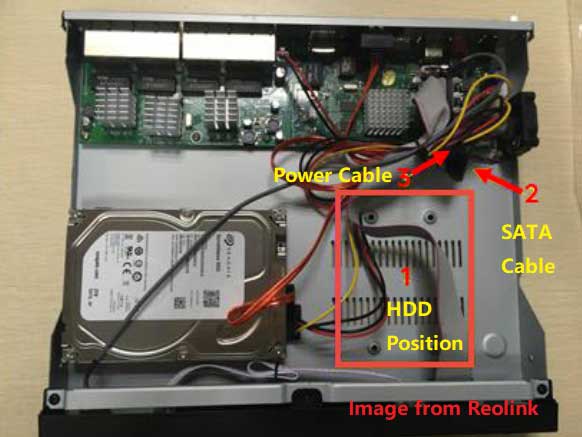
- Open the NVR box gently.
- If your NVR device has two or more SATA slots, you will see an extra hard drive bay. If your NVR device has only one SATA slot, you need to remove the original SATA HDD and then unplug the cables on it.
- Plug the SATA and power cables of the PCB board into the new HDD correctly and then fasten the HDD to the base of the NVR.
- Put the upper plate back on the NVR box and restore it to its original state.
Reolink HDD Format Guide
After the Reolink hard drive upgrade or replacement, you need to format the new HDD for use. To do the Reolink HDD format, you can use Reolink NVR device, app, client, and web browser. Here is the guide.
- On NVR Device: Log in to your NVR via the monitor, and go to Settings > Storage. Choose the HDD you want to format and click on the Format button.
- On Reolink App: Log in to your NVR via Reolink App and go to Device Settings > Device Info page. Choose the HDD you want to format and click on the Format button.
- On Reolink Client: Log in to the Reolink device on Reolink Client and click on the Device Settings button. Click on Storage. Choose the HDD you want to format and click on the Format button.
- On Web Browser: Log in to your NVR via Web Browser and then go to Device Settings > Storage page. Choose the HDD you want to format and click on the Format button.
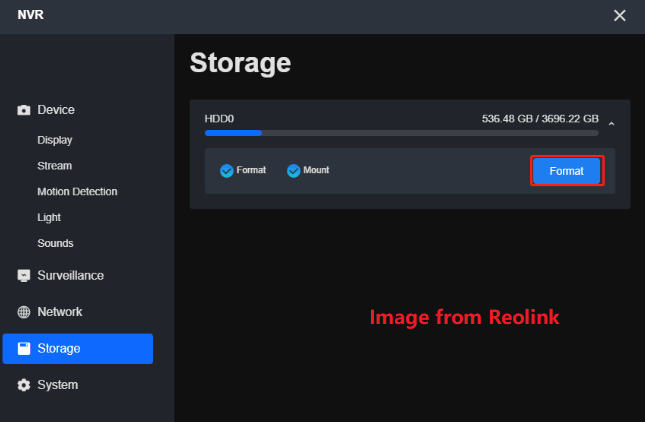
Some people may be curious about Reolink HDD format Windows 10. The easiest way is to use the Reolink client to do that on Windows 10. You should be aware that Reolink will format HDD to a special file system, which will be shown as RAW on Windows Disk Management.
However, some users also report that formatting the Reolink HDD to MBR FAT32 will also make the HDD work on Reolink NVR. You can have a try. To do that, MiniTool Partition Wizard can help you with no fee.
This software can convert MBR to GPT, partition hard drives, clone hard drives, and recover videos. It’s worth trying.
MiniTool Partition Wizard FreeClick to Download100%Clean & Safe
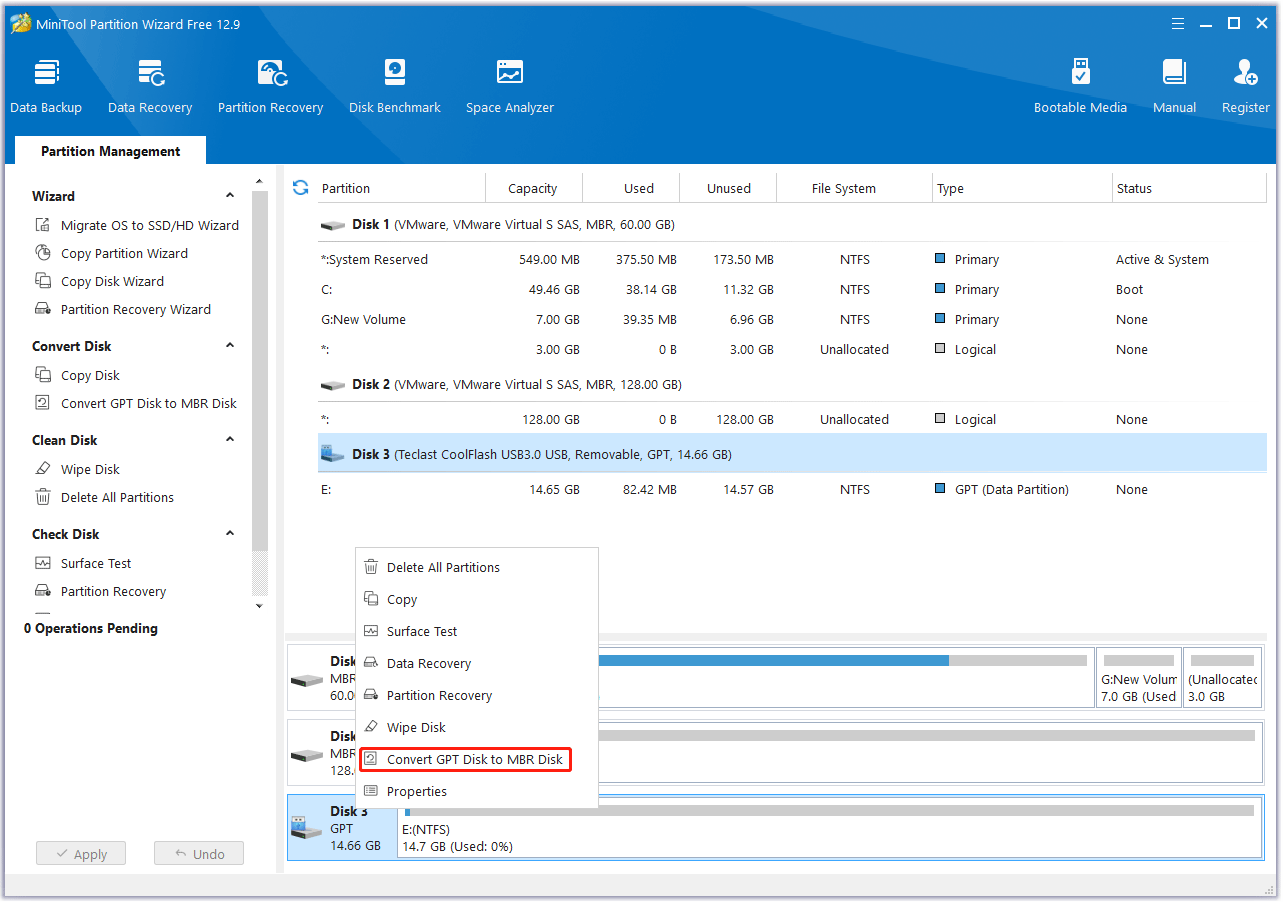
Step 1: Connect the HDD to your PC via a USB adapter. Launch MiniTool Partition Wizard and check if the hard drive is MBR. If not, right-click and choose Convert GPT Disk to MBR Disk.
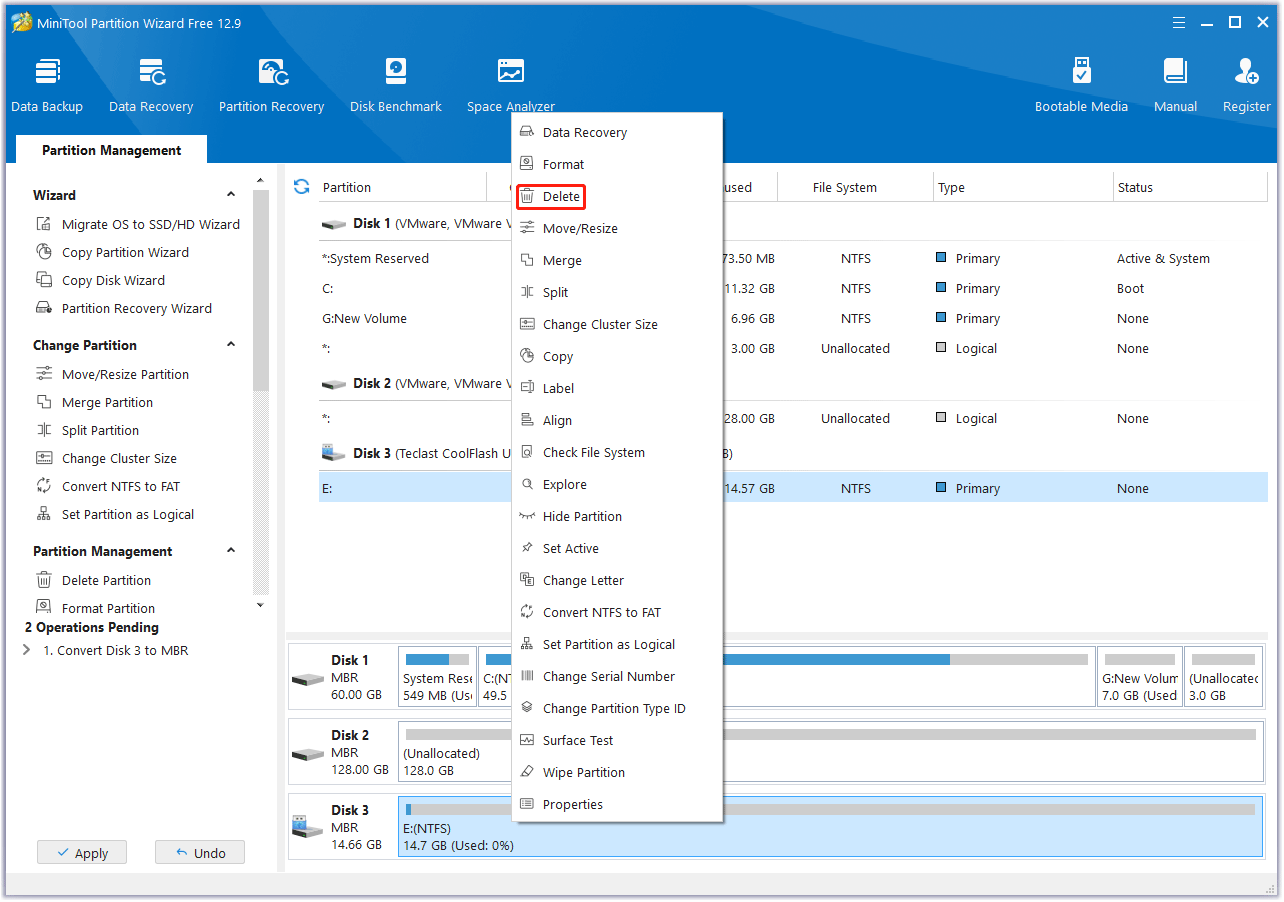
Step 2: Right-click the partition on the HDD and then select Delete.
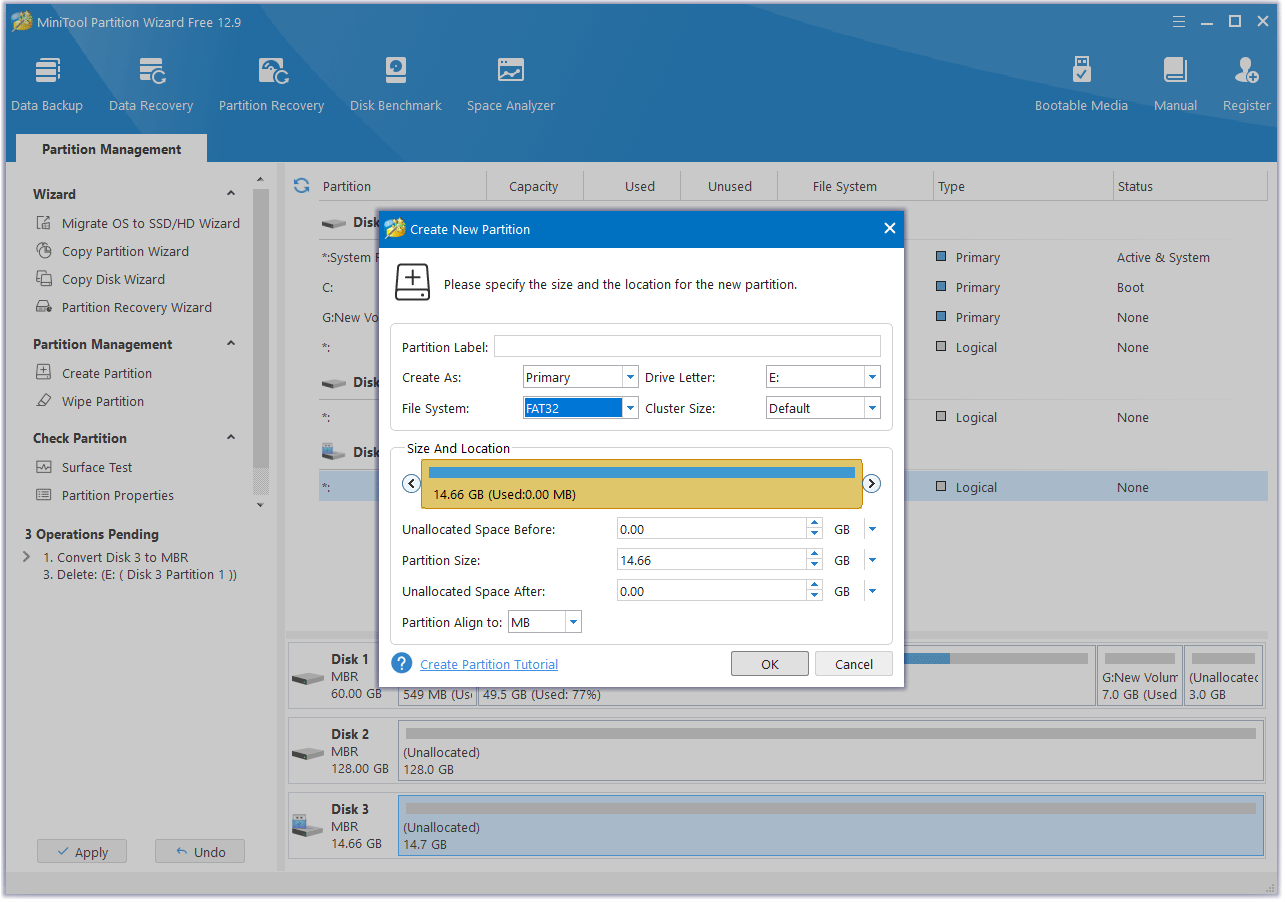
Step 3: Right-click the Unallocated space and select Create. On the pop-up window, change the File System to FAT32 and then click OK. It will create a FAT32 partition up to 2TB.
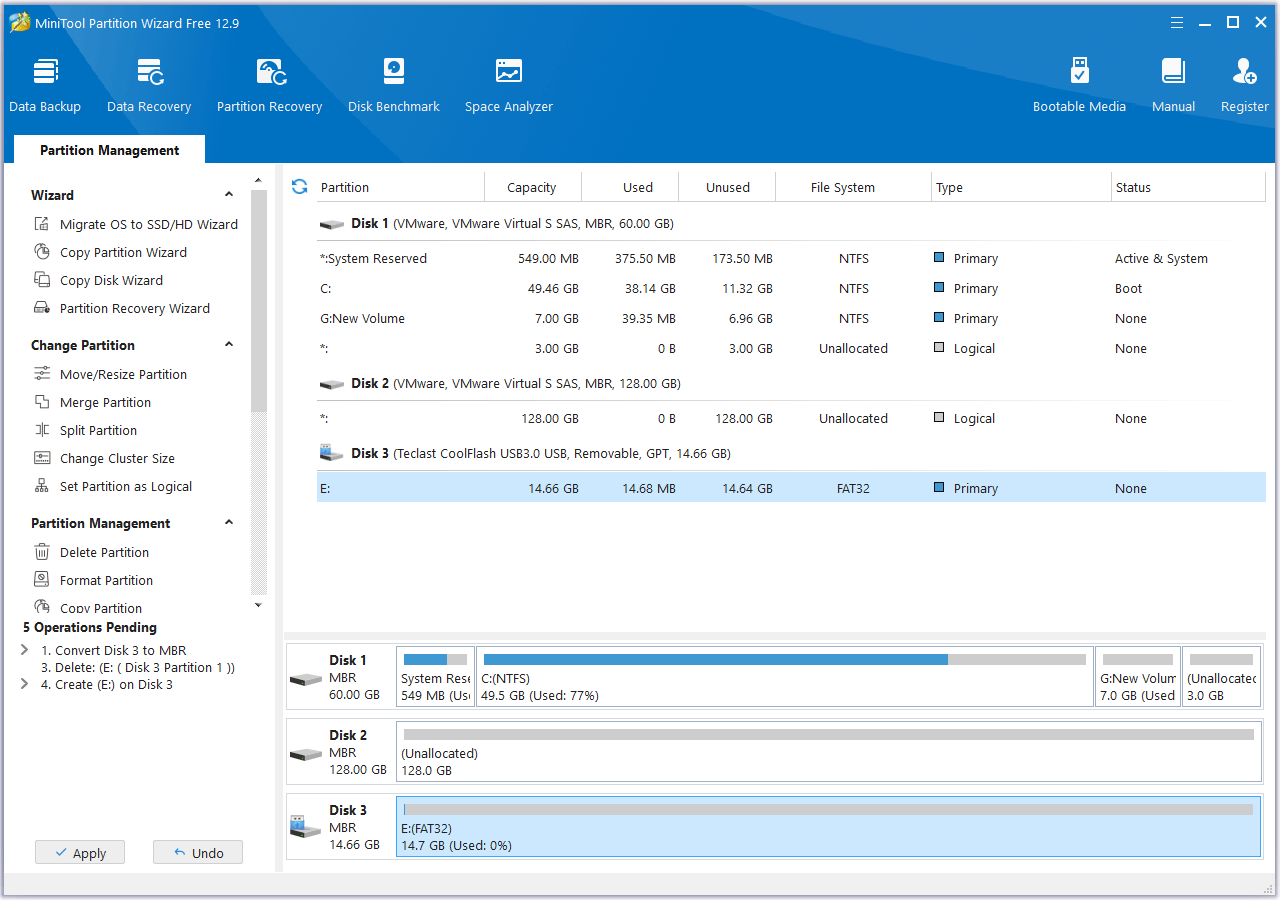
Step 4: Click the Apply button to execute the pending operations.
Reolink HDD Format Failed
If you encounter the Reolink HDD format failed issue, you need to check if the HDD meets the requirements and is installed correctly, and if the NVR firmware is up to date. Or, you can format the HDD to FAT32 to see if it works.
If all of the above ways don’t work, you should consider Reolink hard drive failure. Then, you need to replace the HDD.
Bottom Line
Do you want to upgrade or replace the Reolink hard drive? This post offers you a detailed guide. In addition, if the Reolink HDD format fails, you can use MiniTool Partition Wizard to format it to FAT32 to see if it works.
If you encounter issues when using this software, contact us via [email protected]. We will get back to you as soon as possible.

User Comments :