Can you remove all data on Synology NAS hard drive? How to perform Synology data deletion? If you want to get the answers, you can pay attention to this article from Partition Magic. It explains in detail how to erase all data from Synology NAS.
The Brief Introduction of Synology NAS
Synology NAS, also known as Synology Network Attached Storage, is a type of storage device created by Synology Inc. NAS devices are essentially dedicated file servers connected to a network, providing centralized storage and data management for multiple users and devices. Here are the key features of Synology NAS:
- Centralized Storage: Synology NAS devices provide a centralized location for storing files, which can be accessed by multiple users or devices over a local network or the Internet.
- User-friendly interface: Synology NAS devices come with DiskStation Manager (DSM), a powerful and intuitive operating system that provides a graphical interface for managing storage, backup, and applications.
- Scalability: Many Synology NAS models are designed to be scalable, allowing you to add more storage drives or expand capacity as your data needs grow.
- Data Protection: Synology NAS offers a variety of data protection features, including RAID configuration and backup solutions, to prevent data loss.
While devices like Synology NAS are great for data storage and backup, sometimes you need to completely delete the data on your Synology NAS for some special reason. Do you know how to do it? Just keep reading to get the details on how to wipe all data on Synology NAS.
How to Remove All Data on Synology NAS
When you want to sell your old NAS, or you want to reset your NAS or for other reasons, you may want to erase all data from Synology NAS. In any case, you want to wipe all data on Synology NAS hard drive. The following will teach you two methods on how to remove all the data on your Synology NAS without any possibility of recovering any data.
Way 1: Factory Reset Synology NAS
This method will remove all data on Synology NAS. If you have some important data on it, you’d better back up the data to another drive. To factory reset Synology NAS, the steps are as follows:
Step 1: Log into the DSM and open the Control Panel.
Step 2: Hit the Update & Restore icon, and click the Reset at the top part of the window.
Step 3: Click the Erase All Data button under the Factory Reset section. A warning message will come out: “Your data will be completely removed and the Synology NAS device will be restored to its default settings. Are you sure you want to continue?” You need to check the box I understand all my data will be deleted forever and unrecoverable. Then click Erase All Data.
Step 4: After that, a new screen will open and you will be prompted to type in your current admin password to continue. After you type in the admin password, all data on your Synology NAS device will be deleted forever and will be unrecoverable.
Step 5: Wait for the Synology NAS to reset. Once the reset is done, start the Synology Assistant to check the NAS status. It should show Not Installed.
Step 6: After confirming that the reset has been completed, the Synology NAS is ready for a fresh start. Set up the NAS just like how it was done the first time.
Way 2: Use MiniTool Partition Wizard (Recommend)
Performing a factory reset on Synology NAS does not mean a secure erase. Because all the data is stored on the hard drive. So, you should take the hard drive out of your Synology NAS, and then connect it to your PC to perform secure erase.
How to perform a secure erase of all the data on the Synology NAS hard drive? You can try MiniTool Partition Wizard. With this tool, you can wipe the disk data with a few clicks. Its Wipe Disk feature gives you 5 wiping methods. Different wiping methods cost different times and bring different security.
In addition to the Wipe Disk feature, you can use it to partition hard drive, clone hard drive, check hard drive health, convert FAT32 to NTFS without data loss, rebuild MBR, etc.
MiniTool Partition Wizard FreeClick to Download100%Clean & Safe
To completely wipe all data on Synology NAS hard drive with MiniTool Partition Wizard, you can follow the detailed steps below.
Step 1: Connect the Synology NAS hard drive to your computer and then launch MiniTool Partition Wizard to get into the main interface.
Step 2: Right-click the disk you want to wipe then select Wipe Disk. Or you can highlight the target disk and select Wipe Disk from the left action panel.
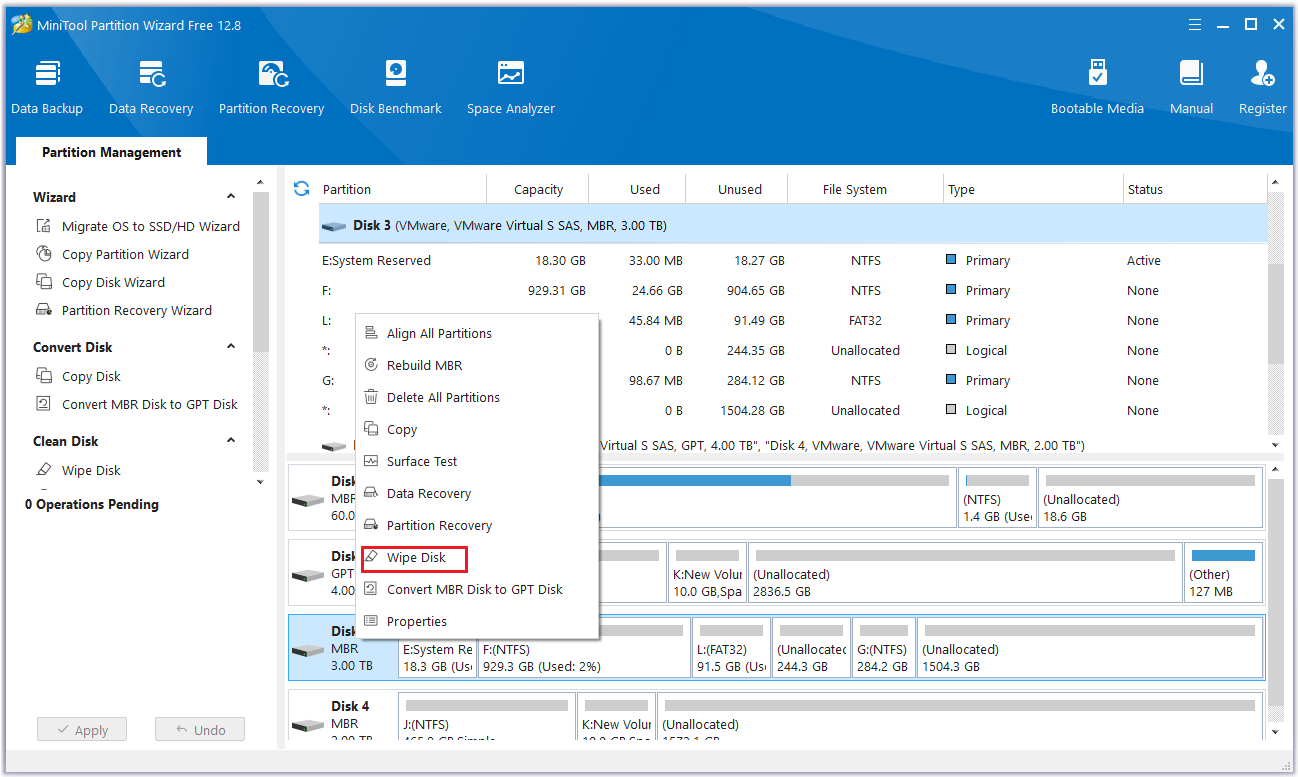
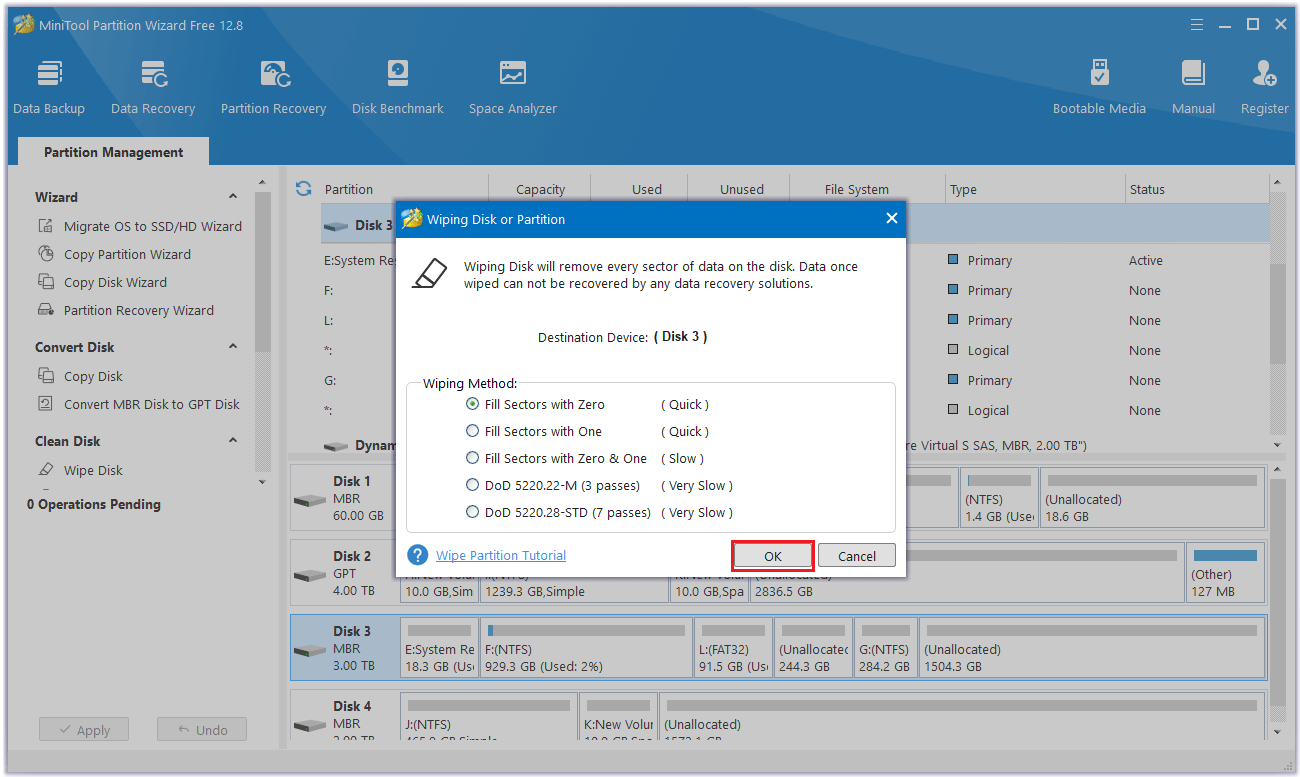
Step 3: In the pop-up window, select a preferred wiping method and click OK to continue.
- Fill Sectors with Zero and Fill Sectors with One: They just write the same code to the partition, which is similar to the full format in Windows.
- Fill Sectors with Zero & One: It will randomly write zeros and ones to partition, which makes data more unrecoverable.
- DoD 5220.22-M (3 passes): It is recommended if users want to get rid of the data permanently.
- DoD 5220.28-STD (7 passes): It provides a higher security level for data because it has more passes than DoD 5220.22-M (3 passes).
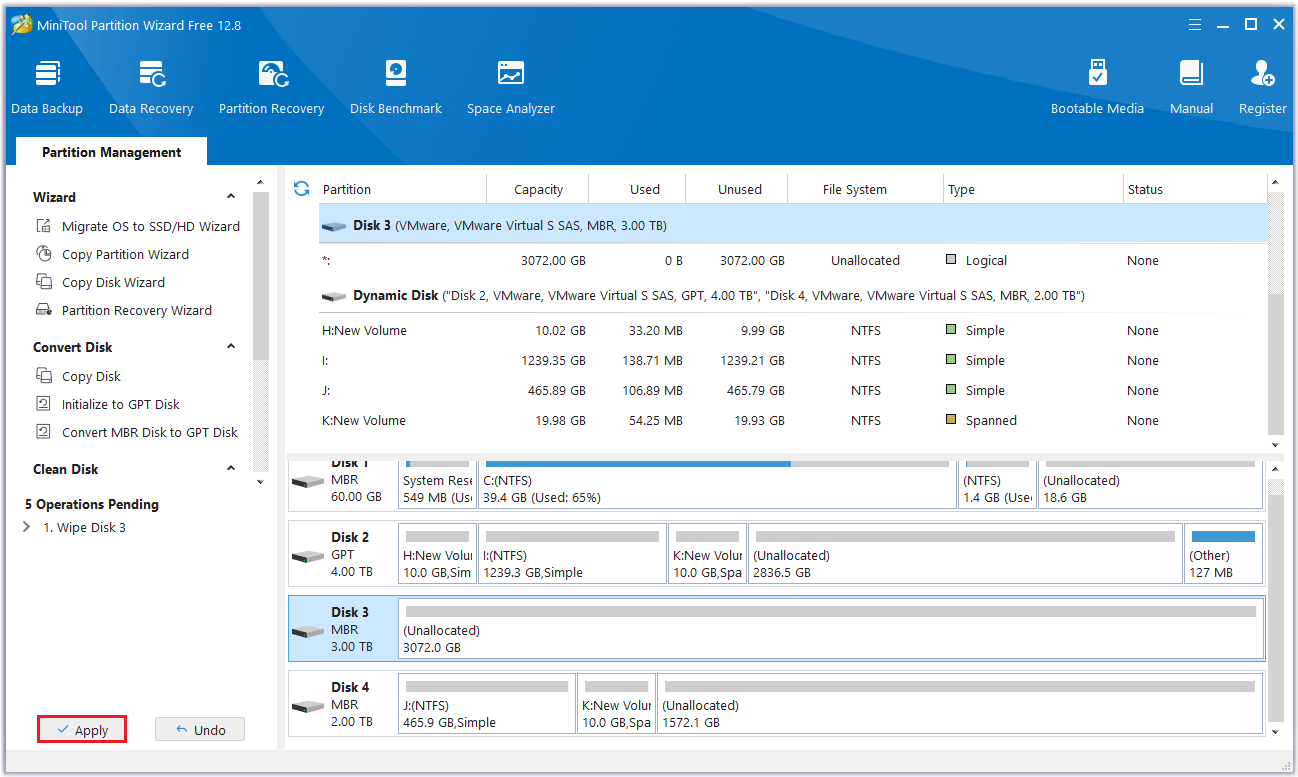
Step 4: Click Apply to execute the pending operation.
Bottom Line
This article introduces 2 ways to wipe all data on Synology NAS. You can try factory reset to remove all data on Synology NAS. But I highly recommend you try MiniTool Partition Wizard to secure erase the data.
If you have any questions or suggestions while using MiniTool Partition Wizard, you can contact us via [email protected] to get a quick reply.
About The Author

Position: Columnist
Cecilia is a new member of MiniTool. She works as an English editor on the MiniTool team. She likes to learn articles about computers and is passionate about partition management and Windows operating systems. She is committed to allowing readers to use simple, efficient, and fast methods to solve the computer problems they encounter. To provide more professional solutions, she will continue to learn and master computer knowledge.
User Comments :