PowerShell is a powerful graphical user interface that can access various services of an operating system as an administrator via command lines. This tool can be used to deal with many different works such as copy file PowerShell, connect to exchange online, shut down/restart a remote computer, and Windows update PowerShell.
When it comes to installing Windows update on Windows 10/11/8/7, most of us may want to use the Windows Update Settings feature. Sometimes, however, the Windows Updates may be stuck at downloading or some error codes.
If you want to run a custom script to automate the installation or patch a new installation, you can perform the PowerShell Windows update cmdlets with PSWindowsUpdate. How to install/manage Windows update PowerShell on Windows 10/11? Let’s keep reading.
What Is PSWindowsUpdate
When it comes to PowerShell Windows update install and management, it’s inevitable to discuss the PSWindowsUpdate module. It is an important module that can help you install or manage Windows updates from the PowerShell command lines.
In addition, it allows an administrator to remotely check, install, hide, and remove Windows updates using PowerShell on Windows servers and workstations. It is a community module by Michal Gajda and available for installation from the PowerShell Gallery repository. So, it is not built into Windows.
How to Install/Manage Windows Updates with PowerShell
In this part, you will learn how to install Windows updates PowerShell on Windows 10/11. Besides, it also introduces other useful information related to PowerShell Windows updates, including PSWindowsUpdate install, PowerShell check for Windows updates, PowerShell Windows updates remove, etc. Let’s start exploring.
# 1. Install the PSWindowsUpdate Module
As discussed above, the PSWindowsUpdate module is necessary to make PowerShell install Windows updates. Since it is not built into Windows, you need to install it from the PowerShell Gallery. Here you can install it on Windows 10/11 and Windows Server 2022/2019/2016 via the PowerShell PackageManagement. For that:
Step 1. Right-click the Windows menu at the left button of your screen and select Windows PowerShell (Admin), and click on Yes to confirm it.
Step 2. In the elevated PowerShell window, type the following command and hit Enter to start installing PSWindowsUpdate.
Installing the thSWindowsUpdate module requires to use the TLS 1.2 protocol for connection. To enable it for PowerShell, you can run the [Net.ServicePointManager]::SecurityProtocol = [Net.SecurityProtocolType]::Tls12 command.
Install-Module -Name PSWindowsUpdate -Force

Step 3. Once installed, run the following command to check the package.
Get-Package -Name PSWindowsUpdate

Step 4. You can run the following command to show the list of available command lines in the PSWindowsUpdate module.
get-command -module PSWindowsUpdate
# 2. List All Available Windows Updates with PowerShell
Before you PowerShell install Windows updates, you can check all available Windows updates for your current computer by running the Get-WindowsUpdate or Get-WUList command in the elevated PowerShell window.

If you want to list all available updates on a remote computer, you can run Get-WUList –ComputerName server2 command.
# 3. Install All Available Windows Updates with PowerShell
Now, you can automatically download and install all available Windows updates PowerShell from the Windows Update servers. To do this work, open the elevated PowerShell window as we explain above and run the following command.
Install-WindowsUpdate -MicrosoftUpdate -AcceptAll -AutoReboot
or
Get-WindowsUpdate -AcceptAll -Install -AutoReboot
After running the command, Windows 10/11 should download and install Windows Updates and automatically reboot the computer to apply these changes.

# 4. Install Specific Windows Updates with PowerShell
Sometimes, you may want to install specific Windows updates instead of all of them. In this case, you can open the elevated PowerShell window, type the following command, hit Enter, type A, and hit Enter.
Here you need to replace KB5017308 with the KB name of the update you want to install.
Get-WindowsUpdate -Install -KBArticleID KB5017308

# 5. Check the Windows Updates Installed History with PowerShell
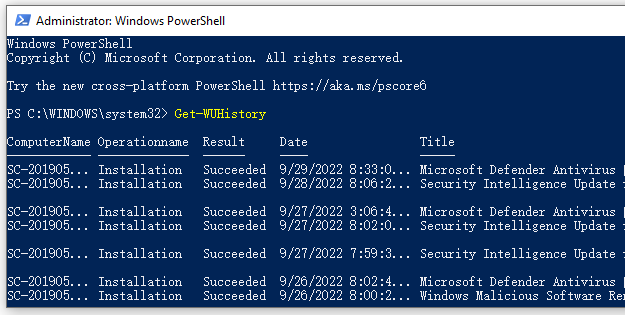
You may want to check the Windows update history with PowerShell. To do so, you can open the PowerShell window and run the Get-WUHistory command. Then you will get a list of Windows updates you installed on the computer earlier.

# 6. Remove Specific Windows Updates with PowerShell
Sometimes you may want to remove recently installed Windows updates due to some reasons such as Windows 10 keeps instilling the same updates over and over. In this case, you can run the following command and just specify the KB number as the one you want to remove from Windows 10/11.
Remove-WindowsUpdate -KBArticleID KB5017308 -NoRestart
Also, you can hide a specific Windows update so that it will be never installed by the Windows Update server on your computer. For example, you can run the following commands to hide the KB5017308 update.
- $HideList = “KB5017308”
- Get-WindowsUpdate -KBArticleID $HideList –Hide

If you want to unhide the update later, you can run the following command:
Show-WindowsUpdate -KBArticleID $HideList
Further reading: If you can’t install the Windows Updates with PowerShell due to insufficient disk space, don’t worry. MiniTool Partition Wizard can help you fix the problem easily by analyzing disk space, extending partition, upgrading to a larger hard drive, etc.


User Comments :