Recently, some users report that they are unable to print PDFs on their Windows 10 devices. This could be a frustrating problem for users who prefer sending files in PDF format. If you are facing the “PDF won’t print” problem, you are at the right place. Here, MiniTool Partition Wizard puts together several methods you can try to get rid of the issue.
PDF is one of the most popular file formats commonly used in the workplace. Files in PDF format are independent of the operating system, hardware, and application used to create them. By using this format, you can transfer your files across multiple computer platforms without worrying about the files’ layout and look are changed.
However, some users encounter certain problems while printing PDF files on Windows 10 devices. When they click Print on Adobe, the printer is not responding and they got no error messages. If your PDF won’t print, perhaps it has something to do with your printer, the PDF files, or the Acrobat Reader application.
If you are sure your printer is connected to your computer properly, you may fix the problem by using the following solutions. But before that, you can do some simple test:
- Restart your printer and try again.
- Print this post you are viewing. Just click the three-dot icon and choose Print. If you cannot print this post either, the cause of the problem should be your printer.
- Open the PDF file in your web browser and print it in the browser. If the file can be printed here, the culprit might be the Acrobat Reader application. If not, the PDF file itself might be corrupted.
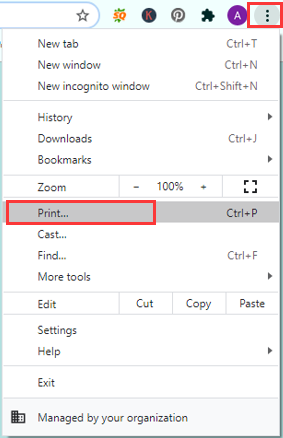
After figuring out the reason for the “PDF won’t print” problem, you can follow the tutorial to fix the problem.
Fix 1: Set Your Printer as The Default Device
At first, you need to make sure your printer is set as the default device. Here’s what you should do.
Step 1: Press Windows + S, input control panel, and click the search result to open it.
Step 2: Choose to view by Category and navigate to Hardware and Sound > Devices and Printers.
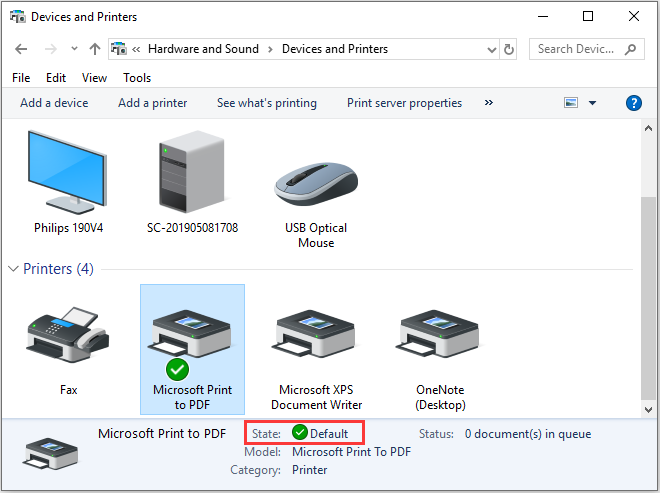
Step 3: Check if there is a green mark with your printer which means its state is Default. If not, please right-click the printer and choose the Set as default printer option.
If you're looking for a user-friendly and feature-rich PDF editor, I highly recommend downloading and trying out MiniTool PDF Editor.
Fix 2: Update Printer Driver
Besides, the outdated or corrupted printer driver could also lead to various printer issues like “PDF won’t printer”. If you can’t print PDF files, updating the printer driver could be helpful.
Step 1: Right-click the Start button and choose Device Manager.
Step 2: Expand the Print queues category, right-click your printer driver, and choose Update driver.
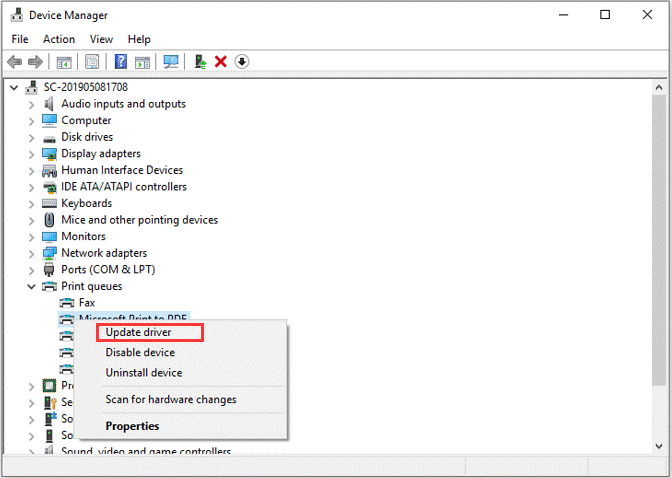
Step 3: In the pop-up window, choose Search automatically for updated driver software to proceed and follow the on-screen instructions to complete the process.
Once it’s done, restart your computer and check if you can print the PDF file now.
Fix 3: Troubleshoot the PDF File Problem
If your printer won’t print PDF files, perhaps the file to be printed is corrupted. In this case, you need to take some measures to troubleshoot the PDF file issue. Just as follows:
a) Copy or download the PDF file again directly to your hard drive.
If you get the PDF file from others or the website, you can download it again and save it directly to the hard drive of your Windows 10 device, instead of a network drive or a connected USB drive. You can also open it in Acrobat Reader and click File > Save as to save it directly to the hard drive and print the new PDF file.
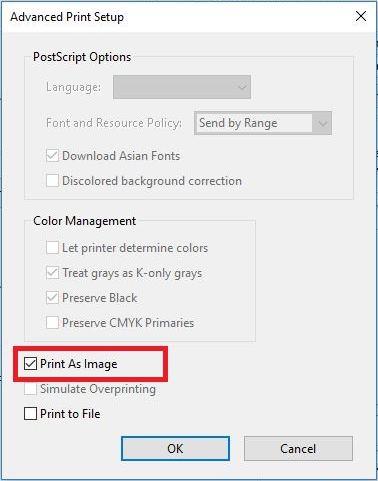
b) Choose to print as an image.
Open the target PDF file in your Acrobat Reader and click File > Print > Advanced. In the Advanced Print Setup dialog, check Print As Image and click OK to save changes. Then, click Print to see if the PDF file can be printed.
Fix 4: Reinstall Your Acrobat Reader
As mentioned before, if you are unable to print PDFs, the Acrobat Reader application could be one of the possible reasons. You can reinstall it to fix the problem.
Just press Windows + I to open Settings and go to Apps > Apps & features. Select your Acrobat Reader, click Uninstall, and confirm the operation. Then, visit the official website of Adobe Reader to get the latest version of it and install it properly on your computer.
To get further information about uninstalling software in Windows, you can refer to this article.


User Comments :