Why Is My Computer Stuttering Windows 10/11
PC stuttering is a common computer issue that can happen due to various reasons. Here, we summarize the main reasons as follows:
- Outdated device drivers
- Improper application settings
- Virus infection
- Too many tasks running in the background
- Corrupted system files
- Hardware issues
Since you know “why is my computer stuttering”, you can now follow the methods below to fix this issue.
How to Fix Computer Stuttering Windows 10/11
There are several methods available to fix PC stuttering. If you encounter this issue, you can take a look at this section.
Method 1: Disable and then Re-enable the CD/DVD Drive
If there is a CD/DVD drive inserted into your PC, you can try disabling and re-enabling it to see if the PC stuttering Windows 10/11 is solved.
Step 1: Right-click the Start icon and select Device Manager.
Step 2: In Device Manager, find and expand CD/DVD ROM drives.
Step 3: Right-click the CD/DVD drive and select Disable device. Click Yes in the prompted window.
Step 4: Restart Device Manager. Then right-click the CD/DVD drive and select Enable device.
Method 2: Close Unneeded Background Tasks
Your PC will stutter if too many programs are running in the background. To solve this issue, you should close all the unnecessary background tasks. You can open Task Manager, right-click the unwanted processes and then click End task to close them one by one.
Method 3: Uninstall the Problematic Applications
If PC stuttering Windows 11/10 happens after you install certain applications on your PC, that may indicate there are software conflicts. In this case, you can try to fix this issue by uninstalling the recently installed apps that may cause computer stuttering. Here’s a useful guide for you: How to Uninstall Programs on Windows 10? Here Are Methods
Method 4: Change the Power Management Settings
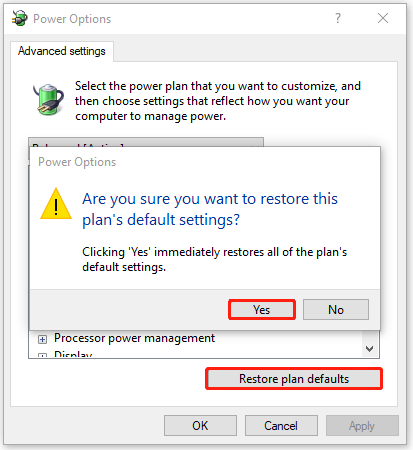
In some cases, you can fix PC stuttering by changing the Power Management settings to default.
Step 1: Open Control Panel and then go to Hardware and Sound > Power Options.
Step 2: After that, click Change plan settings > Change advanced power settings.
Step 3: In the prompted window, click Restore plan defaults. Then click Yes to confirm.

Method 5: Disable Notifications and Action Center
Another possible solution to computer stuttering is to disable Notifications and Action Center. When you are stuck in this issue, you can have a try with the detailed guide: How to Disable Action Center Windows 10? [Complete Guide].
Method 6: Disable Wallpaper Slideshow
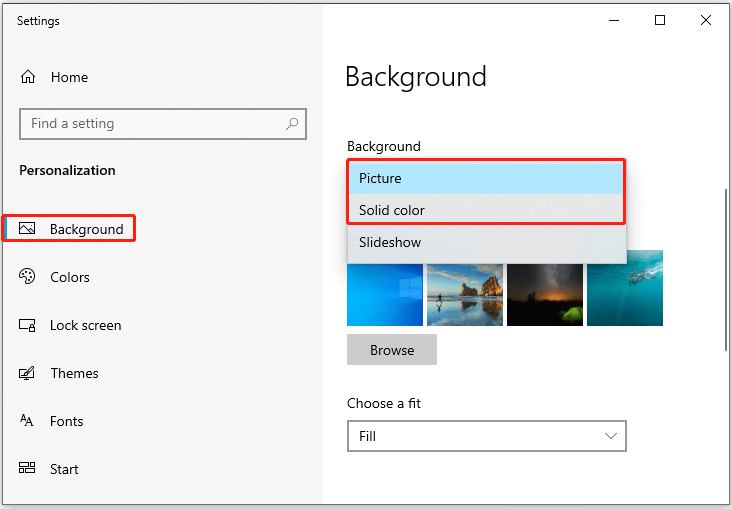
Disabling wallpaper slideshow may help you fix PC stuttering Windows 11/10 as well.
Step 1: Right-click an empty space on your desktop. Then select Personalize.
Step 2: Go to the Storage tab. Then change Slideshow to Picture or Solid color on the right side.

Method 7: Perform a Virus Scan
Viruses or malware in your system may lead to PC stuttering as well. So, to fix this issue, it’s important to perform a virus scan via Windows Defender. You can follow this guide: How to Run Windows Defender Full/Quick/Custom/Offline Scan.
Method 8: Run the SFC Scan
If some of the system files get corrupted or missing, you may also experience PC stuttering Windows 10/11. In this case, it’s recommended that you perform an SFC scan. To carry out this operation, you can follow the steps below.
Step 1: Press Windows + R to open the Run dialog.
Step 2: Type cmd in the text box and then press Ctrl + Shift + Enter to open Command Prompt as an administrator.
Step 3: After that, type sfc /scannow and press Enter.
Method 9: Update Your Graphics Driver
The outdated graphics driver on your PC is a common reason for computer stuttering Windows 10. Therefore, you can try to solve this issue by updating your graphics driver as well. Here’s a step-by-step guide for you: How to Update Graphics Card Drivers (NVIDIA/AMD/Intel)?
Method 10: Free Up Disk Space
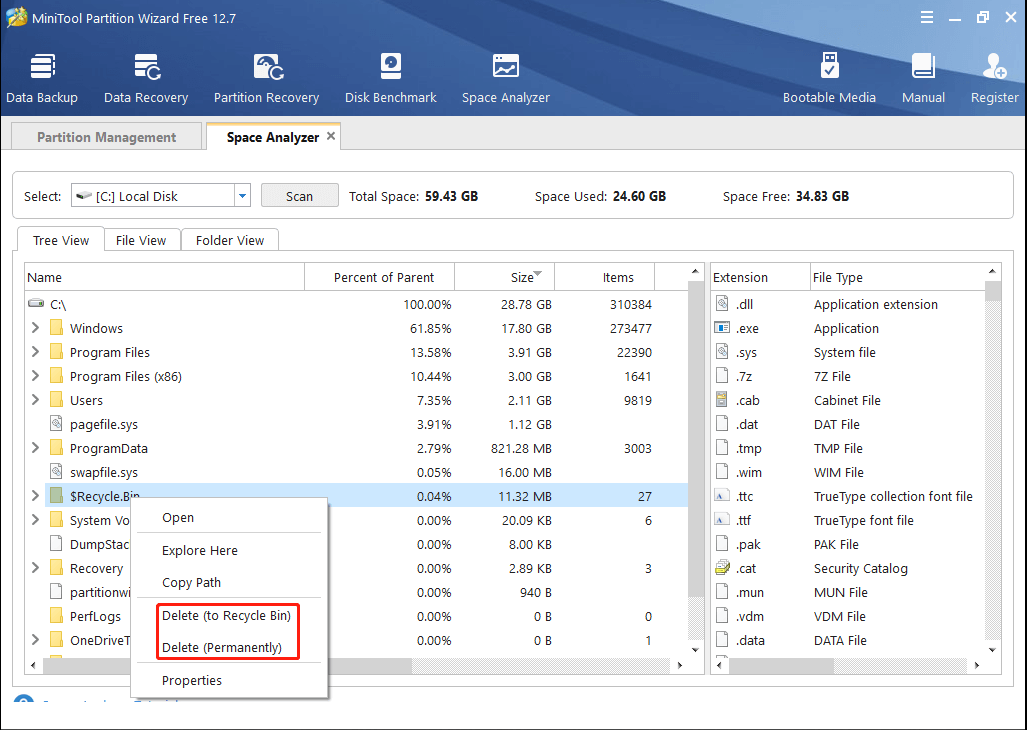
If your disk is full, you are likely to suffer from PC stuttering Windows 11/10. To get rid of this issue, you’d better free up your disk space. Many ways can help you execute the operation Here, we recommend you use MiniTool Partition Wizard. It’s a professional and secure partition manager that can help you check your disk usage and decide which files or folders to delete for more free space.
Step 1: Install and launch MiniTool Partition Wizard. Then select Space Analyzer at the top toolbar.
MiniTool Partition Wizard FreeClick to Download100%Clean & Safe
Step 2: Select the drive to get more free space and then click Scan.
Step 3: After the scan finishes, right-click the space-consuming and useless files or folders and then select Delete (to Recycle)/Delete (Permanently).

You can learn the main causes and fixes for PC stuttering Windows 10/11 from this post. If you have any other great solutions to this issue, you can share them with us in our comment part.

User Comments :