OpenCL.dll missing is one of the most common DLL errors for users. It might occur when you are trying to launch a program or start your Windows PC. In this guide, MiniTool software puts together some proven methods to help you deal with this issue.
About OpenCL.dll Missing Error
OpenCL.dll is called OpenCL Client DLL. It is a part of OpenCL ICD (Installable Client Driver) program which is developed by Khronos Grouop.
OpenCl.dll is an important file needed by plenty of applications or games. If OpenCL.dll is missing, you might experience various problems while using these programs, and even get an error while trying to launch your computer.
You might get various error messages when OpenCL.dll missing error occurs, and here are some common ones:
- dll is missing
- dll error loading
- dll crash
- dll was not found
- the procedure entry point OpenCL.dll
- dll could not be located
- dll Access Violation
- Cannot find OpenCL.dll
- Cannot register OpenCL.dll
Don’t worry. This error is easy to fix. You can feel free to try these fixes listed below.
Fix 1: Copy OpenCL.Dll File from Another PC
The most direct method to fix DLL file missing error is copying the missing file from another trusted resource. But you have to make sure the computer is of the same version as yours.
If you are using 32-bit version of Windows, copy from and paste to both C:WindowsSystem32 directory. If you are using 64-bit version, the OpenCL.dll should be in the path of C:WindowsSysWOW64.
After you get the new OpenCL file, you need to register it. Just follow the steps below to complete the operation.
Step 1: Right-click the Start button and choose Windows PowerShell (Admin) to run this tool as administrator.
Step 2: Input regsvr32 opencl.dll and press Enter to execute the command.
Now, you can check if OpenCL.dll not found error is fixed.
Fix 2: Update Graphics Card Driver
Actually, the OpenCL.dll file is related to the graphics card. If your graphics card driver is outdated, you might receive OpenCL.dll missing error as well. Here’s how to update your driver.
Step 1: Press Windows + X to open Start menu, and choose Device Manager to open it.
Step 2: Under Display adapters category, right-click your graphics card driver and select choose Update driver.
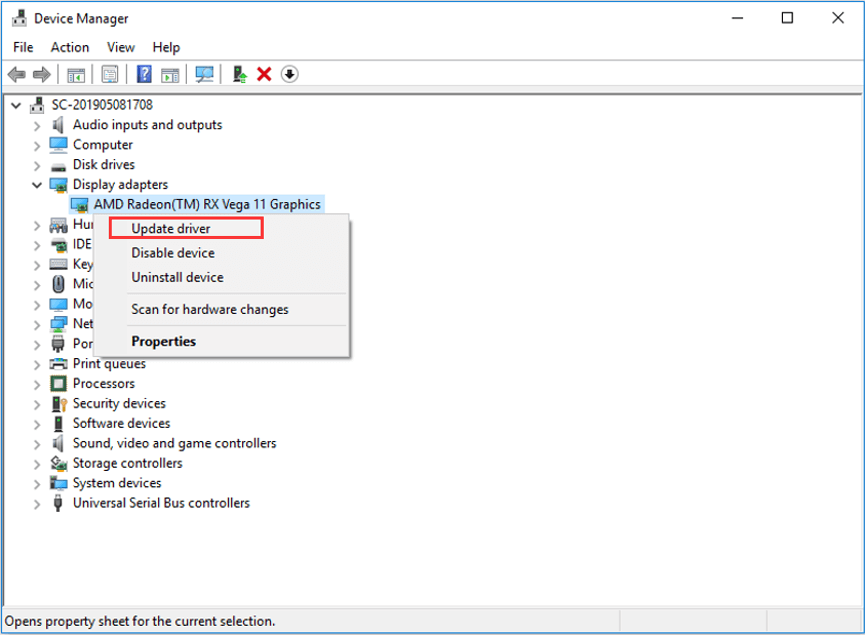
Step 3: When you get a pop-up window, choose Search automatically for updated driver software to continue.
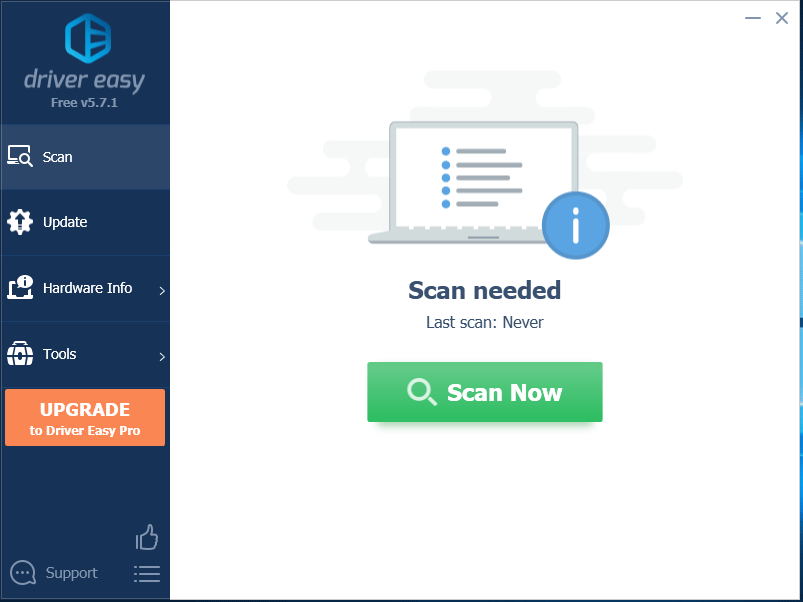
Then, you just need to follow the onscreen prompts to finish the process. Of course, you can also use third-party software like Driver Easy Pro to detect problematical drivers, and then search, download, and install the latest driver version with just one click. Here is the guide:
Step 1: Install Driver Easy and launch it. Click the Scan Now button.
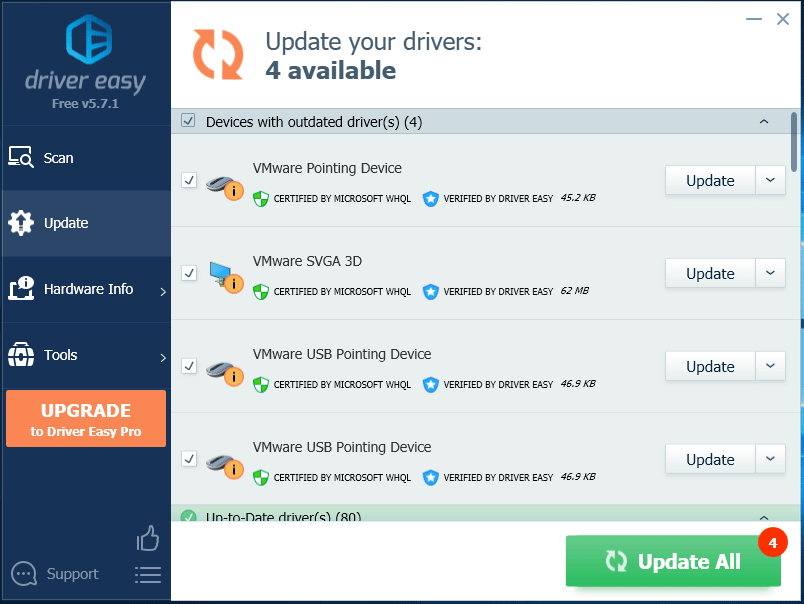
Step 2: After the scanning process is completed, click the Update All button to download and install the latest drivers for all devices with outdated drivers.
Fix 3: Reinstall Graphics Card Driver
If OpenCL.dll issue still exists after updating graphic driver, you can also try reinstalling them.
Step 1: In Device Manager, right-click your graphic driver and choose Uninstall device.
Step 2: A confirmation window will appear. If Remove driver software for this device option is available here, check it. And then, click Uninstall button to continue.
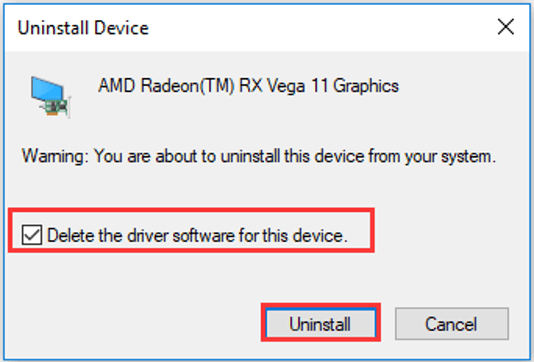
Step 3: After uninstalling your graphics card drivers, restart your computer. Your Windows will check and reinstall the missing driver automatically.
Now, the OpenCL.dll missing error should have been resolved if it is caused by your graphics card drivers.
Fix 4: Reinstall the Problematic Program
If you receive OpenCL.dll not found error only when you are trying to launch a certain program, you can do as the error message indicates: Try reinstalling the program to fix the problem.
Step 1: Open Run dialog, input appwiz.cpl and click OK.
Step 2: Select the program that is giving the error and click Uninstall button.
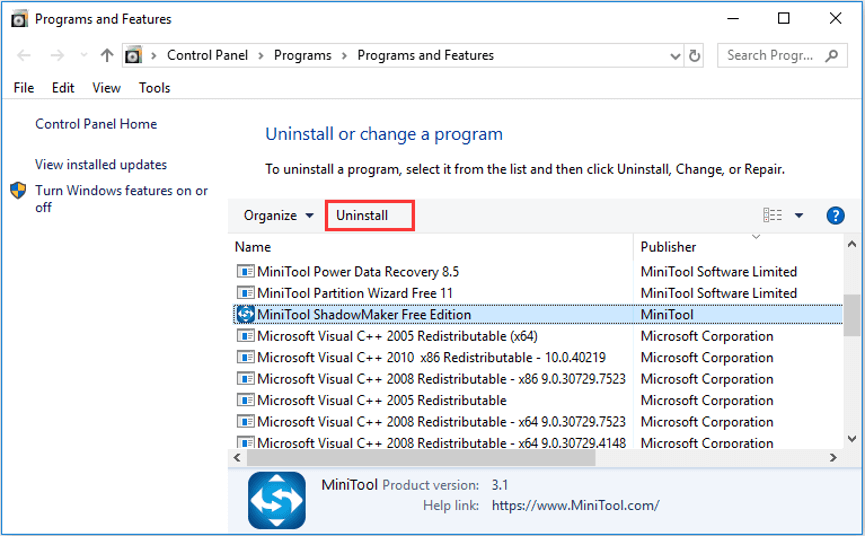
Step 3: Click Yes to confirm the uninstallation.
Step 4: Restart your computer and reinstall the program.
Now, you should be able to launch this program without receiving OpenCL.dll error.
Fix 5: Keep Your Windows Updated
The OpenCL.dll missing might be a bug of your Windows computer. So, you can try updating your Windows to the latest version to fix this problem.
Step 1: Press Windows + I to open Settings.
Step 2: Go to Update & Security > Windows Update.
Step 3: Click Check for updates from the right pane.
Then, you Windows will check and download the available updates. You need to restart your computer to install these updates.
Fix 6: Use Windows ISO File
If you have Windows 10 Image file (ISO file) of the exact build you are using, there is a more advanced solution for you.
Step 1: In Run window, input cmd and press Ctrl + Shift + Enter to open Command Prompt as administrator.
Step 2: Input the command mkdir C:WIM and press Enter to create a temporary directory to mount Windows Image file.
Step 3: Input the command line Dism /Mount-Wim /WimFile:D:sourcesinstall.wim /index:1 /MountDir:C:WIM /ReadOnly and press Enter to mount the file.
Step 4: Now, run DISM command and don’t forget to press Enter: Dism /Online /Cleanup-Image /RestoreHealth /Source:C:WIMWindows /LimitAccess
Step 5: Execute the command Dism /Unmount-Wim /MountDir:C:WIM /Discard to unmount the file and the command rmdir C:WIM to delete the folder created just now.
After that, restart your computer and check if OpenCL.dll not found issue has been removed.
Alternative Methods
According to the reports of users on the forum, there are some other useful methods to fix OpenCL error. If all the solutions introduced above fail to fix the error, you can try the following recommended ways.
- Use System File Checker (SFC).
- Perform System restore.
- Scan your computer for virus and malware.
- Download the latest OpenCL runtime package and install it on your computer.

User Comments :