When you are trying to boot up your computer, the system will check the HDD/SSD for boot information and other operating system information in order to boot successfully. However, if the computer cannot find any boot information or operating system on the HDD/SSD, the error: no boot disk has been detected or the disk has failed may appear on your screen.
There are some possible factors that may cause the “no boot disk has been detected or the disk has failed” issue:
- Improper hard disk connection to PC
- Incorrect boot order settings
- Missing operating system from the HDD/SSD
- Hard disk failure
- Corrupt Boot Configuration Data (BCD)
To fix the issue, you should check the hard disk connection first to make sure it is connected to your PC properly. Please be careful while operating in case you damage certain hardware. If you are not sure about how to connect a hard drive properly, you can ask professors for help as well.
If the error still persists, then you are supposed to try the following solutions.
Solution 1: Change Computer’s Boot Order in BIOS
If you don’t set the HDD/SSD boot disk at the top of the computer’s boot order, the computer will try to boot from another disk and find no valid boot information. As a result, you will fail to boot up your computer with the error message “no boot disk has been detected or the disk has failed” showing up on the screen.
Faced with this situation, you should change the computer’s boot order in BIOS.
Step 1: Power on your computer.
Step 2: Press F2 on the keyboard quickly to enter the setup utility.
Step 3: Go to the Boot tab. Then select your HDD/SSD boot disk and move it to the top according to the helpful instructions at the bottom or from the right side.
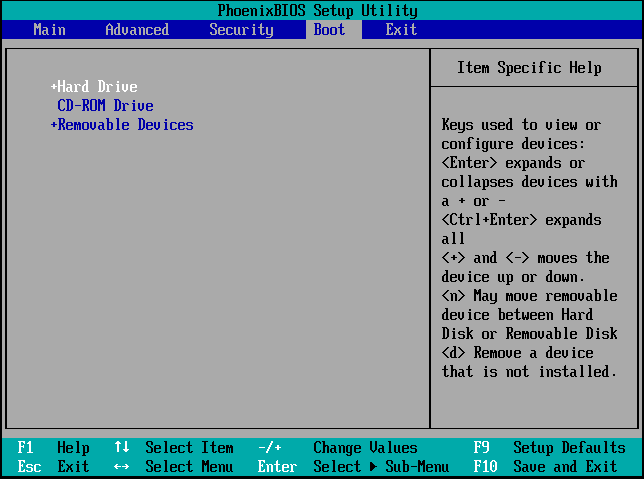
Step 4: Once you manage to change the order, press F10 to save your changes and exit the setup utility.
After that, your computer will restart automatically from the correct boot disk. If the issue is not resolved in this way, you should continue with the next solution.
Solution 2: Run Automatic Repair/Startup Repair
You can also fix the “no boot disk has been detected or the disk has failed” issue by performing automatic repair or startup repair in Windows RE (Recovery Environment). To enter Windows RE, you can use Windows installation media. Alternatively, just follow the steps below.
Step 1: Turn off your computer, and then press the Power button to turn it on. As soon as the screen lights up, hold the Power button again to turn off the computer.
Step 2: Repeat the action of turning on and turning off your computer several times until a blue screen with Recovery appears.
Step 3: Click the See advanced repair options button, and then select the Troubleshoot option in the next window that shows Choose an option.
Step 4: Finally, go to Advanced Options > Startup Repair or Automatic Repair.
Wait until the repair is completed, and then restart your computer to see if the boot device has not been detected issue is resolved.
Solution 3: Run the SFC Scan
The SFC (System File Checker) scan is a built-in Windows utility that may help you to fix the “no boot disk has been detected or the disk has failed” caused by corrupted system files.
To run the scan, follow the steps below.
Step 1: Enter the Windows RE by following the first two steps shown in Solution 2.
Step 2: Click the See advanced repair options button, and then go to Troubleshoot > Advanced Options > Command Prompt.
Step 3: In the Command Prompt panel, type sfc/scannow and then press Enter to execute the command.
Your Windows will start to scan corrupted system files in the system and repair them automatically. Exist Command Prompt after the scan is accomplished and restart your computer. You may find that the “boot device has not been detected” disappears and you can boot your Windows normally.
Solution 4: Run CHKDSK
The error: no boot disk has been detected or the disk has failed possibly comes out if there is something wrong with your system hard drive. In this case, you are supposed to run the CHKDSK tool to repair the error.
Step 1: Enter Command Prompt in Windows RE.
Step 2: In the Command Prompt panel, type chkdsk c: /f and press Enter to carry out the command.
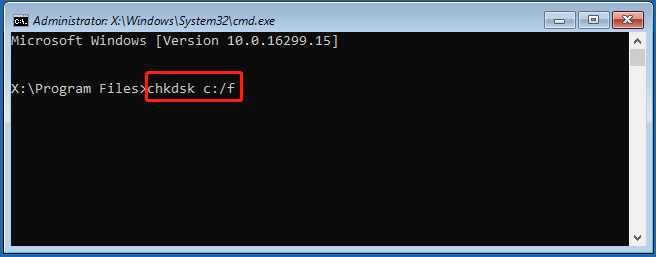
After that, restart your computer and the “no boot disk has been detected or the disk has failed” error might be repaired.
Solution 5: Check File System Through MiniTool Partition Wizard
MiniTool Partition Wizard is a comprehensive partition management program that can help you manage disks and partitions efficiently. For example, you can format partitions, copy disks, and do other things with MiniTool Partition Wizard.
MiniTool Partition Wizard can also help you fix the “no boot disk has been detected or the disk has failed” by checking file system. It is an alternative solution to Solution 4.
The operation can be divided into two parts.
Part 1: Create a Bootable USB Flash Drive
First, you need to build a bootable USB flash drive with MiniTool Bootable Media Builder on another computer. So, you can boot your computer with bootable media and check the file system later.
Step 1: Connect your USB flash drive to a computer that can run normally.
Step 2: Download and install MiniTool Partition Wizard first. And then launch it to enter the main interface.
MiniTool Partition Wizard DemoClick to Download100%Clean & Safe
Step 3: To build a bootable USB flash drive, click the Bootable Media feature in the top-right corner.
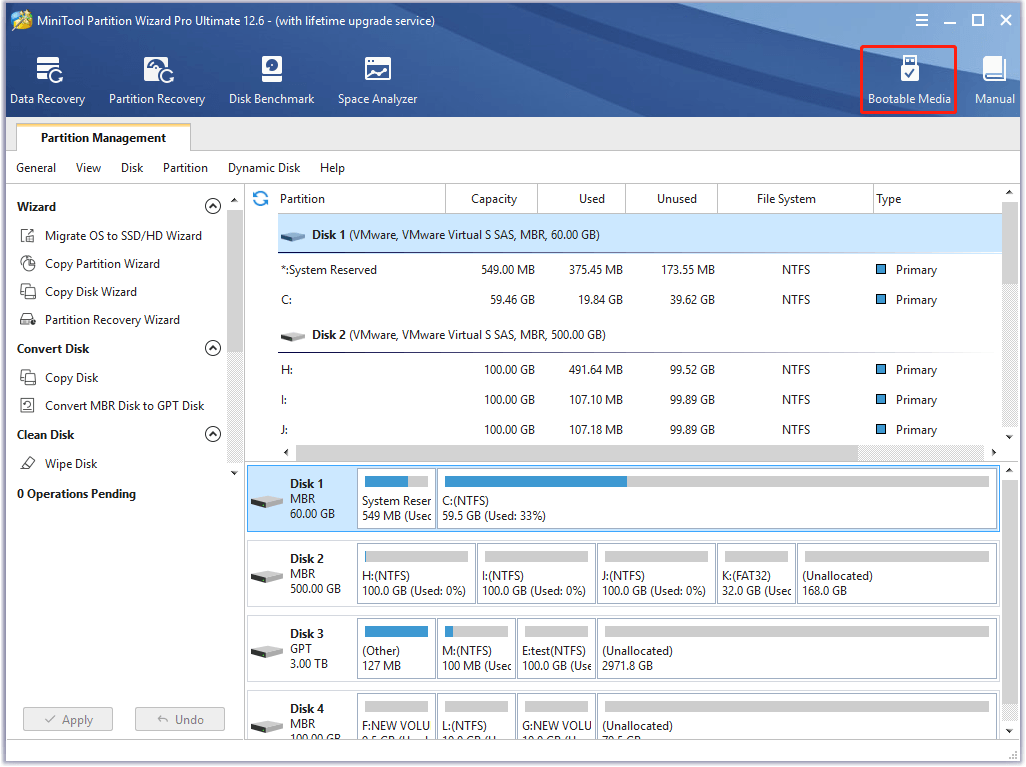
Step 4: Click WinPE-based media with MiniTool plug-in to go on.
Step 5: In the next window, check the USB Flash Disk and then click Yes to continue when there is a warning saying that the data on the USB flash drive will be destroyed.
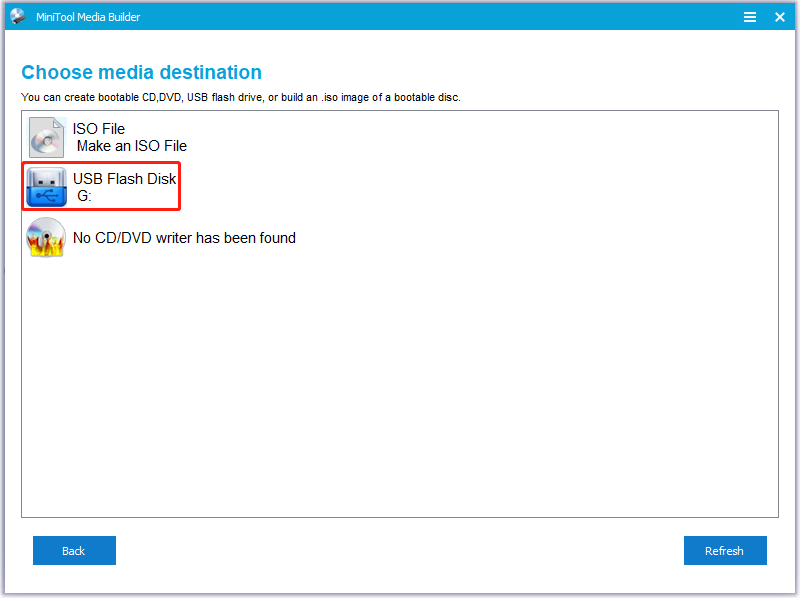
Step 6: Wait a moment until the MiniTool Bootable Media Builder finishes to build the bootable USB disk. Finally, click Finish.
Part 2: Check File System
With the bootable USB drive, you can boot your computer and check the file system.
Step 1: Boot your computer from the bootable USB drive.
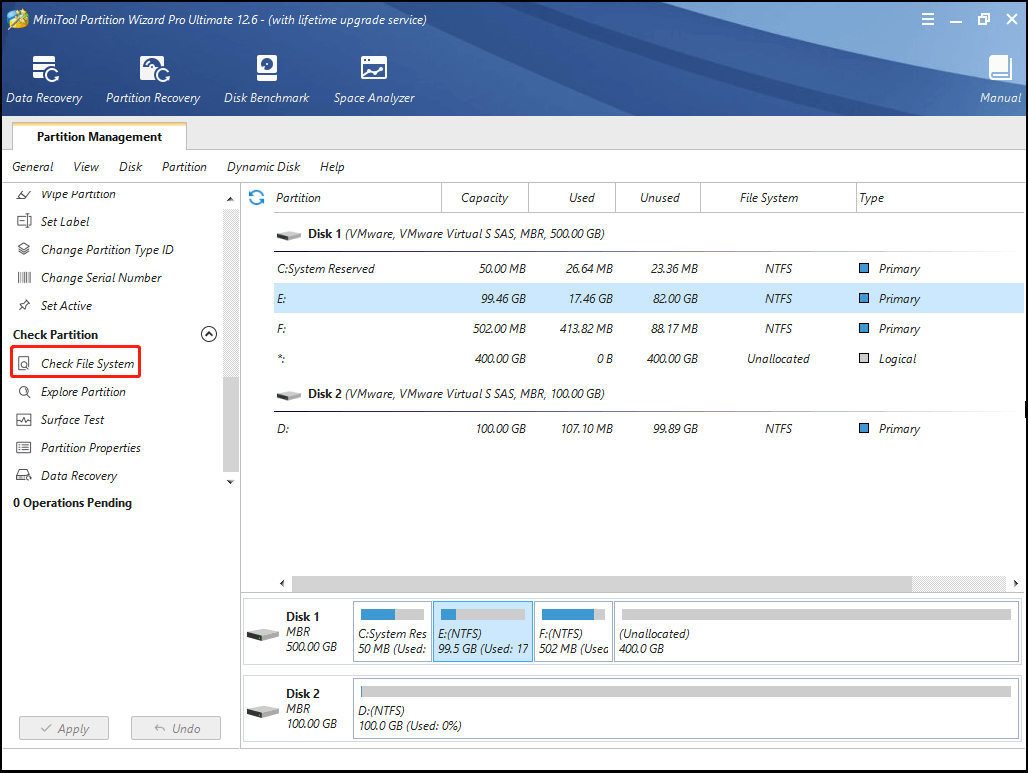
Step 2: Select the boot partition and choose the Check File System feature in the left action panel.
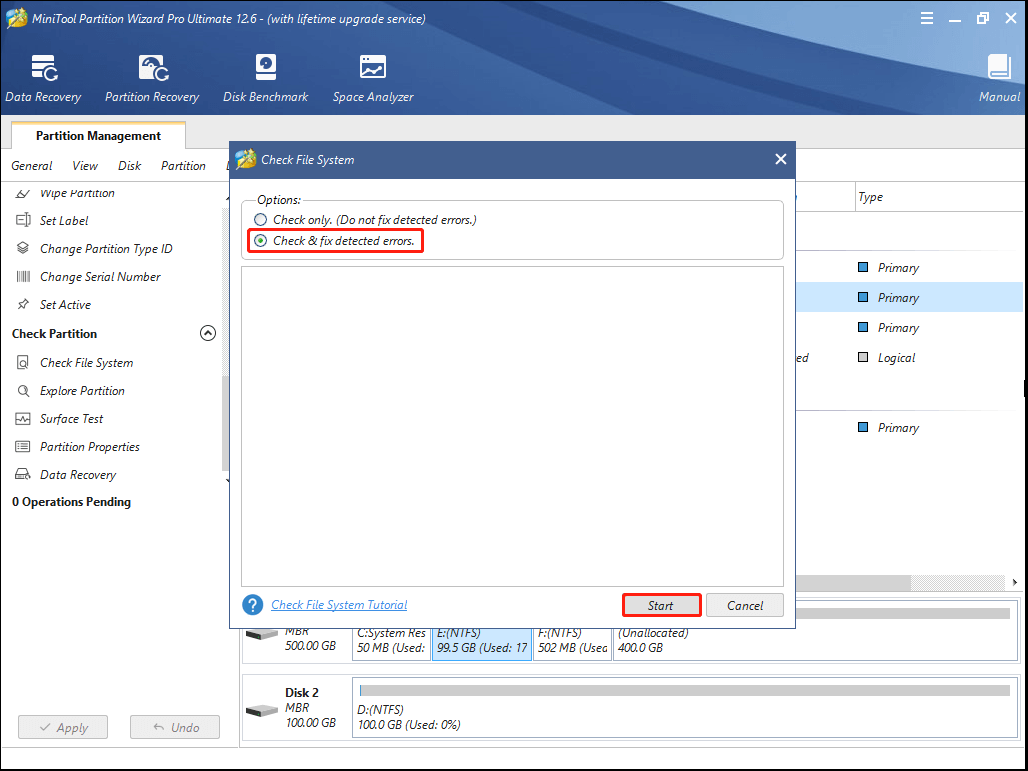
Step 3: In the pop-up window, select Check & fix detected errors, and then click Start to begin the operation.
Once the detection finishes, close MiniTool Partition Wizard and restart your computer to check if the error: no boot disk has been detected or the disk has failed is repaired successfully.
Solution 6: Rebuild the Boot Sector
In this way, you need to fix the “boot device has not been detected” error in Windows RE. And first of all, you are supposed to rebuild MBR (Master Boot Record).
MBR is a special type of boot sector at the very beginning of your bootable system hard drive. It helps your computer boot successfully. If the MBR is damaged, your system cannot recognize the boot information and will fail to start the computer. There are two available ways to fix MBR.
Rebuild MBR with MiniTool Partition Wizard
MiniTool Partition Wizard can help you to fix MBR when some issues appear in your boot disk.
Step 1: Boot your computer from the MiniTool bootable USB flash drive.
Step 2: After you enter the main interface of MiniTool Partition Wizard, right-click the boot disk containing damaged MBR and select the Rebuild MBR feature.
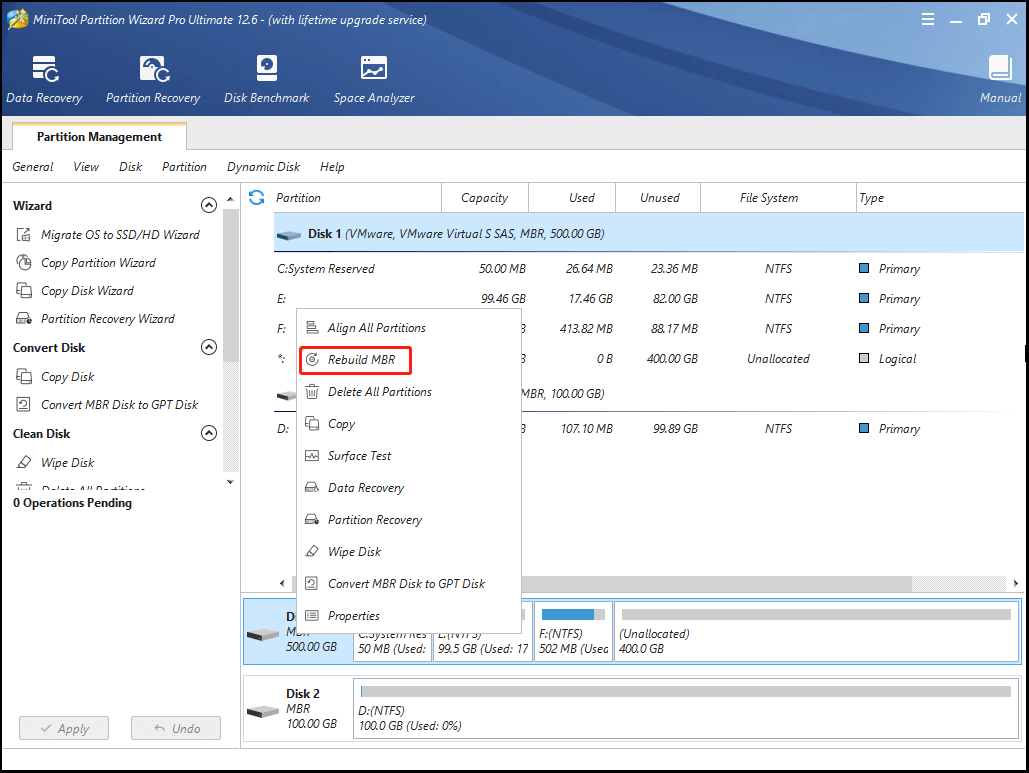
Step 3: Finally, don’t forget to click Apply to execute the operation.
Fix MBR with Command Prompt in Win-PE
You can also fix MBR by using Command Prompt in Windows 10 Recovery Environment.
Step 1: Enter Windows RE with Windows bootable installation CD or DVD.
Step 2: Go to Repair your computer > Troubleshoot > Advanced Options > Command Prompt.
Step 3: In the Command Prompt pane, type bootrec/ fixmbr in the panel and then press the Enter button to carry out this command.
Rebuild BCD
After managing to repair MBR, you can go on with the following steps to rebuild BCD.
Step 1: Enter Command Prompt in the Windows RE.
Step 2: In the Command Prompt panel, type the following commands one by one and press Enter after each one to carry out all of them.
- bootrec/ fixboot
- bootrec/ scanos
- bootrec/ rebuildbcd
After these commands are executed, restart your computer to see if the “no boot disk has been detected or the disk has failed” error has been fixed.
Bottom Line
These methods mentioned above are feasible to fix the “no boot disk has been detected or the disk has failed” error. You just need to follow them when you get stuck in the error.
If you have any other problems with the error, you can leave a message in our comment zone below. In addition, if you have something confused when using MiniTool Partition Wizard, welcome to contact us via [email protected].

User Comments :