Minesweeper used to be the standard configuration of the Windows operating system, but this has not been the case since Windows 8. Do you want to get and play Minesweeper on Windows 10? This article from MiniTool Partition Wizard shows you about that.
Although Microsoft no longer uses Minesweeper as part of the operating system, this does not mean that you can’t play classic games on Windows 10!
How to Get Minesweeper on Windows 10?
Minesweeper on Windows 10 can be got from Microsoft Store. The following steps show how to get it.
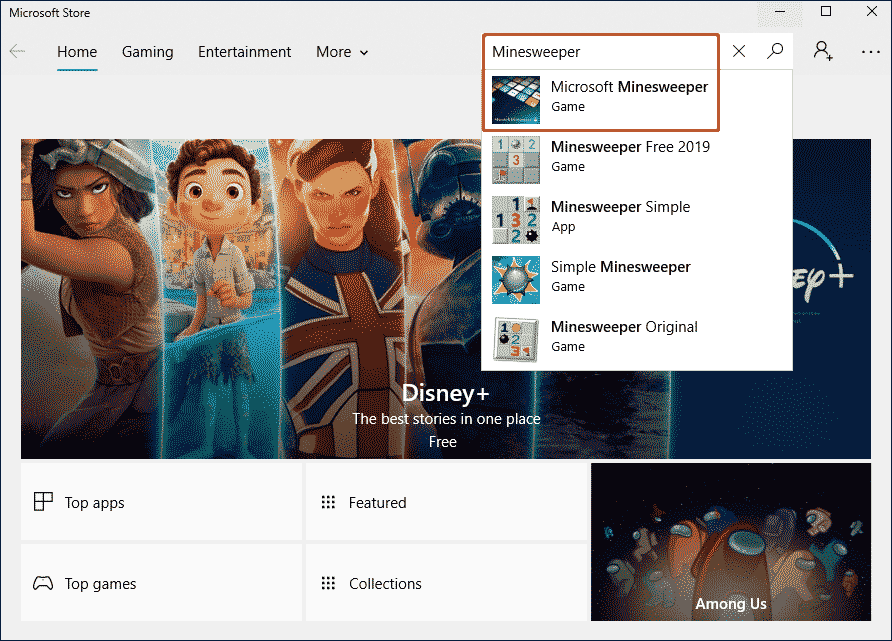
Step 1: Open the Microsoft Store. Then type Minesweeper in the search box.

Step 2: To download the official version of Microsoft, select Microsoft Minesweeper from the list of many versions of minesweepers.
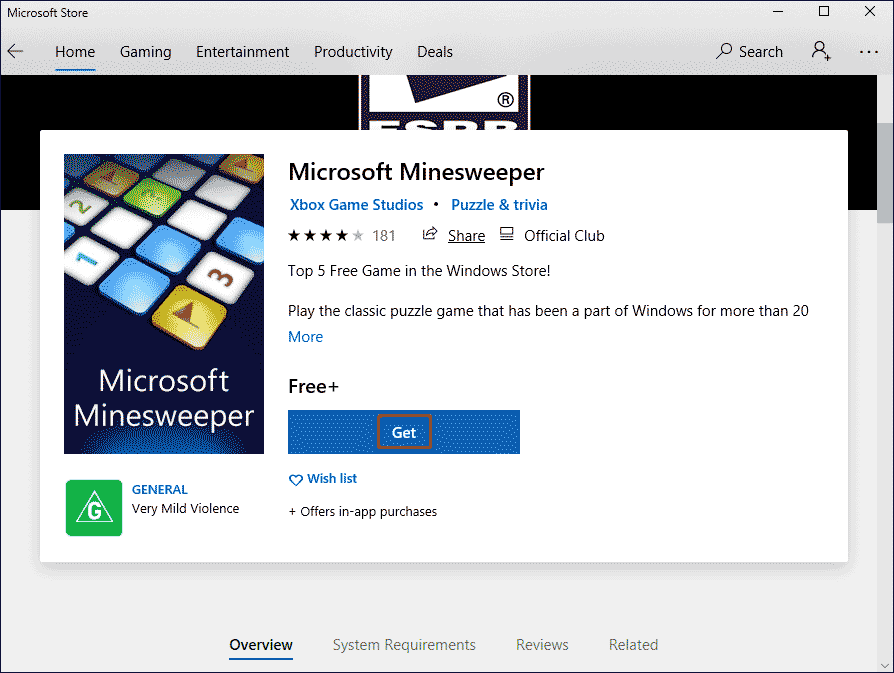
Step 3: Click the Get option and then Minesweeper will download to your computer.

In this way, you can start playing Minesweeper on Windows 10.
How to Play Minesweeper on Windows 10?
To play Minesweeper after downloading, open your Start menu. Then type minesweeper and click the Microsoft Minesweeper app.
If you are just starting to play this classic game or want to review it before starting again, here is a quick overview of how to play Minesweeper on Windows 10.
1. Each game starts with a blank square, the size of which varies according to the difficulty you choose.
- Easy 9×9: A nine-by-nine grid with 10 mines.
- Middle 16×16: A sixteen-by-sixteen grid with 40 mines.
- Expert 30×16: A thirty-by-sixteen grid with 99 mines.
- Custom: Set your own game parameters, including grid size, number of mines, etc.
2. The number at the top shows how many mines are hidden on the board. Your goal is to infer their location.
3. Select any box to start playing. The board will display information based on where you click.
- If the box you select is not adjacent to the mine, the board will show all the squares around it, but it will not be adjacent to the mine.
- If the box you select is adjacent to a mine, the board will display a number showing how many mines are in the surrounding square (including the diagonal). For example, if a square has a “3” on it, then there are 3 bombs next to that square.
- If the first square you choose contains a mine, the game will automatically mark it and display other squares according to the first two rules.
4. Infer the location of the mine based on the numbers you can see.
5. Once you have determined where the mine is, right-click on the box to insert the flag.
6. Continue to select squares and mark mines until you display each part of the grid or select mines. Whichever comes first.
After a brief understanding of the basic rules of Minesweeper on Windows 10, you can try to play it.
Bottom Line
Now we have reached the end of this article. In this article, we introduce to you how to get and play Minesweeper on Windows 10. Do you have any questions about this content? If you have any questions, please leave them in the comment zone and we will try to answer them as soon as possible.


User Comments :