PS4, short for PlayStation 4, is a home video game console developed by Sony Computer Entertainment. It has been more than 8 years since its first release in November 2013.
A lot of game lovers are very fond of this game console. With a PS4, they can play a huge number of games, including Dark Souls 3, Destiny 2, Fallout 4, Fortnite, Marvel’s Spider-Man, Minecraft, etc.
It is a good experience to play games on the PS4 console. However, it is common to see various problems on PS4 sometimes, such as PS4 running slow, PS4 freezing, PS4 error codes, and so on.
Today, this post discusses another issue: Minecraft stuck on loading screen PS4.
Minecraft is a game developed by Mojang Studios. Users can download it in PlayStation Store and the game includes a 3D world where players can explore to get kinds of raw materials and make tools to survive.
Some players reported the “Minecraft PS4 not loading” or “stuck on the Mojang Studios screen” issue. A lot of them are asking: why is my Minecraft not loading. Unfortunately, the problem could happen due to many factors, and it might take some time to figure out the culprit.
If you are bothered by the same issue, don’t worry. Here are some solutions and you can try them one by one to troubleshoot the problem.
Fix 1: Restart Minecraft or the PS4 Console
Sometimes, the “Minecraft PS4 not loading” or “Minecraft PS4 stuck on loading screen” issue can be solved by a simple restart. It is not sure whether it will work in your case but it is quite simple and worth trying.
First, you should close and re-open Minecraft. You can go to the home screen on your PS4, select the Minecraft application, and then select Option > Close Application to close Minecraft. If the problem still exists, repeat the operating about 5 or 6 times.
Then, restart your PS4 console if restarting Minecraft doesn’t help. You just need to turn your console off completely and unplug its power supply. Then re-plug the power supply after at least 60 seconds. Turn on your PS4 and check if you can play Minecraft without stuck on loading screen.
If you still encounter the problem, please move on to the next fix.
Fix 2: Clear Your Minecraft Download Cache with a Hotfix
Mojang Studios released a hotfix for Minecraft users in the Minecraft version 2.08 on PlayStation 4. It can help you clear your Minecraft download cache and solve the “Minecraft freezing on the loading screen” issue that happens while you are trying to run the game.
If your Minecraft version is higher than 2.08, you can use the hotfix to solve the problem you are facing, and you just need to:
Step 1: Run Minecraft on your PS4.
Step 2: Press and hold the following buttons on your PS4 controller when you see the splash screen: L1 + L2 + R1 + R2 + Options + Touch pad. Don’t release those buttons until you access the next screen.
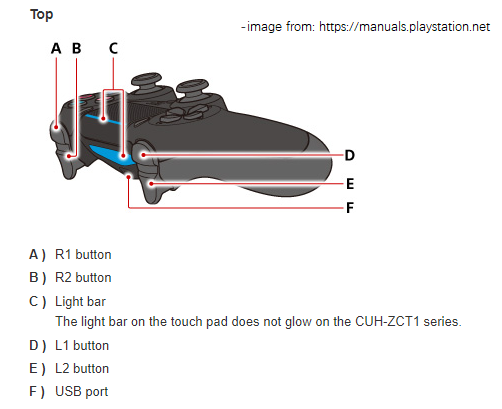
If you still get stuck on loading screen, try the next fix.
Fix 3: Update Minecraft to the Latest Version
To make sure that Minecraft can work properly, you are always recommended to install the latest version of the game. It can not only help you solve certain bugs but also bring you some new features as well as improve your gaming experience.
If your PS4 is set to auto-downloads, Minecraft can be updated automatically. If updates are not set to automatic, you need to select the game with your OPTIONS button and select the Check for update option in the pop-up menu.
Once your Minecraft is updated, you can launch the game and check if the problem “Minecraft PS4 stuck on loading screen” has been fixed.
Fix 4: Update PS4 System Software
Similar to game developers, PlayStation developers are also keeping releasing updates to the game console for bug fixes and new improvements. If your PS4 is outdated, you might encounter various problems while playing games, including Minecraft PS4 not loading.
To update the game console, here are two methods and you can choose one according to your situation.
Method 1: Update PS4 System Software via Settings
An easy way to update PS4 system software is to go to the Settings and find the option for updates on your console. Before the operation, remember to close your games and applications. Here are the detailed steps.
Step 1: Select Settings on the home screen of your PS4 console.
Step 2: In Settings, select System Software Update. Then your PS4 will check for available updates for the system and install them automatically.
The updating might take some time. Please wait patiently and do not turn off the console during the process. Once the available update is installed successfully, you will be required to restart your PS4. After that, you can open Minecraft to check if the problem disappears.
Method 2: Update PS4 System Software via a USB Flash Drive
Alternatively, you can download and install the latest system software on PS4 via a USB flash drive. Before the operation, please keep the main steps in mind:
- You need to format the USB flash drive to the FAT32 file system.
- Create specific folders on the USB drive via a computer and download the latest system software to the USB drive.
- Connect the USB flash drive to your PS4 console and install the system software in Safe Mode.
Now, let’s see more details.
Prepare a USB Drive and Format It to FAT32
There are many ways to format a USB flash drive. As you will download the latest system software on a computer later, you can format your USB flash drive via a computer, too.
On a Windows 7/8.1/10/11 computer, you can use built-in tools such as File Explorer, Disk Management, and Command Prompt to format your USB flash drive. And you can search our previous posts to learn how to use them.
Here I recommend you to use MiniTool Partition Wizard to perform the operation. MiniTool Partition Wizard is a professional, reliable, and easy-to-use disk manager. It can help you create, move, resize, delete, wipe, and recover partitions quickly. Of course, you can format your USB flash drive with MiniTool Partition Wizard free.
MiniTool Partition Wizard FreeClick to Download100%Clean & Safe
Step 1: Connect your USB flash drive to a computer running Windows 10 or 11. Then download MiniTool Partition Wizard by clicking the button above and installing it.
Step 2: Launch MiniTool Partition Wizard to get the main user interface.
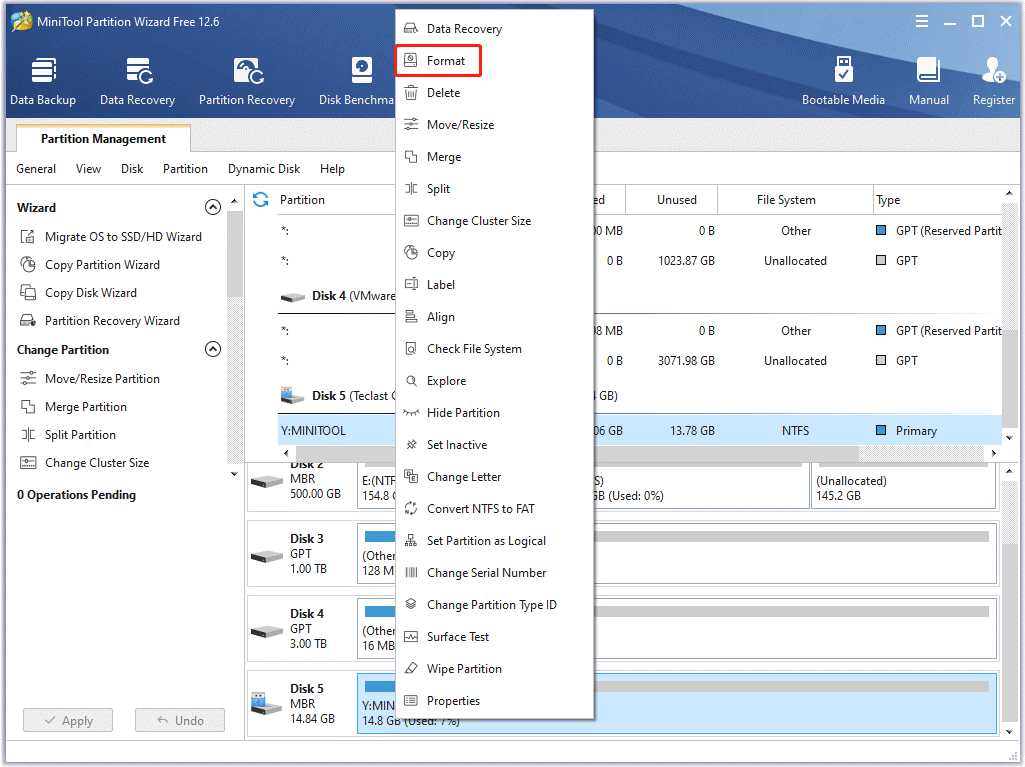
Step 3: Right-click the partition on your USB flash drive and select Format in the pop-up menu.
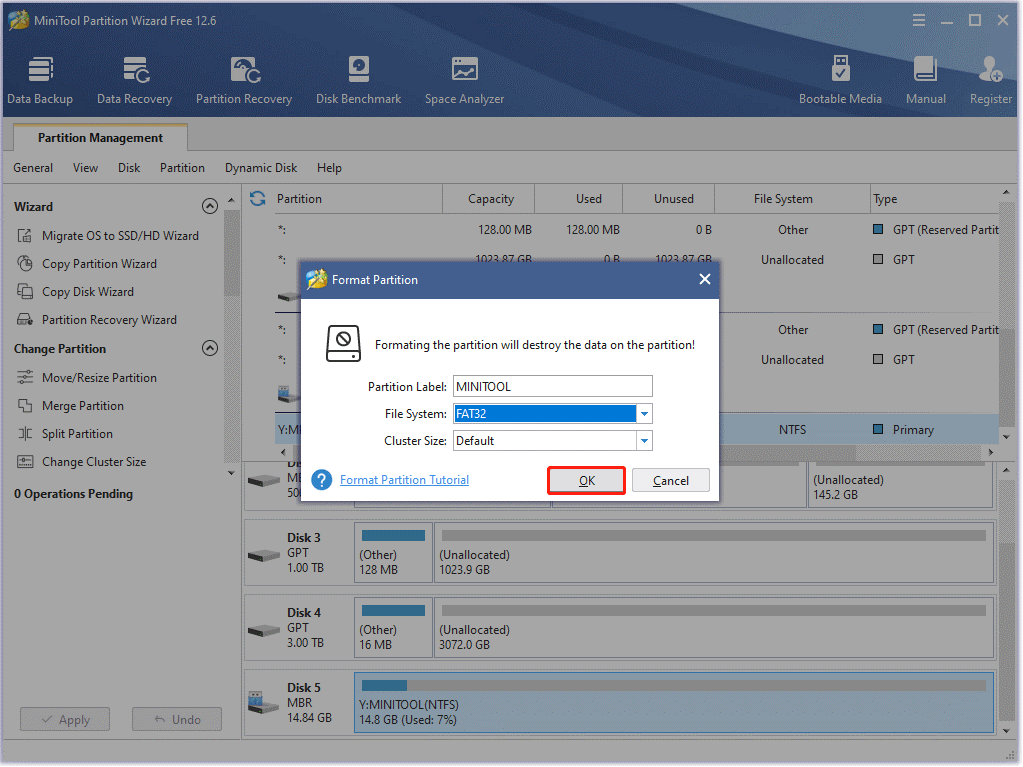
Step 4: In the next window, select FAT32 for the File System option and click OK.
Step 5: When you go back to the main interface, click the Apply button to start formatting the USB flash drive.
Download the Latest PS4 System Software
Once your USB flash drive is formatted to FAT32, you can download the latest PS4 system software.
Step 1: Press Win + E to open File Explorer and open your USB flash drive.
Step 2: Create a new folder on the USB flash drive and name it as PS4. Then create another new folder named UPDATE inside the PS4 folder.
Step 3: Launch a web browser and go to the PlayStation support page. Find the download link for PS4 console update file and right-click it. Then select the Save link as option in the pop-up menu.
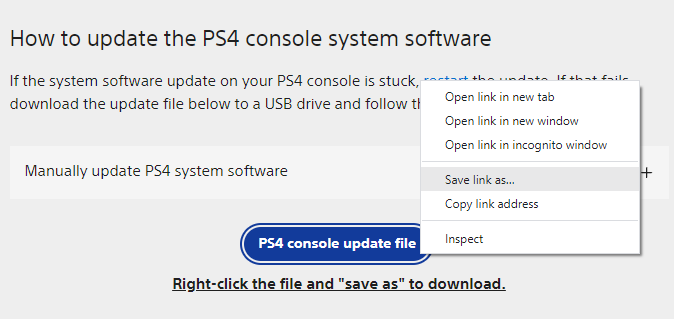
Step 4: Select the UPDATE folder you created in Step 1 and click Save. Once it is downloaded successfully, you can go to File Explorer and check it.
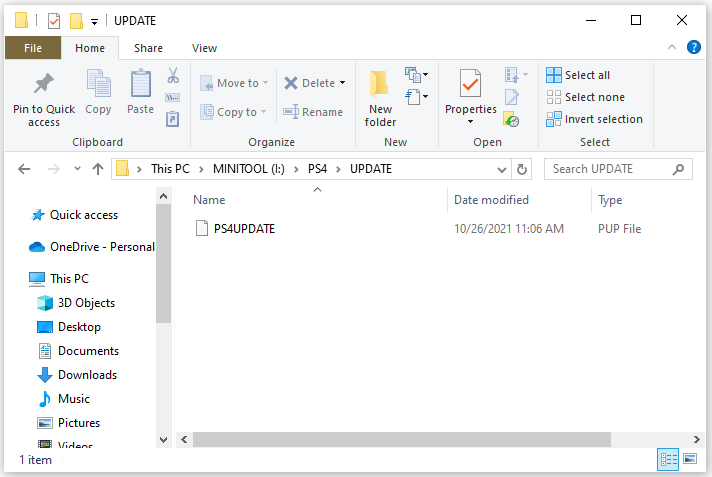
Update PS4 System Software
Now, you can start to install the latest system software on the PS4 console. You should check the power supply and do not turn off the console while updating system software. Otherwise, it might do harm to the system.
Step 1: Connect the USB flash drive to your PS4 console.
Step 2: Boot your PS4 console in Safe Mode. You just need to turn off the console. Then press and hold the power button until you hear the second beep (about 7 seconds).
Step 3: When you enter the PS4 Safe Mode, you can see the following options. You need to select the third one – Update System Software.
- Restart PS4
- Change Resolutions
- Update System Software
- Restore Default Settings
- Rebuild Database
- Initialize PS4
- Initialize PS4 (Reinstall System Software)
- Set HDCP Mode
Step 4: Select Update from USB Storage Device and OK.
Then you just need to wait until the latest system software is installed successfully. Hope your Minecraft can work properly after updating system software.
Fix 5: Reinstall Minecraft
If all the solutions above fail to solve the “Minecraft stuck on loading screen PS4” problem, you might need to uninstall and reinstall Minecraft on your console.
To uninstall Minecraft, you can go to Settings > Storage > System Storage > Applications. Then select Minecraft and press the OPTIONS button. Then select the Delete button. After uninstalling Minecraft, you can download and install the game on your PS4 again.
Bottom Line
Minecraft is quite popular among game lovers. Don’t worry if you encounter the “Minecraft stuck on loading screen PS”4 issue, as you are not alone. Many other users are facing the same problem. And you can try the fixes listed in this post one by one to solve the problem.
You can share your ideas with us in the following comment zone. For any problems with MiniTool Partition Wizard, you can contact our support team via [email protected].

User Comments :