If you are going to merge folders Windows 10/11, this post from MiniTool deserves your attention. It provides you with 4 methods. You just need to follow the given steps of each method to merge folders on Windows 10/11.
Method 1: Merge Folders Windows 10/11 in File Explorer
File Explorer enables you to merge two folders with the same name. Actually, Windows can automatically merge the contents of two folders that share the same name when you copy the folder from one location to another. How to merge folders in Windows 10/11? Here are the steps.
Step 1: Find the two folders that you would like to merge. If they don’t have the same name, rename them.
Step 2: Highlight one of the two folders and press Ctrl + C keys.
Step 3: Navigate to the second folder’s location and press Ctrl + V keys.
Step 4: When you see a prompt telling you the destination folder has files with the same name, click Replace or Skip over them. Then the first folder’s content will be merged with the second.
Step 5: Once the transfer is done, the two folders are merged.
Method 2: Merge Folders Windows 10/11 in Notepad
Notepad is a good option to merge folders Windows 11/10. You can use it to merge files that have similar content. The Notepad command line allows you to merge files with different names as well. If you have a lot of logs or reports to merge, use the “merge files” command in Notepad to combine them.
Notepad++ is another tool that can help you merge folders Windows 10/11. Its Compare plugin feature enables you to compare text, markdown, or coding files. By using this feature, you can see the difference between two files easily.
Method 3: Merge Folders Windows 10/11 via PowerShell Script
PowerShell allows you to merge folders on Windows 10/11 too. Its script can go through the contents of the parent folder to compare each file name to see if there’s a match. According to your preference, you can replace different files or just not overwrite them altogether.
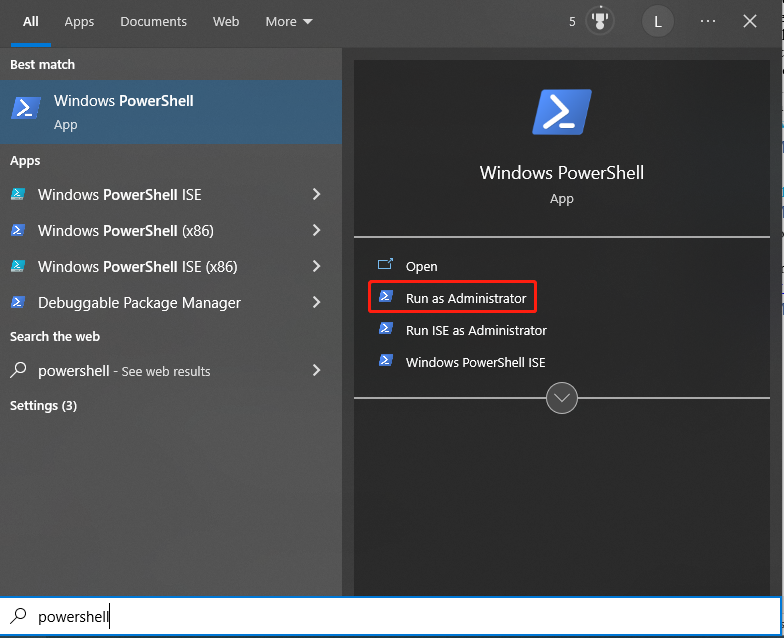
Step 1: Type powershell in the search box and then click Run as administrator under the Windows PowerShell App section.

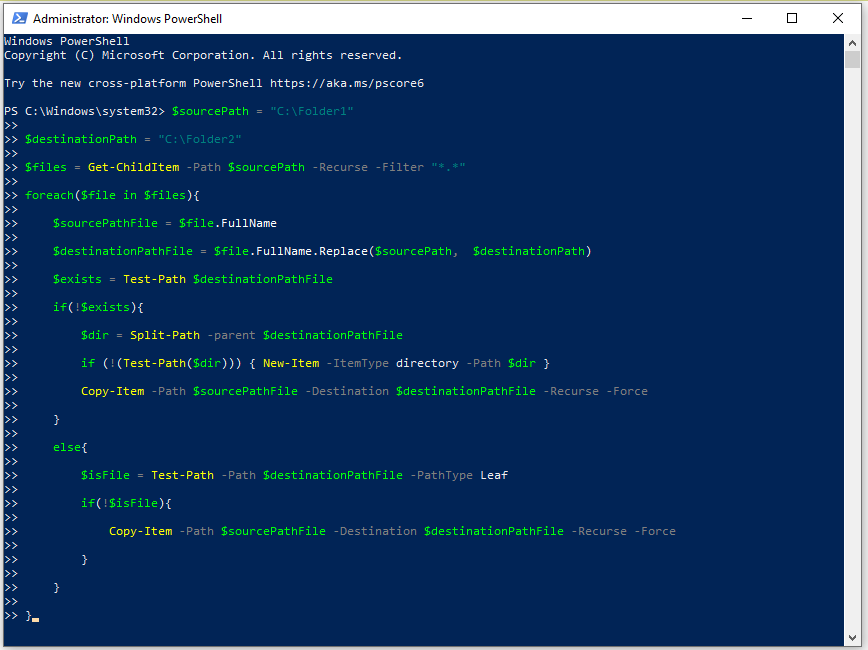
Step 2: In the prompted window, type the following commands and hit Enter.
$sourcePath = “C:Folder1”
$destinationPath = “C:Folder2”
$files = Get-ChildItem -Path $sourcePath -Recurse -Filter “*.*”
foreach($file in $files){
$sourcePathFile = $file.FullName
$destinationPathFile = $file.FullName.Replace($sourcePath, $destinationPath)
$exists = Test-Path $destinationPathFile
if(!$exists){
$dir = Split-Path -parent $destinationPathFile
if (!(Test-Path($dir))) { New-Item -ItemType directory -Path $dir }
Copy-Item -Path $sourcePathFile -Destination $destinationPathFile -Recurse -Force
}
else{
$isFile = Test-Path -Path $destinationPathFile -PathType Leaf
if(!$isFile){
Copy-Item -Path $sourcePathFile -Destination $destinationPathFile -Recurse -Force
}
}
}

Also read: How to Automate PowerShell Scripts? Top 2 Methods for You
Method 4: Merge Folders Windows 10/11 with Third-Party Software
If necessary, you can make use of third-party software to merge folders Windows 11/10. Here are some recommendations for you.
- WinMerge: It compares both folders and files, displaying differences in a visual text format that can be understood easily. It is convenient for coders and system administrators. More importantly, it is an open-source program for Windows PCs.
- Folder Merger: It merges the contents of different folders into a single folder while keeping its folder structure.
- 2XDSOFT Folder Merger: It helps you merge folders and subfolders from an intuitive interface with many customization options.
Bonus tip:
To find and remove duplicate files on your Windows PC, you can apply a free duplicate file finder. Well, MiniTool Partition Wizard is such a tool. Its Space Analyzer feature enables you to find duplicate files quickly. If you don’t need these files, simply delete them.

![How to Open a PDF in Word on Windows/Mac? [Two Ways]](https://images.minitool.com/partitionwizard.com/images/uploads/2023/01/open-a-pdf-in-word-thumbnail.jpg)
![How to Shut Down a Computer Using Notepad? [Full Guide]](https://images.minitool.com/partitionwizard.com/images/uploads/2023/06/shut-down-computer-using-notepad-thumbnail.jpg)
User Comments :