Do you use Logitech G Hub on your Windows computer? Are you bothered by Logitech G Hub not installing or not working? Don’t worry. In this article, MiniTool Partition Wizard puts together 5 feasible ways to help you resolve Logitech G Hub not installing issue.
Logitech G Hub is an advanced Logitech gaming software. It is a standalone customization tool designed to help users manage Logitech peripherals, including keyboards, mice, headsets, speakers, and so on. Recently, many users report the Logitech gaming software not installing Windows 10.
Luckily, this problem can be fixed easily although its causes are various. If you are experiencing this annoying problem, you can try the following methods one by one to get rid of the problem.
Way 1: End Logitech G Hub Process in Task Manager
You are likely to fail to install Logitech G Hub if there is already a Logitech process running in Task. Because your Windows may think the program is already opened when it isn’t and block the process you are trying to perform.
In this case, you can go to end the Logitech G Hub process first.
Step 1: Right-click the Start button and choose Task Manager.
Step 2: Under the Processes tab, select the Logitech Gaming and click End task.
Step 3: If needed, you can also switch to the Startup tab, choose Logitech Gaming, and click Disable to disable it.
Now, you can install or launch your Logitech G Hub again to check if the problem is resolved.
Way 2: Launch Logitech G Hub As Administrator
Lack of administrator permissions is also a common reason for the Logitech G Hub not installing or working issue. So, you can try launching the executable of this gaming software with administrator privileges. Here’s what you should do:
Step 1: Locate the installation folder of Logitech G Hub in File Explorer. By default, it is saved in C:\Program Files (x86)\Logitech Gaming Software.
Step 2: Right-click the executable file and choose Properties.
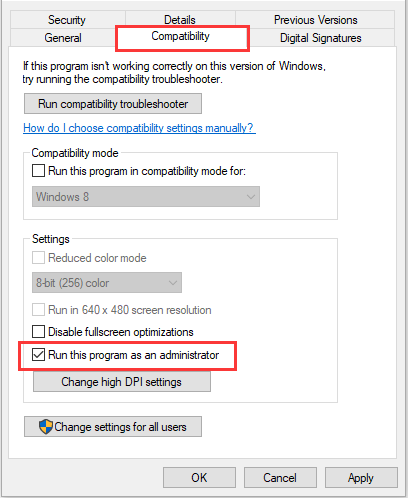
Step 3: Switch to the Compatibility tab and check Run this program as an administrator. Click Apply and OK to save changes.

Way 3: Allow Logitech G Hub Through Firewall
In some cases, the Logitech G Hub not installing or not working has something to do with your Firewall. If your Firewall mistakenly regards the software as a potential threat, it will block the process and thus you cannot install or use Logitech G Hub as expected.
To solve the problem, you can follow the steps below to allow the Logitech gaming software through firewall:
Step 1: Press Windows + S, input control panel, and click the search result to open it.
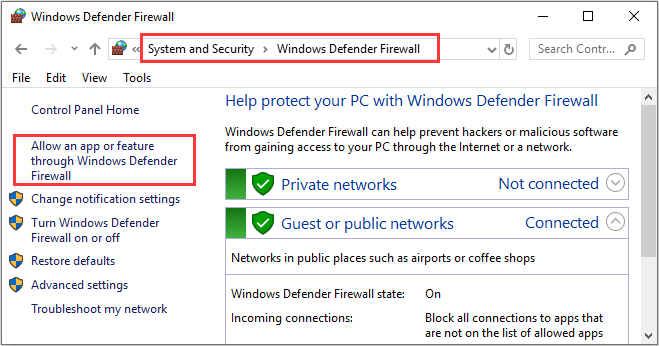
Step 2: Navigate to System and Security > Windows Defender Firewall and click Allow an app or feature through Windows Defender Firewall in the left pane.

Step 3: Click the Change settings button to make the settings editable. Find Logitech G Hub and check its boxes under both Private and Public. Then, click OK to apply the changes.
Once it’s done, restart your computer and check if Logitech G Hub not working issue is resolved.
Way 4: Update Your Windows
Some users recommend updating Windows 10 to the latest version as they’ve fixed Logitech G Hub not installing effectively in this way. If you haven’t performed updating for your Windows, you can have a try.
Just press Windows + I to open Settings, go to Update & Security > Windows Update, and click Check for updates. Then, your Windows will download and install all the available updates automatically.
Way 5: Clean Reinstall Logitech G Hub
If you are facing Logitech G hub not working on your computer, perhaps the installation is corrupted and you might need to perform a clean installation for this gaming software.
To clean reinstall the software, you need to unplug all the Logitech peripherals, back up your profile data, and completely uninstall the Logitech G Hub. Then, visit the official download page of Logitech G Hub to download the latest version and properly install it according to the given instructions. After that, the software should be able to work fine again.

User Comments :