Malware developers often take advantage of the Java flaws and therefore installing the new updates of Java is quite important to prevent the system from possible attacks. But when Windows users install the Java updates, they run into Java error code 1603. Why does this happen? How to fix it? MiniTool answers all the questions in this post.
Java Error Code 1603 on Windows 10
One Windows user reported that he ran into Java error code 1603 and the detailed information is below.
I cannot install Java updates on my Windows 10 computer. Everything starts fine, but after a couple of settings, it gives me Error Code: 1603. I tried suggested the troubleshooter, but it didn’t help to fix the problem. What else can I do?
What can cause error code 1603 on Windows 10? The reasons for this error might be different. It is possible that the Java update you ware try to install is been blocked by antivirus software, web software or other programs that are running Java.
Before trying to fix this issue, please make sure the following items first as them may prevent you from installing the Java update.
- Make sure you run the installer as administrator.
- Make sure the drive you are trying to install on is not encrypted.
- Make sure you have BitLocker disabled. If it is enabled, disable it and then try to install it again.
After making sure of the above items, let’s try to restart your computer first. If the code error persists, try the following solutions one by one until you get rid of this error code 1603.
Fix 1: Check the Version of Windows 10
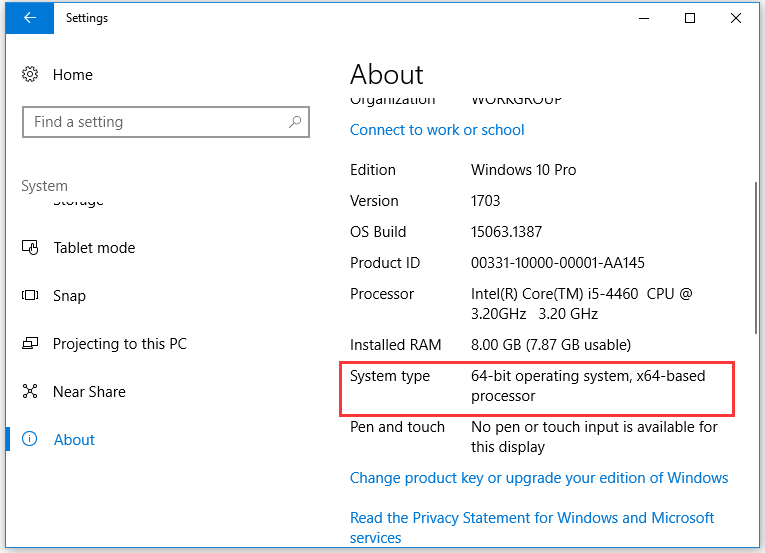
Check whether the version of Java is matched with Windows 10. This means you should install the 64-bit Java if you are running on a 64-bit Windows 10.
If you are not sure what version of Windows 10, follow the steps below.
- Right-click the Windows icon on the toolbar and then select Settings from the menu.
- Click System on the Settings
- Navigate to the About tab and then look at the System type. You will know what version of Windows 10 you are using.
Fix 2: Close Mentioned Programs
After checking the version of your system, let’s try to close the programs that are running Java.
Step 1: Right-click the taskbar and then choose Task Manager from the menu.
Step 2: Under the Process tab, go through the list of programs. If some of them have been mentioned with the error, highlight the programs one by one and then click the End Task button.
After the two steps, Java error code 1603 should not appear when you install or update Java.
Fix 3: Turn off Antivirus
As we have mentioned, the most possible reason for Java error code on Windows 10 is that Java has been blocked by security software. Therefore, you can try to temporarily disable the software and then install Java.
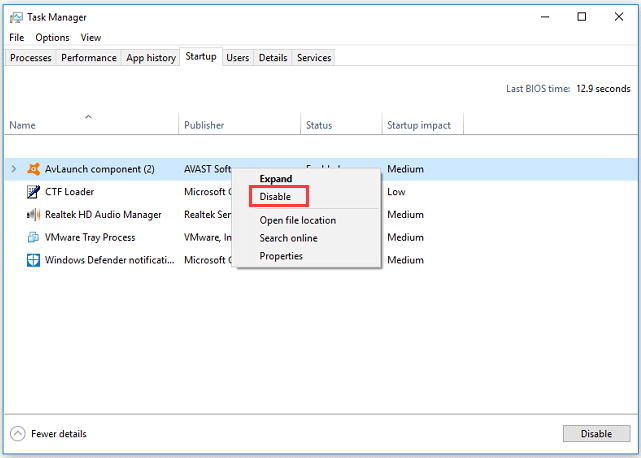
To do that, you need to open Task Manager again if you have closed it and right-click the software to choose the Disable option under the Startup tab.
Fix 4: Disable Java Content
Step 1: Type Control Panel in Cortana’s search bar and then select Control Panel.
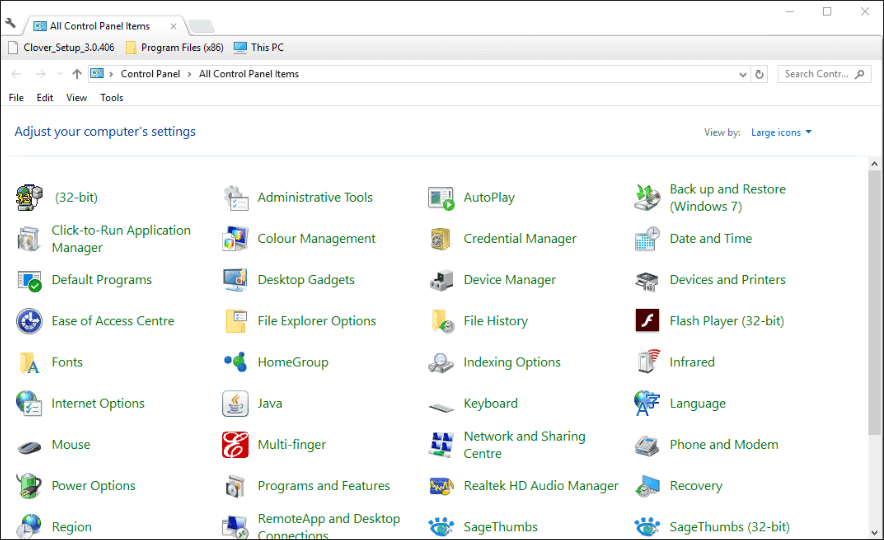
Step 2: On the Control Panel window, switch the View by to Large icons and then locate Java in the list.
Step 3: On the window of Java Control Panel, navigate to the Security tab. Uncheck the Enable Java content in the browser.
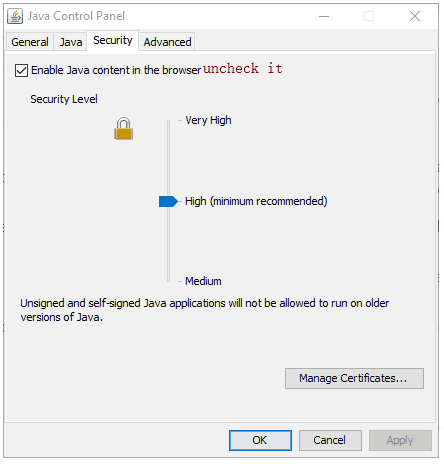
Step 4: Finally, click Apply and OK to confirm the change and execute it.
The issue should have been fixed. Try to update or install Java. After updating or installing, do not forget to check the Enable Java content in the browser again.
Fix 5: Uninstall Previous Versions of Java
This fix may help you get rid of error code 1603 on Windows 10. How to remove Java from Windows 10 PC? The tutorial is below.
Step 1: Call out the Run window by pressing Windows + R at the same time.
Step 2: Type appwiz.cpl on the Run window and then hit the Enter key.
Step 3: Locate Java or JDK in the list and then click it and select Uninstall.
Step 4: Reboot your computer.


User Comments :