This post shows you how to install or uninstall OneDrive with WinGet in Windows 11. If you also want to install or uninstall OneDrive, explore the content with MiniTool now!
OneDrive was first launched in August 2007. It is a file hosting and synchronization service that is operated by Microsoft as a part of its web version of Office. The OneDrive allows you to store files and personal data in the cloud, share and sync files across platforms including mobile devices like Windows Phone, Android, and iOS, Windows & Mac PCs, and consoles such as Xbox 360, Xbox One, and Xbox Series X and S.
Also read: Xbox Series X vs PS5: Which Game Console to Purchase?
You are also allowed to upload Microsoft Office documents to OneDrive. You can use 5GB storage space for free on OneDrive. You may want to install OneDrive because of the above advantages.
Due to some issues with OneDrive, you probably would like to remove OneDrive. How to do that? Well, WinGet helps. If you don’t know what WinGet is, read the section below.
What Is WinGet
WinGet (Windows Package Manager) is a command-line tool that can help you install, uninstall, validate, and obtain detailed information of an app. With WinGet, it would be easier to automate the process of searching, downloading, installing, upgrading, and configuring applications on a PC.
While WinGet is built for developers to run packages from the command line, anyone can install apps like OneDrive, Microsoft Teams, and VirtualBox with it. This program is compatible with Windows 10 v1809 and all the later versions.
To install or uninstall OneDrive with WinGet in Windows 11, read the content below.
Install OneDrive Using WinGet
Option 1: Use PowerShell
The following steps illustrate how to install OneDrive using WinGet in Windows 11 via PowerShell.
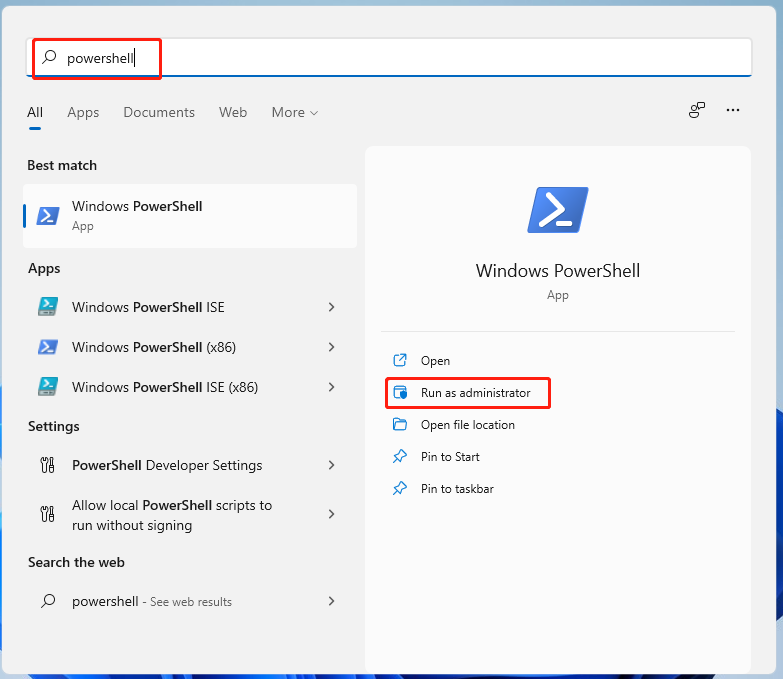
Step 1: Tap the Search icon on the Windows 11 desktop and then type powershell in the prompted window.
Step 2: Click Run as administrator under the Windows PowerShell icon.

Step 3: In the PowerShell window, type winget install onedrive and hit Enter to execute the command. After that, the program will download a package to your PC and begin the installation automatically. You just need to wait for the finish of the process.

Option 2: Use Command Prompt
You can also install OneDrive with WinGet via Command Prompt. Here are steps.
Step 1: Similarly, you need to run Command Prompt as administrator at first.
- Type cmd in the search box.
- right-click on Command Prompt and click Run as administrator.
Step 2: In the next window, type winget search OneDrive and hit Enter.
Step 3: After it lists the results, type winget install Microsoft. OneDrive and press Enter.
Step 4: Wait for the finish of the process.
Uninstall OneDrive with WinGet
Option 1: Use PowerShell
To uninstall OneDrive with WinGet via PowerShell, you should follow these steps.
Step 1: Likewise, run Windows PowerShell as administrator.
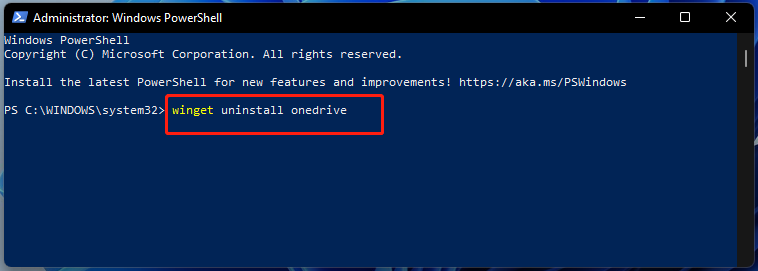
Step 2: In the pop-up window, type winget uninstall onedrive and hit Enter. Then PowerShell will look for OneDrive and uninstall it automatically. After the uninstallation process ends, you will receive the “Successfully uninstalled” message.

Also read: Top 7 Effective Ways to Uninstall Programs/Apps on Windows 11
Option 2: Use Command Prompt
Step 1: Run Command Prompt as administrator.
Step 2: Type winget uninstall and press Enter.
Step 3: When the programs are listed under the command, type winget uninstall Microsoft. OneDrive and hit Enter.
How to install or uninstall OneDrive with WinGet in Windows 11? This post has shown the answers to you. Try the given steps now!


User Comments :