The Insert key can be used to switch between the overtype mode and the insert mode on a computer. It is usually located in the upper right corner of the keyboard. However, can you use the Insert key on laptop without such a key? Here, MiniTool Partition Wizard provides a tutorial for you.
What does the Insert Key Do?
The Insert key is a key usually located on the right corner of a keyboard, up the Delete key. The following picture displays the location of the Insert key on keyboard. You can check whether your keyboard has such a key.
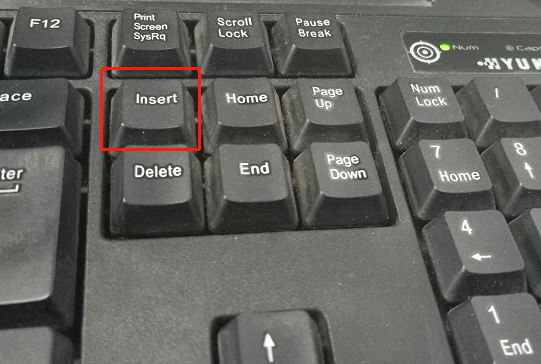
What does the Insert key do?
In fact, the Insert key is mainly used to switch between the overtype mode and the insert mode in the text input window on a computer or word program. In the Insert mode, the cursor inserts a character at its current position, and all characters pass it one position further.
In addition, the Insert key can also be used to copy and paste something in some programs, which works on Windows and Linux. To copy something, just select it and press Ctrl + Insert. To paste something, press Shift + Insert.
How to Use the Insert Key on Laptop
If your laptop keyboard is not designed with an Insert key or the key is broken, how do you use the Insert function? Of course, you can also buy a physical keyboard that has such a key. However, you might not want to take the cost.
Don’t worry. You can try the following solutions and they are totally free and easy.
Solution 1: Press the Alternative Keyboard
Have you noticed that the zero key on the Numpad comes with the word “Ins”? Ins is short for Insert, which means you can use the zero key on the Numpad as the alternative to the Insert key. And you just need to turn off the Num Lock. Then you can press the zero key and it should function as the Insert key.
Have a try if you have a Numpad on your keyboard.
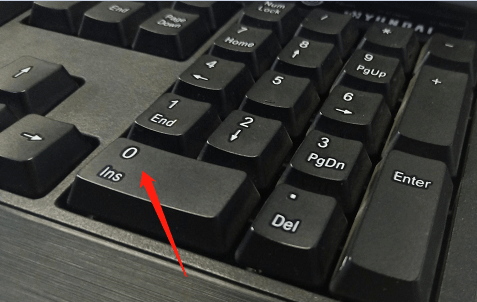
Solution 2: Use On-Screen Keyboard
Here is another way to use the Insert key on laptop, you can use the Insert key on laptop with the On-Screen Keyboard (OSK) instead of a physical keyboard.
An On-Screen Keyboard is a built-in tool in Windows 10. It really helps when you have a touch-screen laptop or the physical keyboard doesn’t work. With the On-Screen Keyboard, you can type by clicking. Now, let’s see how to use the Insert key with an On-Screen Keyboard on Windows 10/11.
Step 1: Right-click the Start button and select Settings.
Step 2: In Settings, select the Easy of Access category. Then click Keyboard.
Step 3: Now you can turn on the feature “Use the On-Screen Keyboard”. Then the On-Screen Keyboard will show up.
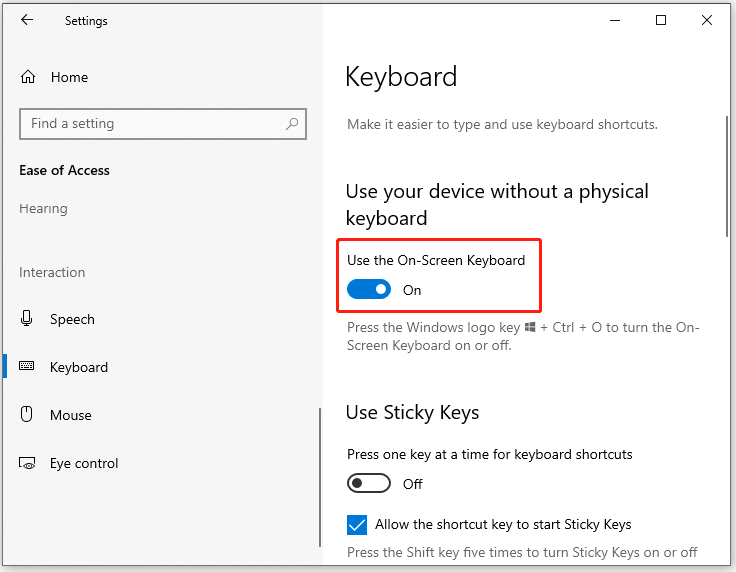
Step 4: On the On-Screen Keyboard, the Insert key is located on the right side, next to the Enter key. Find it and click it.
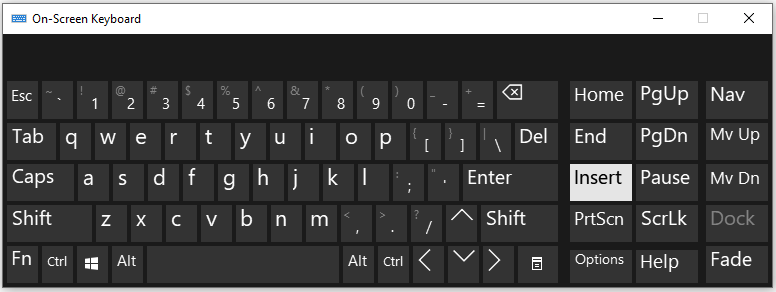
Which solution do you prefer? Choose the one you like and have a try!

User Comments :