Accessing the recent items you are working on in one application via Jump Lists is quite convenient. But, some of them may be not listed in Jump Lists. In this post, MiniTool shows you how to increase the number of items in Jump Lists Windows 10 to help you get rid of this dilemma.
Jump Lists Windows 10 is a feature tailored to let you quick access to the items you are working on in one application. To access the items in Jump Lists, you just need to right-click an app from the Start menu and taskbar.
To better the Windows 10 user experience, the creation of Jump Lists and recording of opened items are enabled by default. Furthermore, the number of items in Jump Lists is 12.
However, you may prefer a larger maximum number of items and you want to change the default number of items in Jump Lists Windows 10. That is still possible if you utilize Registry Editor.
Now let’s see how to “increase items in Jump Lists” via Registry Editor.
Increase Items in Jump Lists
Before using Registry Editor to “increase items in Jump Lists”, you should know that editing this Windows tool is risky and it can cause irreversible damage to your installation if you entered a wrong value or deleted the wrong key. So, in case something goes wrong, please back up your whole computer at fits and then change the number of items in Jump Lists.
After finishing PC backup, let’s “increase items in Jump Lists” on Windows 10 via Registry Editor.
Step 1: Press Windows + R to call out the Run window. On the Run window, please type regedit and then click the OK button.
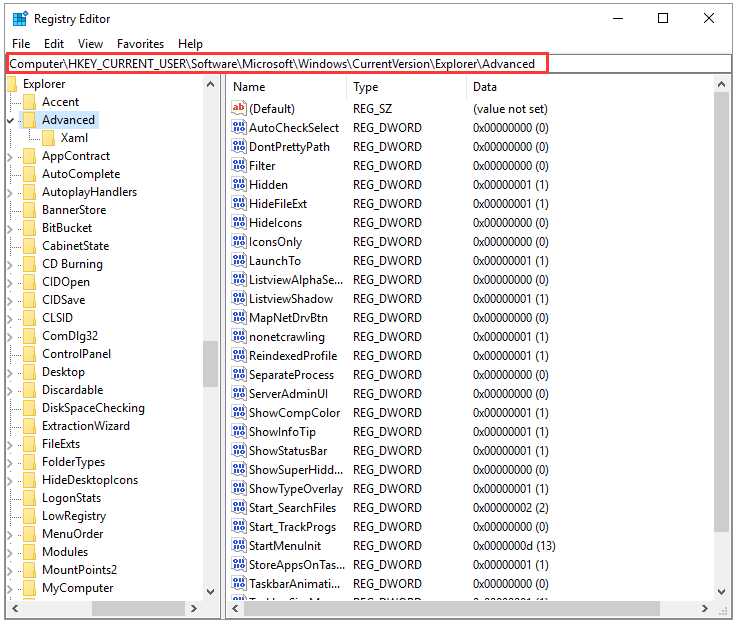
Step 2: Once you access the Registry Editor window, please navigate to the following path:
ComputerHKEY_CURRENT_USERSoftwareMicrosoftWindowsCurrentVersionExplorerAdvanced

Step 3: Create a key named JumpListItems_Maximum under the Advanced folder.
- Right-click the Advanced folder and then choose New > DWORD (32-bit) Value.
- Name the key as Jump;istItems_Maximum.
Step 4: Double-click the key you have created and then choose the Decimal option and change the Value data to the number of the items in Jump Lists you what to display (the number you choose will be the same for all apps that support the Jump List feature).
Step 4: Click the OK button to save these changes.
After the four steps, the maximum number of items in Jump Lists should be the one you have input. Now, exit Registry Editor and right-click one application and see all the items you are working in it have been displayed in the Jump Lists feature.
There is no doubt that you can also decrease the number of items in Jump Lists Windows 10 by setting a smaller value data in Registry Editor.
Bottom Line
The above four steps have outlined how to increase items in Jump Lists. Do you have any questions about the operations? If yes, please leave them in the following comment zone and we will replay to you ASAP.

![10 Reasons and 10 Fixes for Computer Running Slow [New Updated]](https://images.minitool.com/partitionwizard.com/images/uploads/2019/08/my-computer-runs-slow-thumbnail.jpg)
User Comments :