Unpartition a USB Drive
What does unpartitioning a USB drive mean? Unpartitioning a USB drive removes all partitions and makes the whole unallocated.
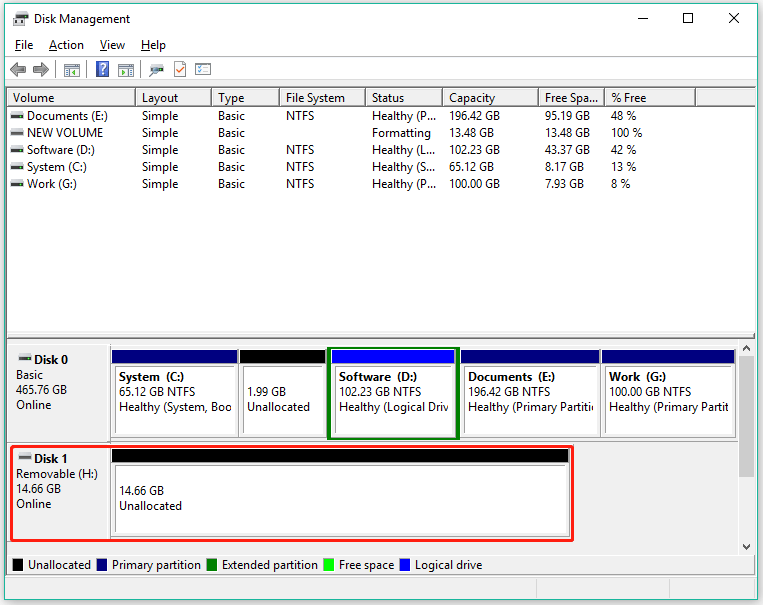
Well, how to unpartition a USB drive? On Windows 10, there are many ways to unpartition a USB drive. For example, you can unpartition a USB drive using Windows built-in tools like Disk Management or Diskpart. Alternatively, you can use MiniTool Partition Wizard, a professional partition manager for Windows, to complete that.
But before you unpartition USB drive using these tools, one thing should not be neglected: back up important files on the USB drive. As to USB drive backup, you can refer to 2 Best USB Clone Tools Help to Clone USB Drive Without Data Loss.
After backing up your files on your USB drive, you can start to unpartition your USB drive.
Unpartition USB Drives Using Windows Built-in Tools
How to unpartition a USB drive via Disk Management and Diskpart? Connect your USB drive to your computer and then follow the tutorials below to unpartition it.
Unpartition a USB Dive via Disk Management
It is easy to unpartition a USB drive via Disk Management. However, the tool has one limitation: it cannot delete the second partition on the removable disk if your system is earlier than Windows 10 Version 1803 and the Delete Volume feature goes greyed out.
Therefore, if you just have one partition on your USB drive or use Windows 10 version 1803 or later, it is OK to delete partitions on a USB drive to unpartition a USB drive via Disk Management. If not, try using the other two tools.
Here is the tutorial on how to use Disk Management to delete partitions on a USB drive to unpartition USB. Follow it.
Step 1: Open Disk Management.
On Windows 10, there are many ways to open Disk Management. For example, you can press Windows + X and then choose the Disk Management option from the menu.
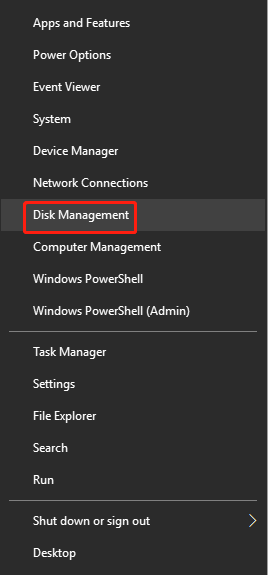
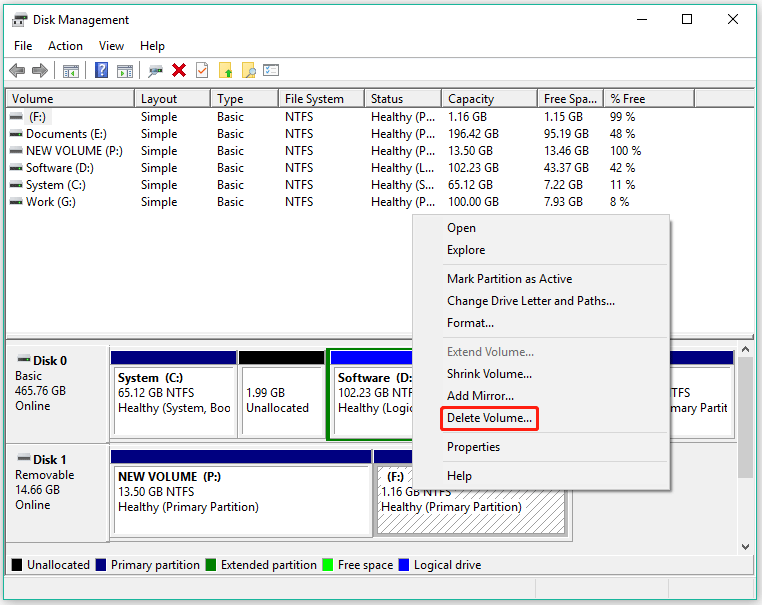
Step 2: Activate the Delete Volume feature of Disk Management.
Once the Disk Management window appears, locate your USB drive and right-click it. Then, choose the Delete Volume feature.
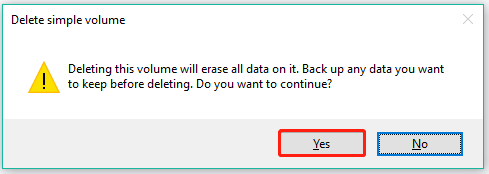
Step 3: Confirm that you want to delete the selected partition.
Once you see a window called Delete simple volume, click the Yes button.
Step 4: Repeat Step 2 – Step 3 to delete all partitions on the USB drive.
After these steps, your USB drive becomes unallocated.
That’s all about how to unpartition a USB drive using Disk Management. Read on to see how to unpartition a flash drive using the other Windows built-in tool.
Unpartition a USB drive via Diskpart
Unlike Disk Management, Diskpart is a command-line disk partitioning utility that does not have a graphical user interface.
How to unpartition a USB drive through Diskpart? It can help you unpartition a USB drive in two ways. What are the two ways? They are detailed below.
Run the Diskpart Delete Partition Command
Step 1: Open diskpart.exe.
- On Windows 10, type cmd in the Windows search bar and then hit the Enter
- On the Command Prompt window, type diskpart and hit the Enter
- On the user Account Control window, click the Yes
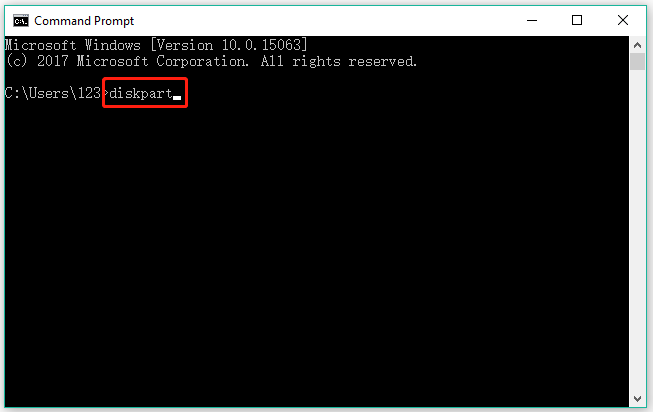
Step 2: Type the following commands and click the Enter key after each typing to delete a partition on a USB drive to unpartition USB drive.
- list disk
- select disk * (* refers to the disk number, like select disk 1)
- list partition
- select partition 1
- delete partition
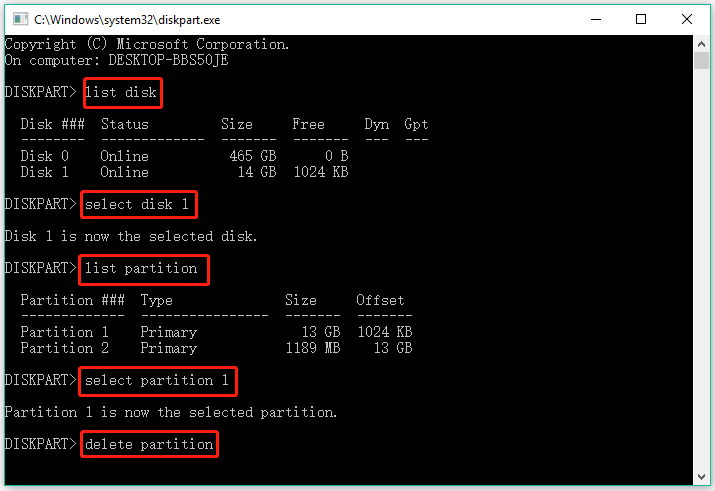
After running the diskpart delete partition command, go to Disk Management where you will find that your USB drive has no partition and becomes unallocated.
However, as you see, it is not convenient to unpartition a USB drive that contains more than one partition using the diskpart delete command. To unpartition a flash drive, you can run the diskpart clean command. How to run the command to unpartition a USB drive? Read on.
Run the Diskpart Clean Command
It is easy to unpartition a USB drive by running the diskpart clean command because the command can delete all partitions on the USB drive at once. Here is how to run the command:
Step 1: Open diskpart.exe.
Step 2: Type the following commands and click the Enter key after each typing to unpartition on your USB drive.
- list disk
- select disk * (* refers to the disk number, like select disk 1)
- clean
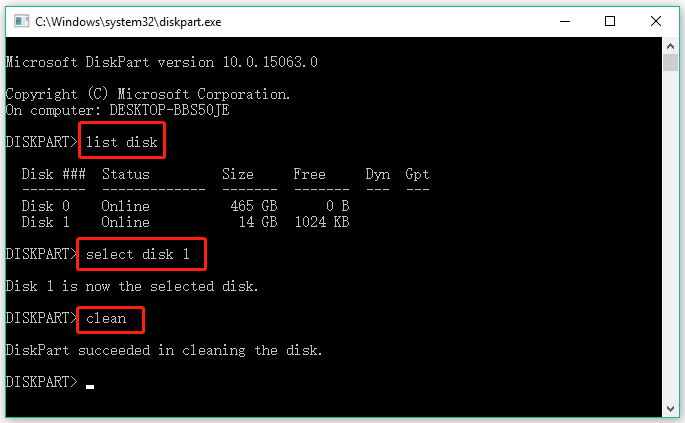
Now go to Disk Management and you will find your USB drive becomes unallocated.
You might be interested in Recover Data Lost By DiskPart Clean – Complete Guide.
That’s all about how to unpartition a USB drive through the Windows built-in tools. Let’s proceed to see how to unpartition a USB drive through MiniTool Partition Wizard.
Unpartition USB Drives Using MiniTool Partition Wizard
MiniTool Partition Wizard is a professional partition manager for Windows computers. It is excellent at deleting partitions, formatting partitions, merging partitions, recovering lost data/partitions, cloning disks/partitions, etc.
MiniTool Partition Wizard FreeClick to Download100%Clean & Safe
MiniTool Partition Wizard offers two features that can help you unpartition a flash drive. They are the Delete All Partitions feature and the Wipe Disk feature, both of which can delete all partitions on the USB drive and make the drive unallocated. But notice that wiping a disk makes data unrecoverable and wears out a disk.
How to unpartition a flash drive via the partition manager? The tutorials are displayed below.
Unpartition a USB Drive via Delete All Partitions
Here is the tutorial:
Step 1: Launch MiniTool Partition Wizard to access its main interface.
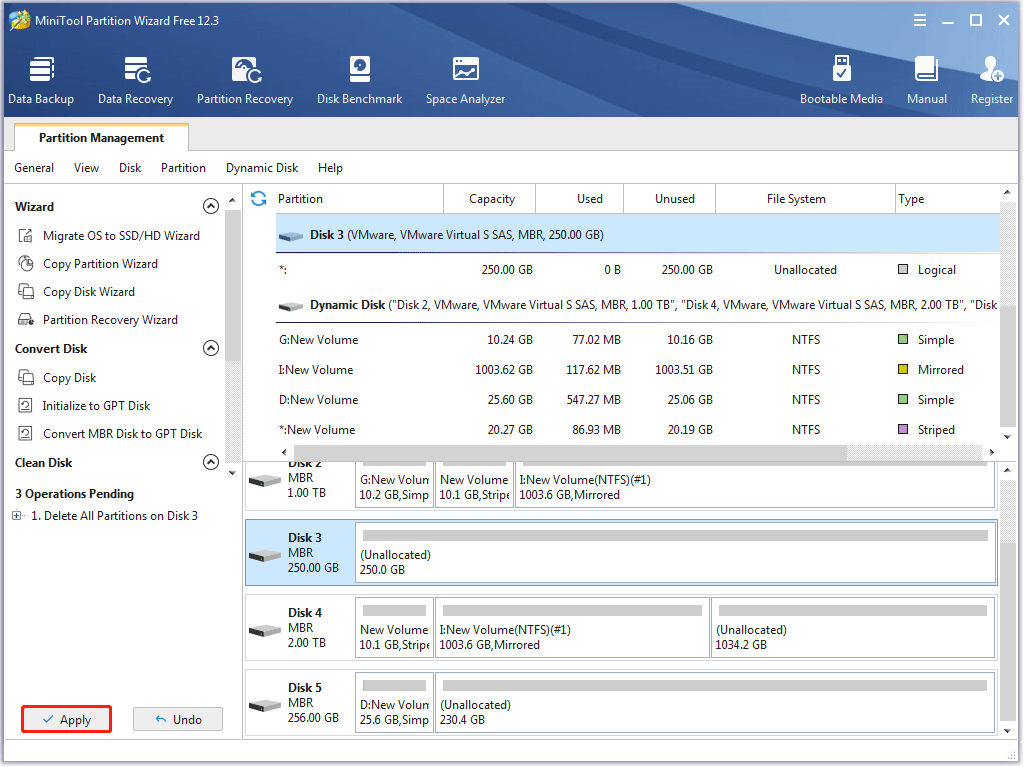
Step 2: Locate your USB drive in the disk map, highlight it, and choose the Delete All Partitions feature from the left panel.
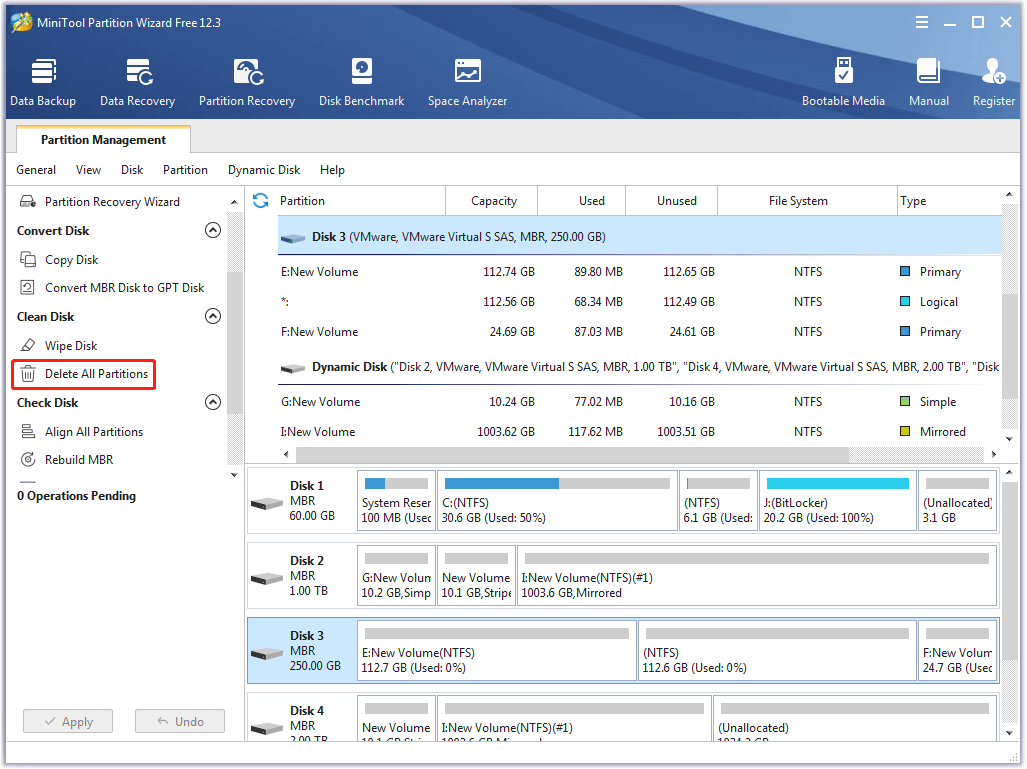
Step 3: Click the Yes button on the small window to confirm to delete all partitions on the USB drive.
Step 4: Click the Apply button at the bottom left corner of the user interface.
Unpartition a USB Drive via Wipe Disk
Here is the tutorial:
Step 1: Launch MiniTool Partition Wizard to access its main interface.
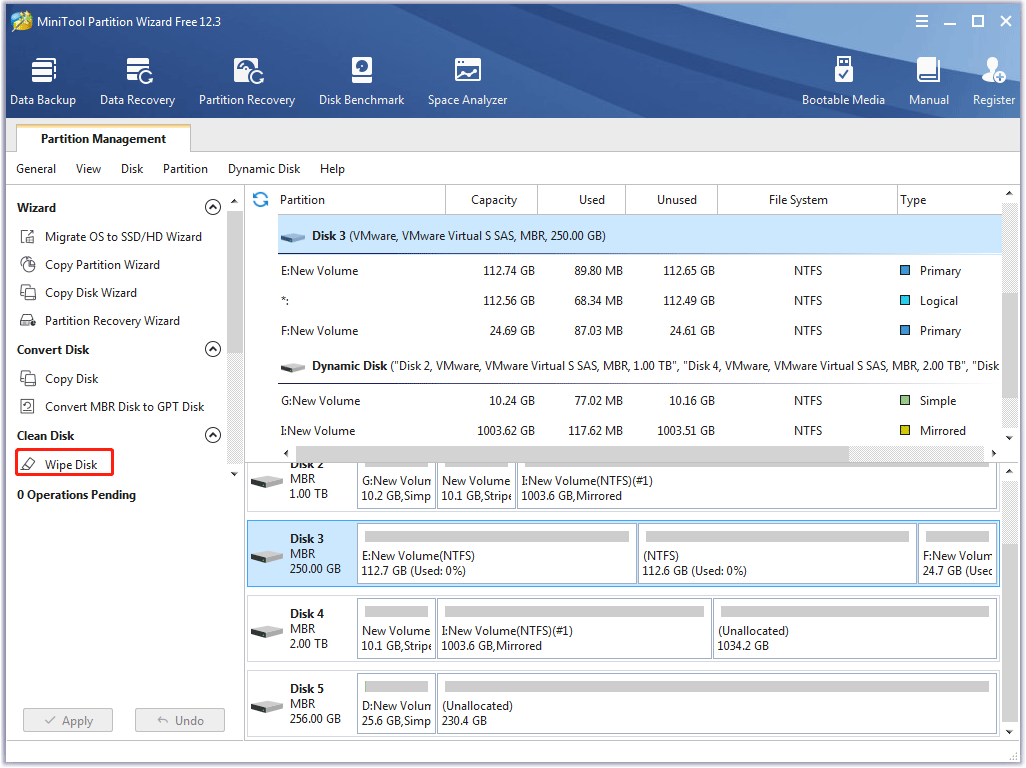
Step 2: Locate your USB drive in the disk map, highlight it, and choose the Wipe Disk feature from the left panel.
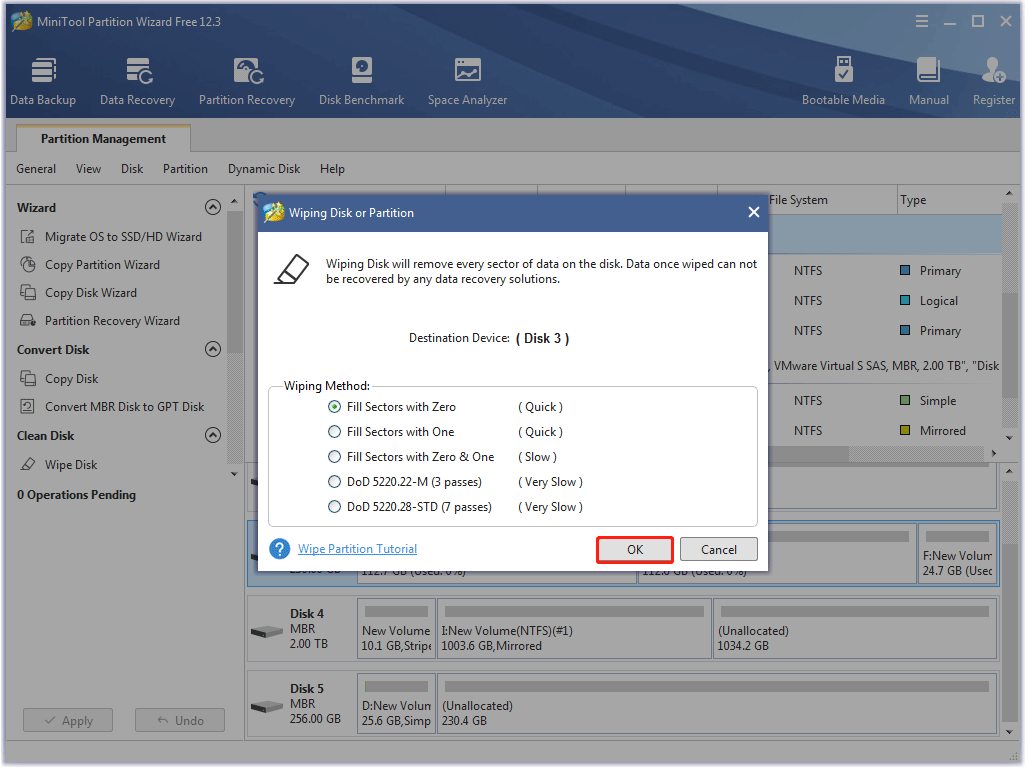
Step 3: Choose a wiping method and then click the OK button.
MiniTool Partition Wizard offers five wiping methods and they are: Full Sectors with Zero, Fill Sectors with One, Fill Sectors with Zero & One, DoD 5220.22-M (3 passes), and DoD 5220.28-STD (7 passes).
Step 4: Click the Apply button at the bottom left corner of the user interface.
That’s all about how to unpartition a flash drive using MiniTool Partition Wizard.
Bonus: How to Create a Partition on a USB Drive
Unpartitioning a USB drive delete all partitions on the USB drive. If you want to continue to use your USB drive for storing files, you need to repartition it. The following shows how to create a partition quickly.
Here is the tutorial on creating a partition on a USB drive using MiniTool Partition Wizard.
MiniTool Partition Wizard FreeClick to Download100%Clean & Safe
Step 1: Launch MiniTool Partition Wizard to access its interface.
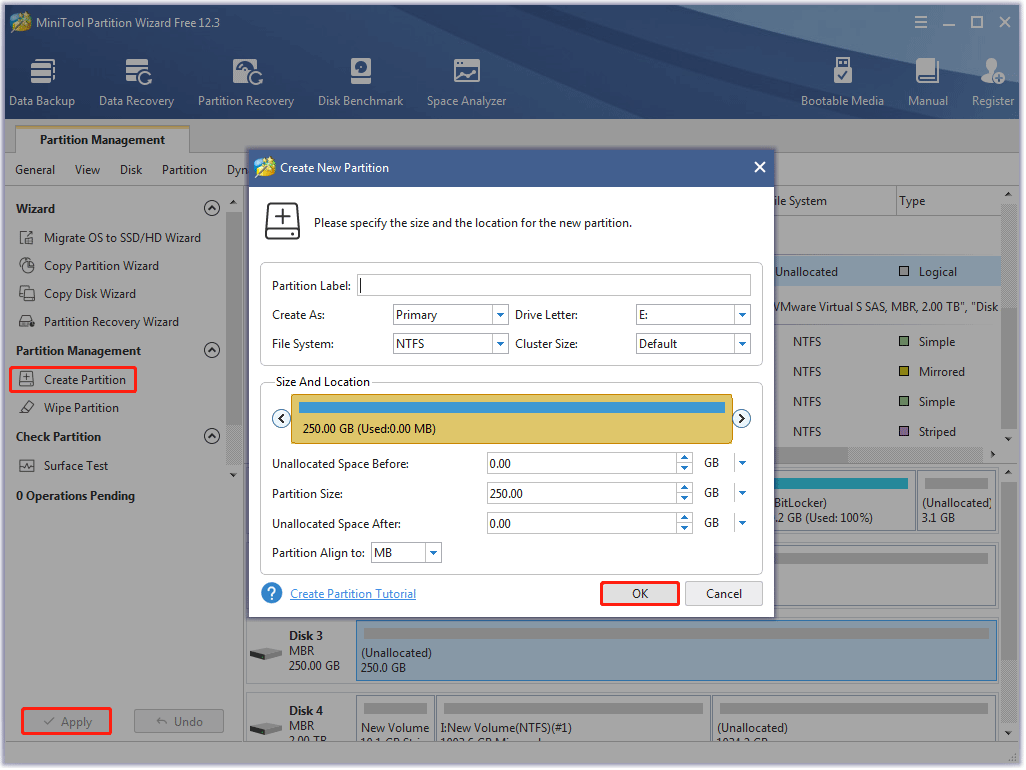
Step 2: Locate your USB drive in the disk map, highlight the unallocated space on the USB drive, and choose the Create Partition feature from the left panel.
Step 3: On the Create New Partition window, specify the following parameters and then click the OK button.
- Partition Label (option)
- Create As: choose Primary or Logical
- Driver Letter (you must assign a drive letter to the partition to be created so that you can see it in File Explorer)
- File System
- Cluster Size (you can keep the Default option selected if you don’t have enough knowledge of it)
- Size and location
Step 4: Click the Apply button to execute the pending task.
Once the partition is created, you can store files on your USB drive again.
Final Thoughts on Unpartitioning USB Drives
It is easy to unpartition a USB drive on Windows computers. You can either use the Windows built-in tools like Disk Management and Diskpart or try MiniTool Partition Wizard.
But note that unpartitioning a USB drive removes all partitions and data. Therefore, before unpartitioning your USB drive, do not forget to back up your important files on it.
Do you unpartition your USB drive successfully? If you have any problems with unpartitioning a USB drive, please feel free to tell us by leaving a comment; if you have any problems with MiniTool Partition Wizard, please contact us via [email protected].
How to Unpartition a USB Drive FAQ
You can utilize the Disk Management tool to resize a partition on a USB drive. Note the Extend Volume feature is available when there is unallocated space on the right of the partition you want to extend.
- Open Disk Management.
- Locate the partition to be resized, right-click it, and choose the Extend Volume feature or the Shrink Volume feature.
- Follow the on-screen instructions to resize the partition.
Apart from using Disk Management, there are other ways to resize partitions on a USB drive effortlessly and these ways are detailed in How Do I Resize Partition with a Free Partition Resizer.
- Open Disk Management and then activate the Delete Volume feature or the Format feature.
- Open Diskpart.exe and run the delete partition command or the clean command.

User Comments :