A great many users complain about the Skype app starting automatically on the computer and running in the background. How to stop Skype from starting automatically Windows 10? Let’s see the following effective methods provided by MiniTool.
As a fantastic communication tool for calls and chat, Skype attracts a great number of users around the world. However, it is an inconvenience for some users that Skype opens automatically when starting computers and log in to user account each time.
The following methods are elaborated based on your current Skype version. Now, let’s see how to stop Skype from starting automatically Windows 10.
Method 1. Stop Skype from Starting Automatically in Task Manager
If you find the Skype app is running on the Startup, the first and fastest method is to disable Skype on Startup using Task Manager. Here’s how to do that:
Step 1. Right-click any empty space in the Taskbar and select Task Manager from the context menu. Alternatively, press Ctrl + Alt + Delete keys and select Task Manager.
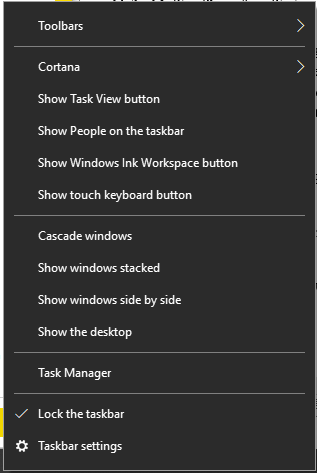
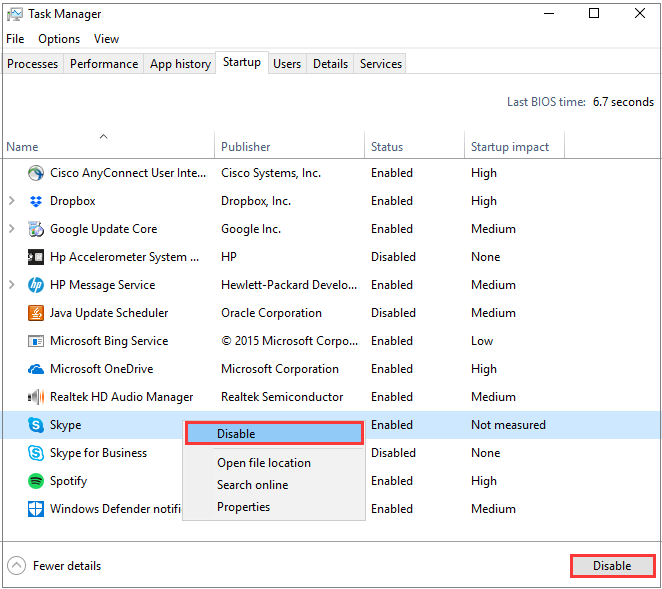
Step 2. In the Task Manager window and navigate to the Startup tab.
Step 3. Select the Skype program and click on the Disable button on the bottom. You can also right-click Skype and select Disable.
Method 2. Sign out from the Skype Preview App
If you click on the Skype Preview app and sign in using a Microsoft Account, the app will remain signed-in even after restarting your computer. This is because you make the mistake of singing-in to Skype. Here you can follow the steps below to disable Skype Windows 10.
Step 1. Click on the Windows 10 Start button and select the Skype Preview app from the context menu.
Step 2. Click on the Profile icon at the bottom left corner of the pop-up screen.
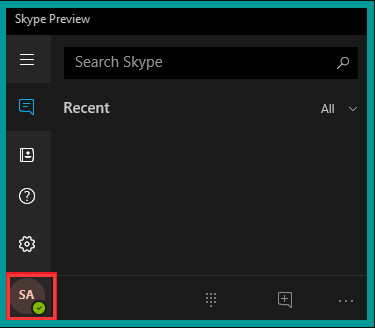
Step 3. Scroll down this screen and click on the Sign Out option.
After that, the Skype Preview app won’t start automatically from your Windows 10 PC.
Method 3. Change the General Settings of Skype
Some users reported that the full version of the Skype Desktop app also starts automatically with the computer. If you are using this desktop version, follow the steps below to stop Skype from starting Windows 10.
Step 1. Sign in to your Skype account.
Step 2. Navigate to the Tools tab on the top menu and click on Options from the drop-down menu.
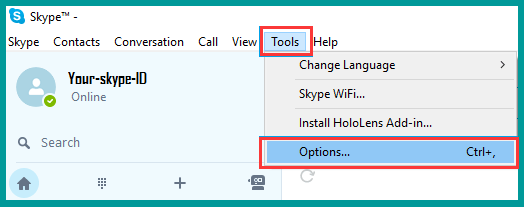
Step 3. Navigate to the General settings tab in the pop-up window, and then uncheck the box for Start Skype when I start Windows and click on the Save button.
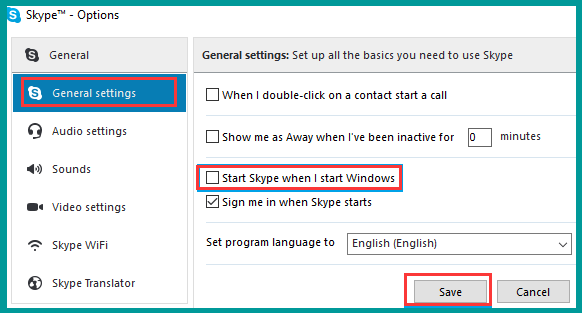
After that, you will find the Skype app won’t start automatically on your Windows 10 PC. It will start only when you click on the Skype shortcut and launch it.
Method 4. Stop Skype from Starting Automatically for Business
How to disable Skype Windows 10 for business? If you are using Skype for business, you can follow the steps below to stop Skype from starting automatically on Windows 10 computer.
Step 1. You need to sign in to your Skype for Business account from the Windows 10 Start button.
Step 2. Click on the Down-arrow button beside the settings icon, and then select Tools and click on Option.
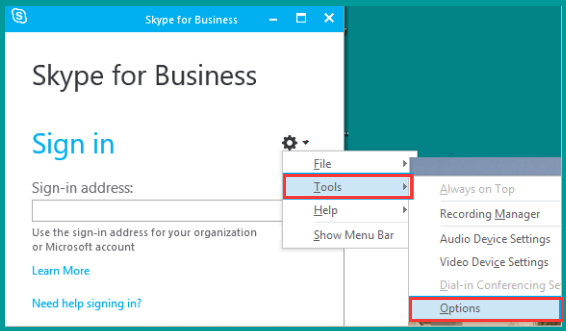
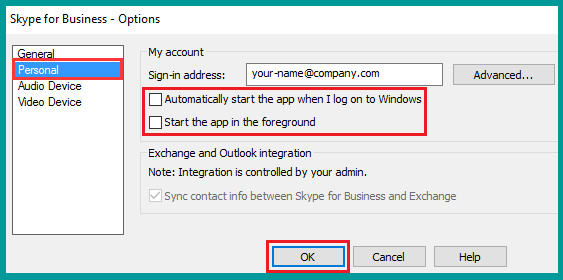
Step 3. Navigate to the Personal tab from the left-side menu, and then uncheck the box for Automatically start the app when I log on to Windows and Start the app in the background.
Step 4. Click on the OK button to save the changes and exit.
How to stop Skype from starting automatically Windows 10? The top 4 methods have been told to you. Now, it’s your turn to have a try.


![How to Disable Action Center Windows 10? [Complete Guide]](https://images.minitool.com/partitionwizard.com/images/uploads/2020/03/disable-action-center-win10-thumbnail.jpg)
User Comments :