Windows 10 surround sound is a practical sound that can enrich the fidelity and depth of sound reproduction by using multiple audio channels. With the Windows 10 5.1 surround sound setup, users can enjoy a great audio listening and media experience especially for those who seek an atmospheric soundtrack.
However, some people may encounter issues when configuring the Windows 10 5.1 surround sound. Don’t worry. Here is a full guide on how to set up 5.1 surround sound on PC Windows 10.
How to Set up 5.1 Surround Sound on PC Windows 10
Before you configure the 5.1 surround sound, make sure that your sound card has the support of 5.1. This is because not all onboard sound cards can be able to output 5.1 surround sound. Usually, a Desktop with newer motherboards supports 5.1 sound.
In addition, make sure that all the cords and wires are connected to your system properly and your sound card driver is updated to the latest version. If you don’t know how to update sound card driver, you can refer to Part 1.
Part 1. Update Your Sound Card Drivers
Step 1. Press Win + R keys to open the Run dialog box, and then type devmgmt.msc in the box and hit Enter to open this program.
Step 2. In the Device Manager window, expand the Sound, video and game controllers category, and then right-click on the sound card driver that matches your surround sound 5.1 setup, and select Update driver.
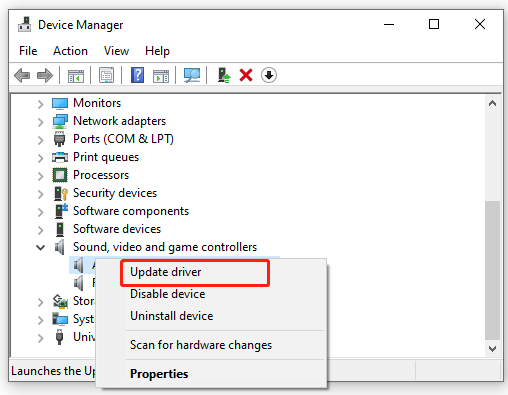
Step 3. Select the Search automatically for updated driver software option and follow the on-screen prompts to install any available updated sound card drivers.
Once installed, you can see how to enable surround sound Windows 10 from Part 2.
Part 2. Enable Windows 10 Surround Sound
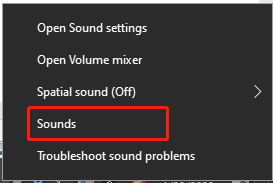
Step 1. Right-click the Speakers icon at the bottom right corner of the Windows system tray and select Sounds.
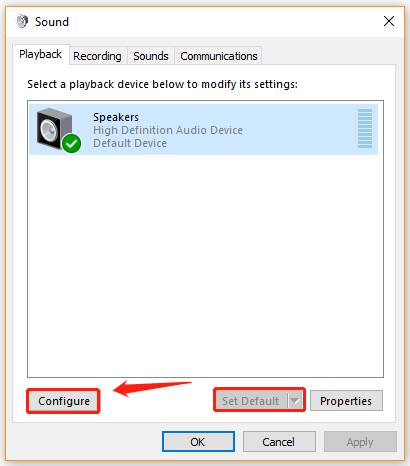
Step 2. Go to the Playback tab and select your playback device that supports Windows 10 5.1 surround sound from the list (here we take Speakers for example), select Set Default, and click on Configure.
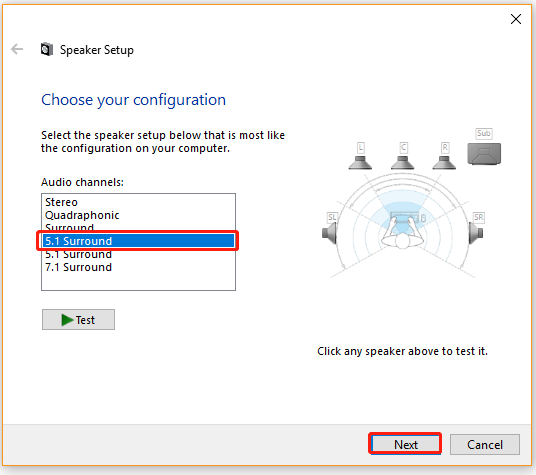
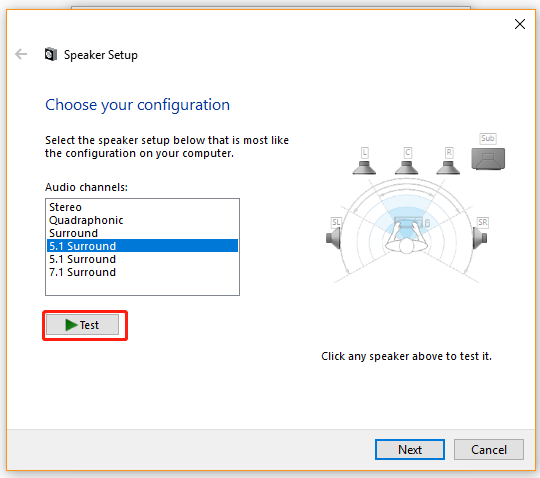
Step 3. Then the Speaker Setup window will pop up, select 5.1 Surround from the Audio channels section and click on Next.
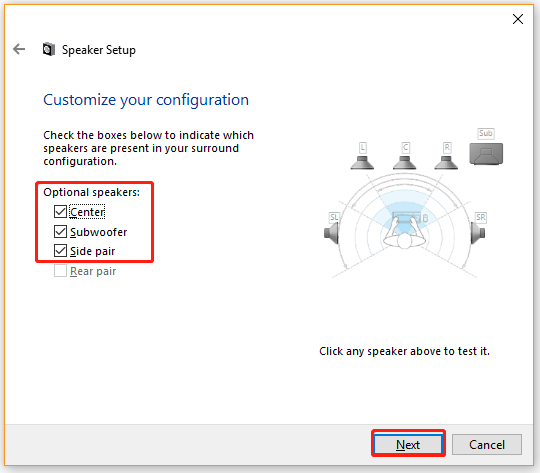
Step 4. In the new window, make sure you select all checkboxes under Optional speakers and click on Next.
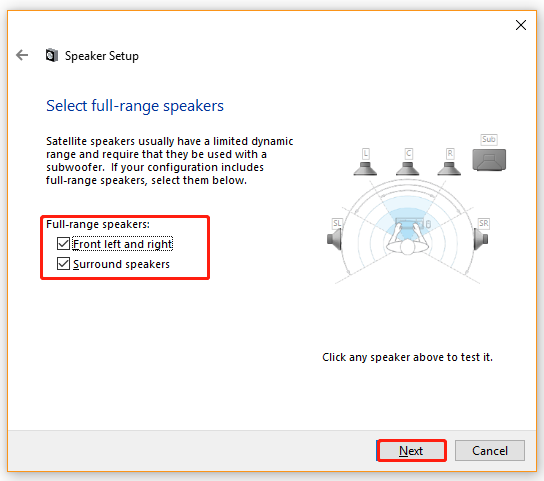
Step 5. Tick the checkboxes under the Full-range speakers and click on Next.
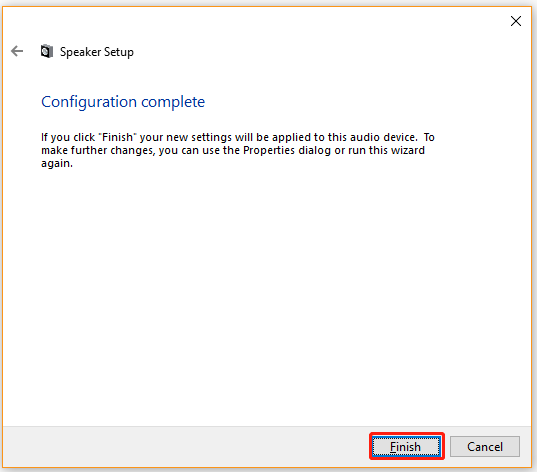
Step 6. Click on Finish to apply these changes and move down to the “how to test 5.1 surround sound” section.
How to configure 5.1 speakers in Windows 10? Now, I believe you already have known the answer. If you want to test your 5.1 surround sound, follow the guide below.
How to Test 5.1 Surround Sound in Windows 10
Now. It’s time to test the Windows 10 5.1 surround sound you just configured successfully. Here you can use the Windows built-in sound test software which can do a basic test to check if the audio channels work properly. For that:
Step 1. Open the Sound control panel again by following Step 1 and Step 2 in the “how to set up 5.1 surround sound on PC Windows 10” section.
Step 2. In the Playback tab, right-click on the 5.1 speakers that just set up and select Test.
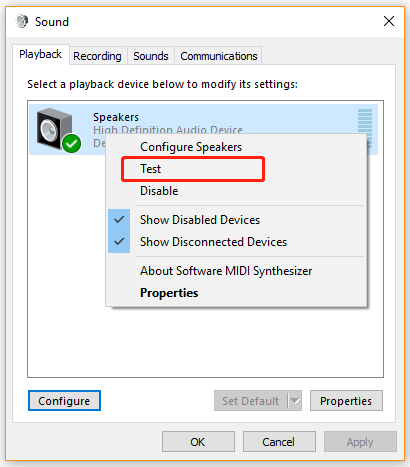
Step 3. Now, you should hear the testing sound from each of your 5.1 surround speakers in turns. Alternatively, you can click on Configure and click on Test to check which surround speaker is being tested, which can ensure that each speaker is connected to the right position.
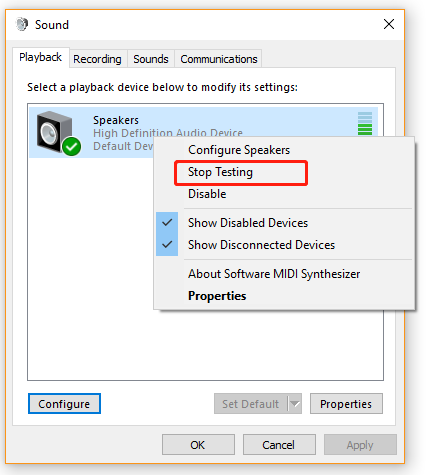
Step 4. When the test is completed, you can right-click the speaker and select Stop Testing.
How to enable 5.1 sound in Windows 10? All the steps have been illustrated. Now, it’s your turn to have a try.

![How to Use Dedicated GPU Instead of Integrated [Intel/NVidia/AMD]](https://images.minitool.com/partitionwizard.com/images/uploads/2022/01/how-to-use-dedicated-graphics-card-instead-of-integrated-thumbnail.jpg)
![How to Customize Windows Sound Schemes [Full Guide]](https://images.minitool.com/partitionwizard.com/images/uploads/2021/06/windows-sound-schemes-thumbnail.jpg)
User Comments :