Some windows users think that the Recycle Bin should be removed from the desktop as it stores useless files. How to remove Recycle Bin from desktop Windows 10/8/7 in 2019? This post from MiniTool will show you detailed steps.
Windows Recycle Bin is a folder mainly used to store files temporarily deleted by users. The files stored in the Recycle Bin can be restored to its original place if you do not empty the Recycle Bin. However, many users hold that the Recycle Bin stores useless files and takes up disk space. So they want to disable Recycle Bin on their computer.
Is there a way to remove Recycle Bin from desktop? The answer is positive. This post will show you how to disable Recycle Bin from desktop on Windows 10/8/7. And before this, you need to make files not go to the Recycle Bin when deleting them.
First Step: Make Files Not Enter the Recycle Bin When Deleting Them
Before removing Recycle Bin from desktop, you can follow the steps below to make files not go to the Recycle Bin when deleting them. The steps are very simple. Let’s have a look.
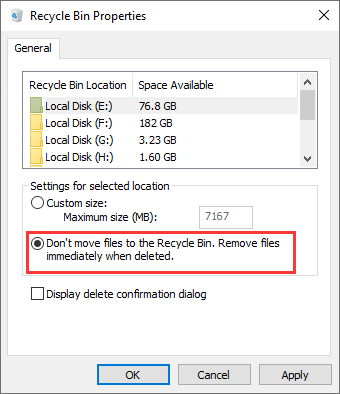
Step 1. Right-click on the Recycle Bin icon on your desktop and select Properties from the pop-up menu.
Step 2. Find and select the option for “Don’t move files to the Recycle Bin. Remove files immediately when deleted“.

Step 3. Click Apply and OK to apply the change. Then you can close the window.
Alternatively, you can use the shortcut Shift + Delete keys on the keyboard to delete files permanently. In this case, the files you are going to delete will not go to the Recycle Bin.
Then if you don’t know how to remove Recycle Bin from desktop Windows 10/8/7/XP, you can follow the steps in the next part.
Second Step: Remove Recycle Bin from Desktop Windows 10/8/7
The following will tell you how to remove Recycle Bin from desktop with detailed steps and screenshots.
For Windows 10 and Windows 8 Users
If you are running Windows 10 or Windows 8 operating system, you can follow the steps below to disable Recycle Bin on Windows 10/8.
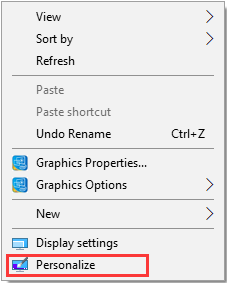
Step 1. Right-click the free space on your desktop.
Step 2. Select Personalize in the pop-up menu.

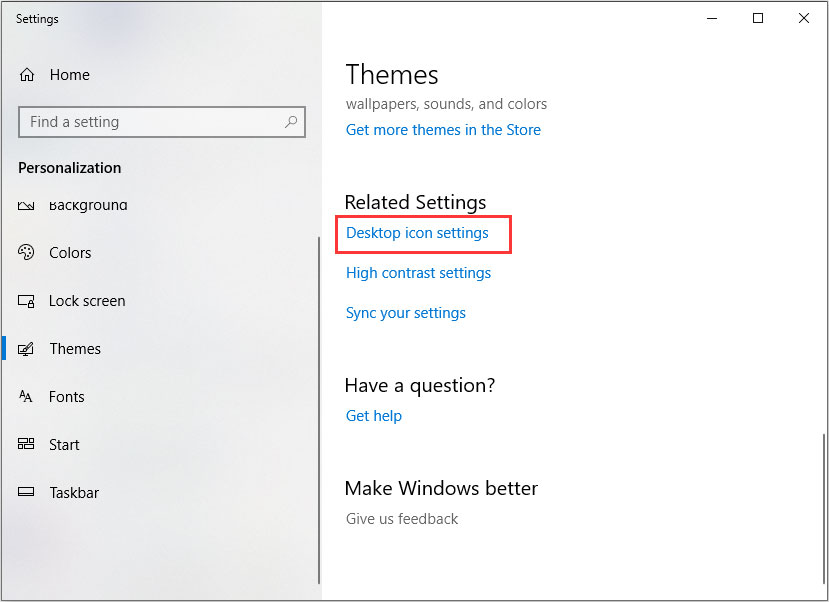
Step 3. In the left navigation menu, locate to the Themes tab.
Step 4. Under Related Settings, click on the Desktop icon settings options.

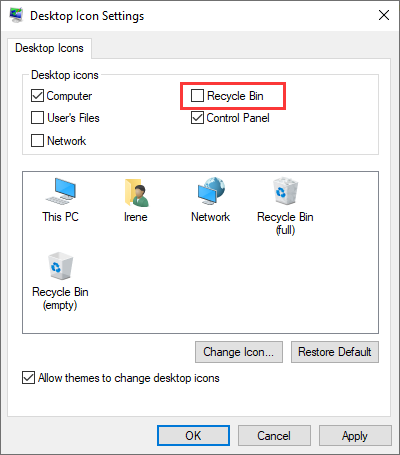
Step 5. Uncheck the Recycle Bin box.

Step 6. Click Apply and OK to all the change.
For Windows 7 Users
Step 1. Right-click the free space on your desktop.
Step 2.Select Personalize from the pop-up menu.
Step 3. Then click the Change desktop icons on the left side.
Step 4. Uncheck the box next to the Recycle Bin.
Step 5. Click Apply and OK to allow the change.
Bottom Line
Have you successfully removed Recycle Bin from your desktop? If you encounter any problems during the process, you can leave a comment in the following comment zone. If you have better solutions, please share it with us.

User Comments :