Do you know how to protect your important and valuable data in Windows? To ensure data security, this article of MiniTool will show you 5 ways to protect your valuable, personal or confidential data in Windows operating system.
For enterprises, a lot of valuable data like contracts, business proposals, report forms, and staff information may be saved on their computers. Actually, for ordinary people, valuable, personal, private or sensitive information are always saved in their personal computer. And I believe everyone hopes to prevent these data from unauthorized access.
In this post, several simple ways to protect our valuable or confidential data on Windows-based computer will be introduced. You may have a look
Way 1. Hide Specific Files or Folders
Follow the detailed steps below to hide specific files or folders on your PC to protect privacy.
Step 1. Firstly, open the drive where important files or folders are saved and locate the very file you want to hide.
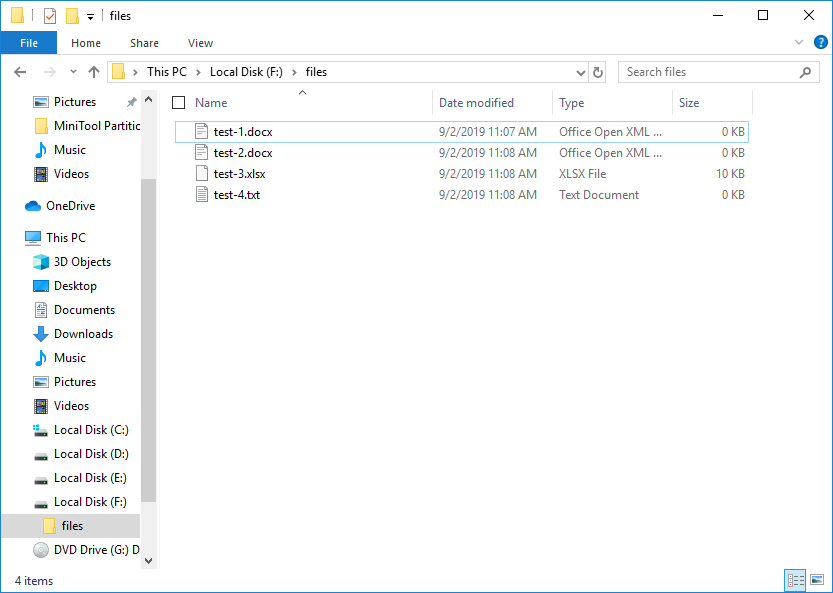
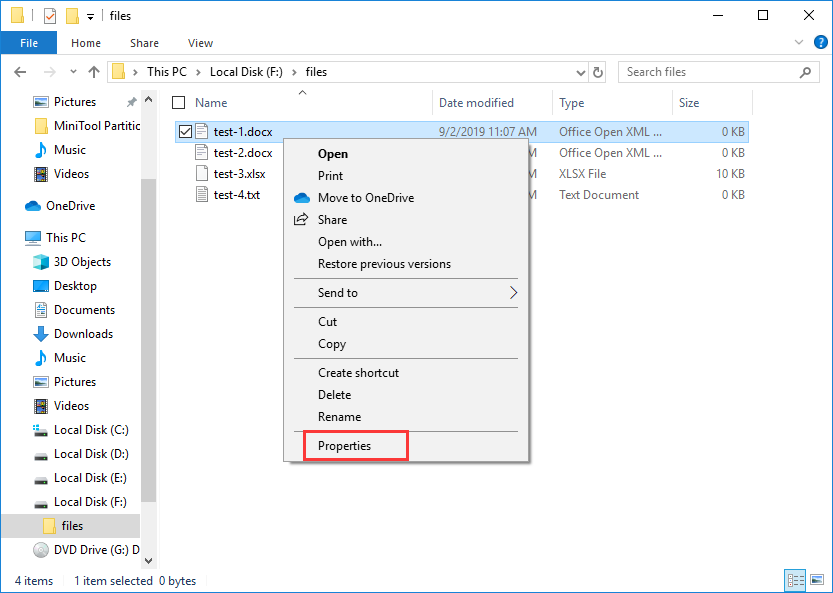
Step 2. Then, right click the file which needs hiding and choose Properties feature from the pop-up menu. Here, we take hiding the file named test file 1.xls for example.
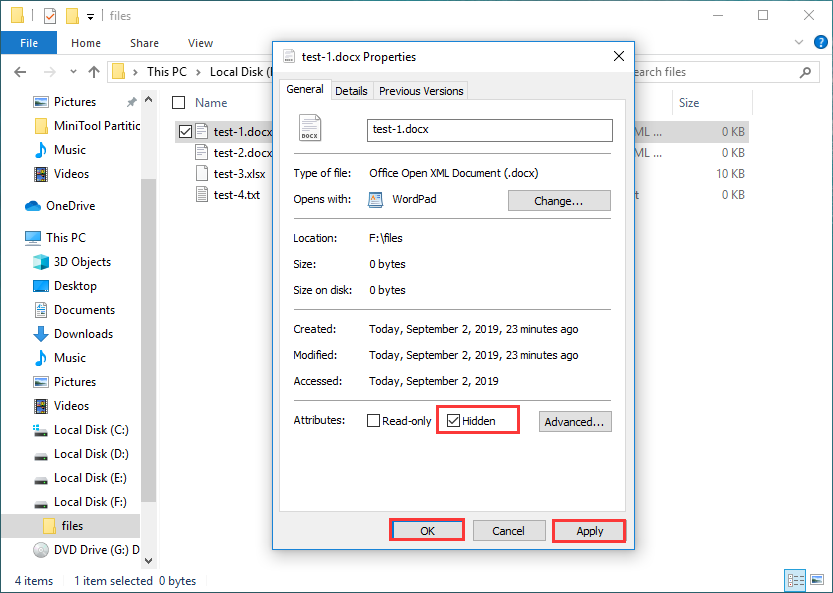
Step 3. Next, check the option Hidden under General tab and click Apply and OK button at the bottom. After these settings, you will find the selected file disappeared from the drive:
Step 4. At this time, common people will be unable to access the hidden file.
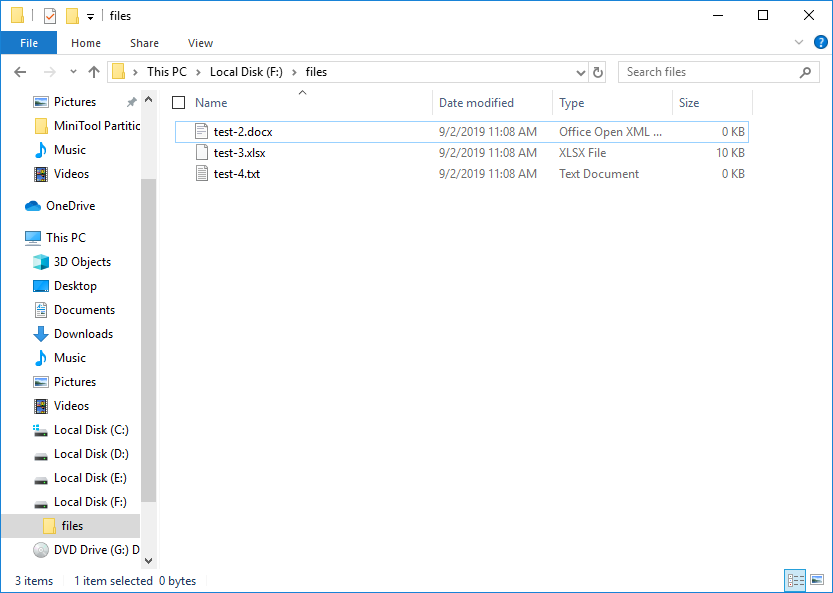
Under this situation, users just need to switch to Don’t show hidden files, folders, or drives, and then the file will be missing. As to how to enter Folder Options, we will introduce right now.
However, this is just the simplest way to protect valuable or personal data, and users who are familiar with computer can unhide your files very easily. They only need to do the following settings:
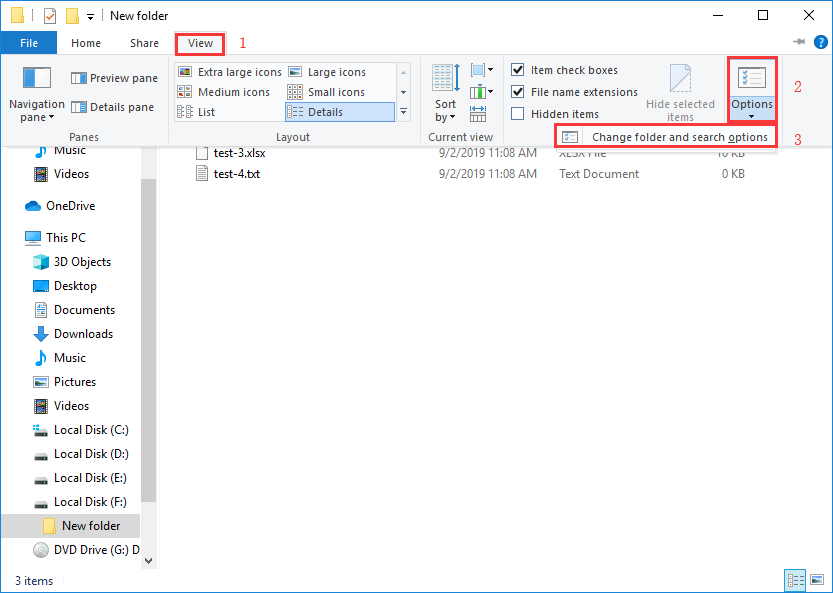
Step 1. Go under View -> Options -> Change folder and search options to open Folder Options.
Step 2. Under View tab, choose Show hidden files, folders, and drives and click OK.
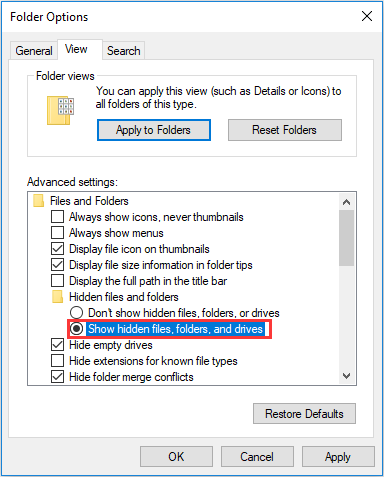
After these steps, they can see and open the hidden file. Aiming at this situation, I will introduce the second way to protect our private data.
Way 2. Make the Drive Saving Important Files Disappear from Windows Explorer
After entering Windows Explorer or opening This PC, you will find multiple hard disk drives which are marked with C:, D:, E:, F:, etc.:
All files are saved in these drives. To access stored files we should open the drive at first. Therefore, as long as we make a drive disappear from this place, naturally others will be unable to see files saved in this drive. There are 2 ways to make a drive missing.
Hide Hard Disk Drive in Windows Disk Management
Step 1. Right-click Windows Start menu and select Disk Management to launch Windows snap-in Disk Management utility:
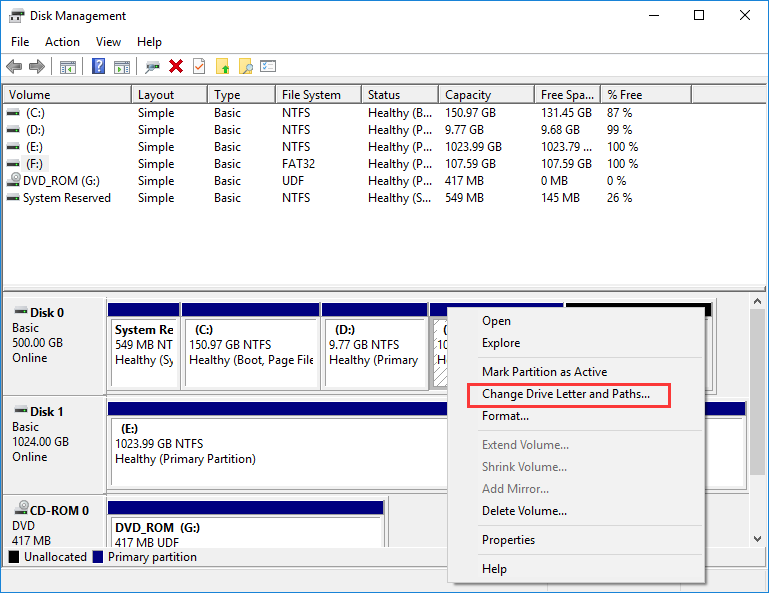
Step 2. Then, right click the drive which saves valuable files or folders and choose Change Drive Letter or Paths.
Step 3. Next, remove the letter of this drive.
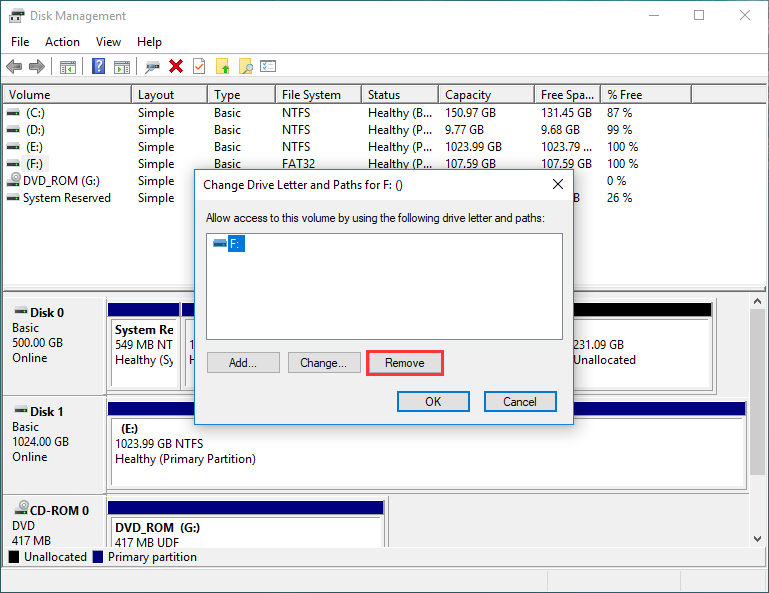
Step 4. After these operations we will find drive F disappears from File Explorer.
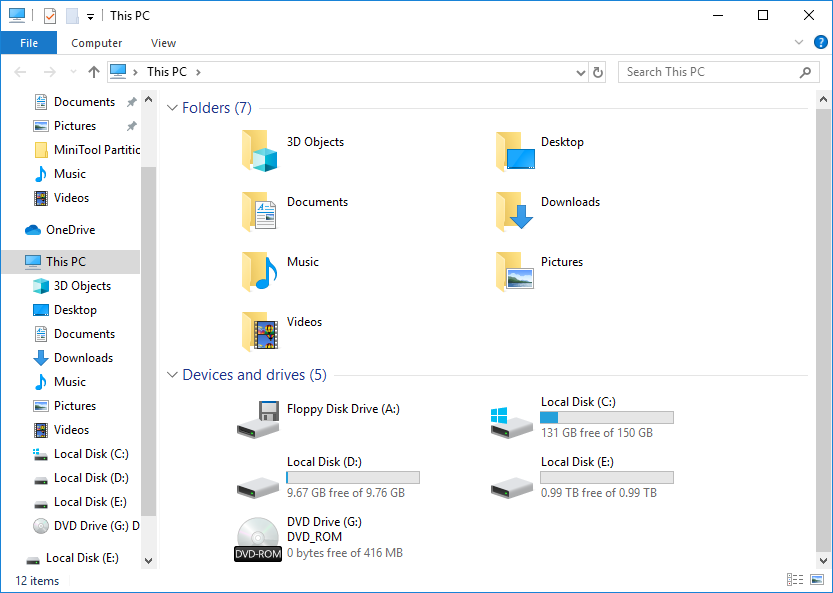
That is to say files saved in the hidden drive are inaccessible. However, if the one who wants to see your privacy is familiar with Windows Disk Management tool, they can unhide the drive very easily.
Detailed steps are: right click the hidden drive in Disk Management, choose Change Drive Letter and Paths, and add a letter for this drive. Therefore, users had better employ the second way to hide a drive, and it is to use free partitioning tool. The second method is much better than the first one.
Hide Hard Disk Drive in Partitioning Programs
Currently, there are professional partitioning toolkits which can help hide a drive, and users will be unable to unhide it in Disk Management. Here, you can take the freeware MiniTool Partition Wizard for example. Steps to hide a hard disk drive in this program are as follows:
Step 1. You need to download the freeware by clicking the following button at first. Then install and launch the freeware to get its starting interface.
MiniTool Partition Wizard FreeClick to Download100%Clean & Safe
Step 2. Select the drive which needs hiding and choose Hide Partition feature from the left side (a hard disk drive can also be called partition).
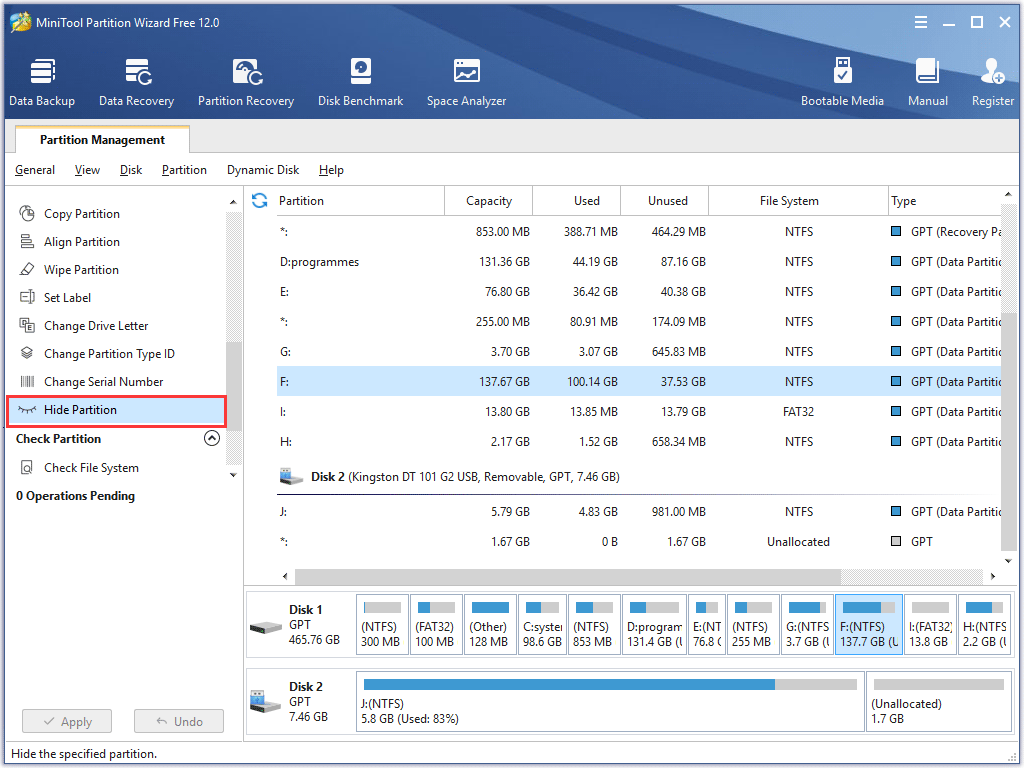
Step 3. Now you can preview drive letter of the selected partition disappears and the state becomes Hidden. At this time, we only need to make the last step. Click Apply button which is on the top left corner to make the preview effect applied.
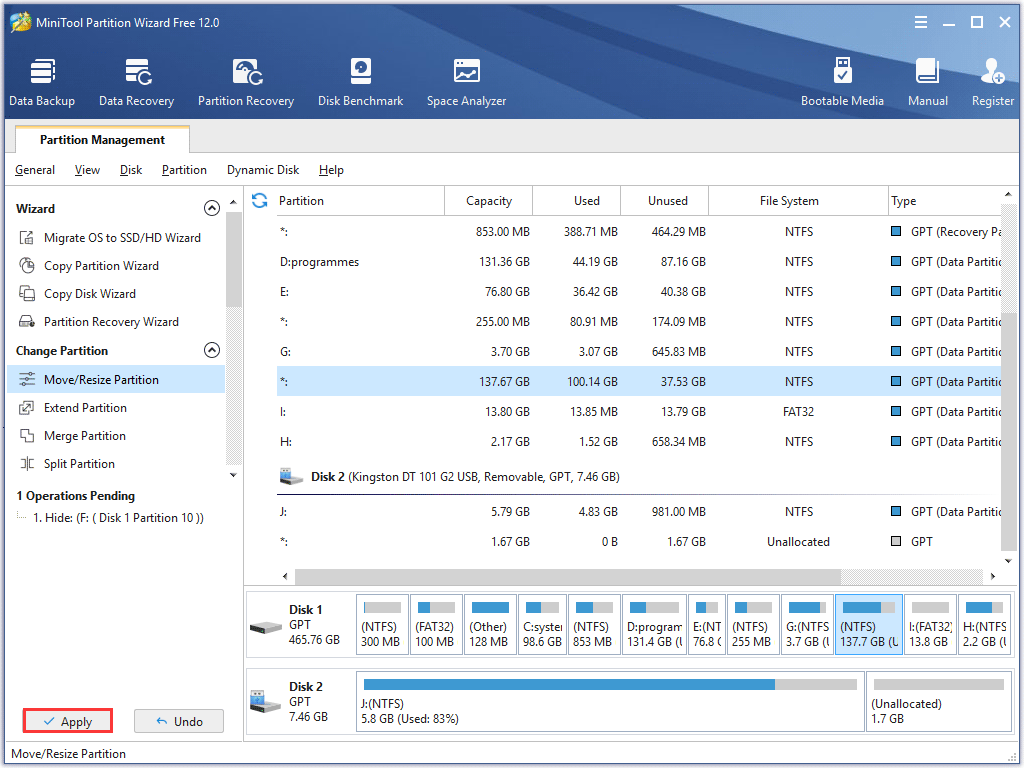
Once MiniTool Partition Wizard shows it applied all the pending changes successfully, the very drive will disappear from File Explorer.
After opening Windows Disk Management and right clicking the hidden partition, you will find the feature Change Drive Letter and Paths is grayed out:
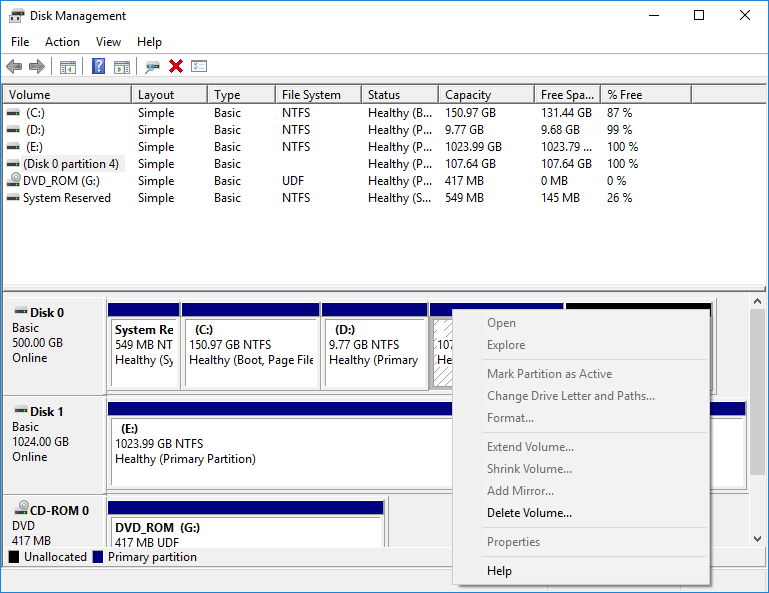
At this time, as long as the one who are planning to see your valuable or personal information does not have professional knowledge, they can do nothing. However, if you want to make the hidden hard disk drive visible again, please take the following operations:
- Launch MiniTool Partition Wizard Free Edition to get its main interface
- Select the hidden drive and choose Unhide Partition function from the left action pane.
- Choose a drive letter for this drive and click OK.
- Click the functional button Apply to perform the change.
After that, you can open and access the drive. However, if you think both hiding files/folders and hiding hard disk drives are not safe enough to protect your important data, create a password for your computer or encrypt the hard disk drive.
Way 3. Set a Password for Computer
When installing Windows OS, users will be prompted to create a password for their computer, which is good for preventing others from entering their computer without authority. Actually, even if Windows has been installed, users can also create such a password. Take the following steps to do the setting:
Step 1. Input Control Panel in the Windows 10 Cortana search box. Click the best match to open Control panel.
Step 2. Then, view items by small icons and choose User Accounts:
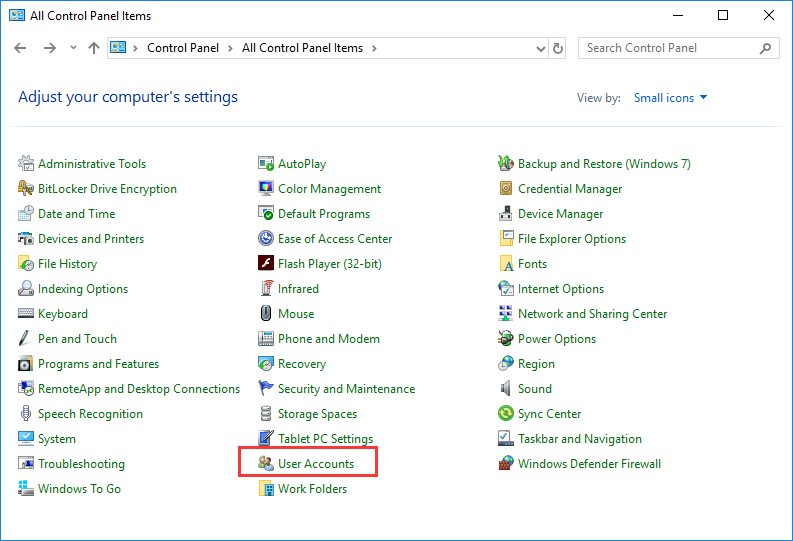
Step 3. Next, choose the option Create a password for your account:
Step 4. Then, type and confirm password for your account and click Create password to apply the password.
Step 5. Once the password is set successfully, all people including yourself will be asked to input the password every time the computer starts. Without a correct password, nobody can enter it.
Of course, users can also encrypt the drive which saves valuable files by making use of Windows built-in encryption program BitLocker to protect data.
Way 4. Encrypt a Drive with BitLocker
Since Windows Vista, the BitLocker feature is added to some editions of Windows OS to protect data by providing encryption for entire volumes. By default, it uses the AES encryption algorithm in cipher block chaining (CBC) mode with a 128-bit or 256-bit key, combined with the Elephant diffuser for additional disk encryption-specific security.
To enable this function, you need to do the following changes:
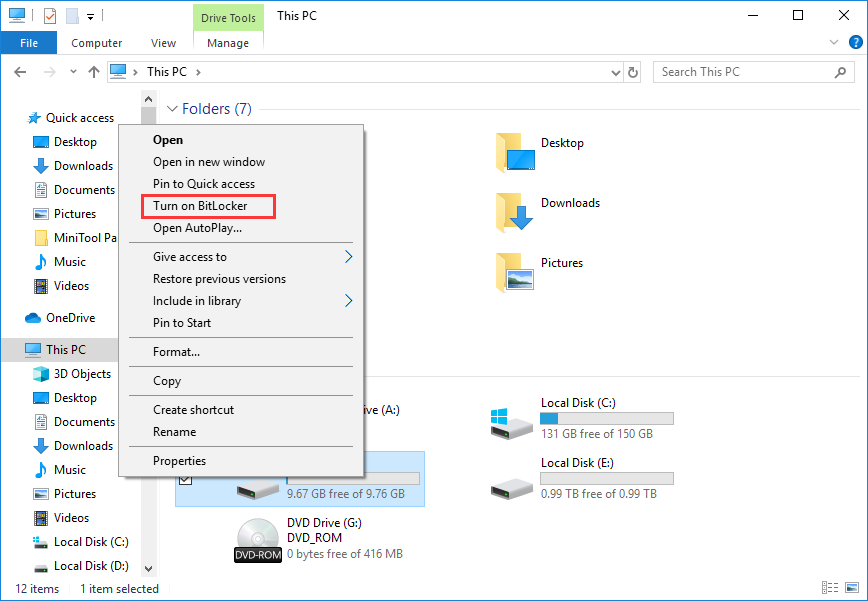
Step 1. Open This PC or go to File Explorer, right click the drive you want to encrypt, and choose Turn on BitLocker.
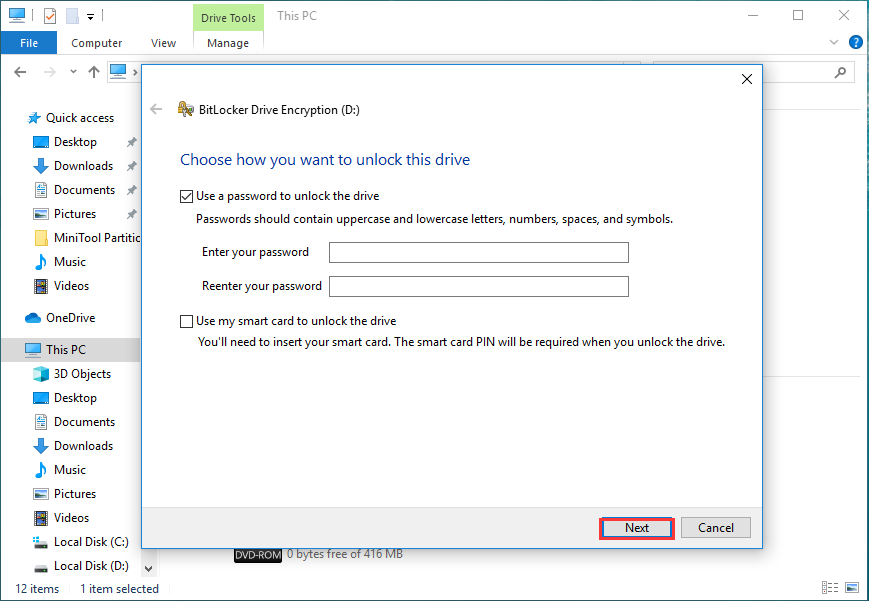
Step 2. Choose a way to unlock the drive. Here, I choose Use a password to unlock the drive. Then, type and retype the password you set and click Next.
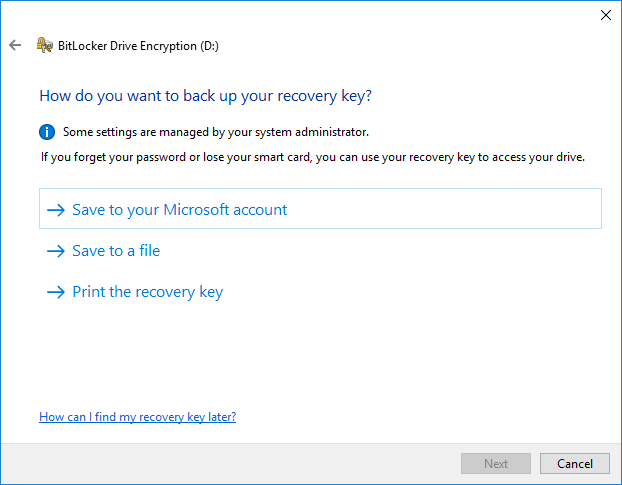
Step 3. Choose a location to save the recovery key with which you can access the encrypted drive when you forget the password.
Step 4. Choose how much of your drive to encrypt.
Step 5. Choose which encryption mode to use.
Step 6. Click Start Encrypting to perform the encryption.
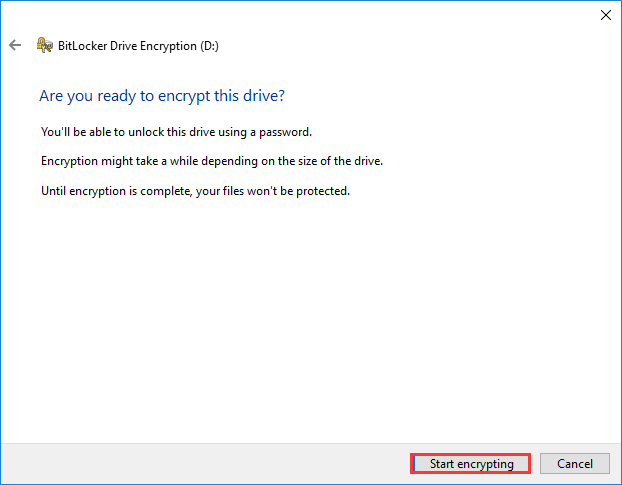
If the drive saves a lot of files, the encryption may cost much time, so please wait patiently. However, there is a big limitation on BitLocker: if you do not restart computer, other people can access the encrypted drive without typing the password as long as the drive has been unlocked for a time.
But there are solutions. For example, you can run CMD and type the command: manage-bde.exe N: -lock. This is a command helping lock the BitLocker encrypted hard disk drive without us restarting computer.
From all content above, you can see that you can hide data or hide a drive to stop important files from being seen or stolen by others, and you can also encrypt our computer or hard disk drive to avoid privacy leakage.
Actually, a quite important issue related to data security may be ignored by a lot of users: deleted or formatted data on our deprecated hard disk or mobile devices can be recovered by making use of data recovery software or hardware technology.
And many people have suffered both economic and spiritual troubles resulting from privacy leakage. Therefore, next we will introduce the last way to protect our important data on Windows platform – erase private or confidential data permanently.
Way 5. Erase Useless but Confidential Data Thoroughly to Avoid Privacy Leakage
When a storage device such as hard disk and USB flash drive cannot meet your actual storage demands, for instance it is too small to save large-capacity files or has been used for a long time, you may send it to others or sell it.
When there is something wrong with our mobile phone, digital cameras, or other digital devices, you may send it to repair. Of course, most people will backup needed files and then delete private information or directly format the device before selling, but I have to say this may make their important or sensitive information leaked too, because both deleting and formatting won’t operate the real data.
For more details, please see Erase Private Data Permanently. Actually, it is highly suggested that users wipe the entire hard disk drive or external device, because wiped data cannot be recovered any more.
To do this kind of erasing, users need to download a free partitioning tool from the internet, and MiniTool Partition Wizard Free may be a good choice since it employs the DOD 5220.28-STD (7 passes) technology which is standardized by US Department of Defense to wipe data. Detailed steps are as follows.
How to Wipe a Drive with MiniTool Partition Wizard Free
Step 1. Firstly, download and install the program on your Windows computer. Then, launch it to get the main interface.
MiniTool Partition Wizard FreeClick to Download100%Clean & Safe
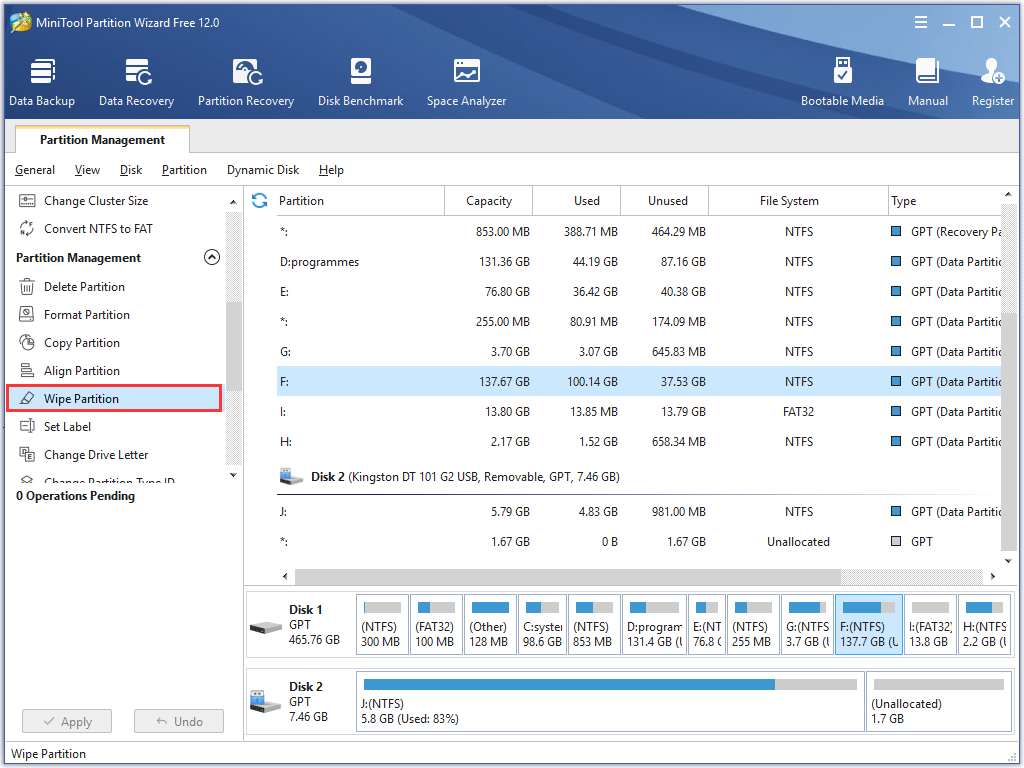
Step 2. Here you can see all disks and hard disk drives recognized by Windows. Please select the drive storing important or private information and choose Wipe Partition feature from the left side to get the interface for choosing wiping methods.
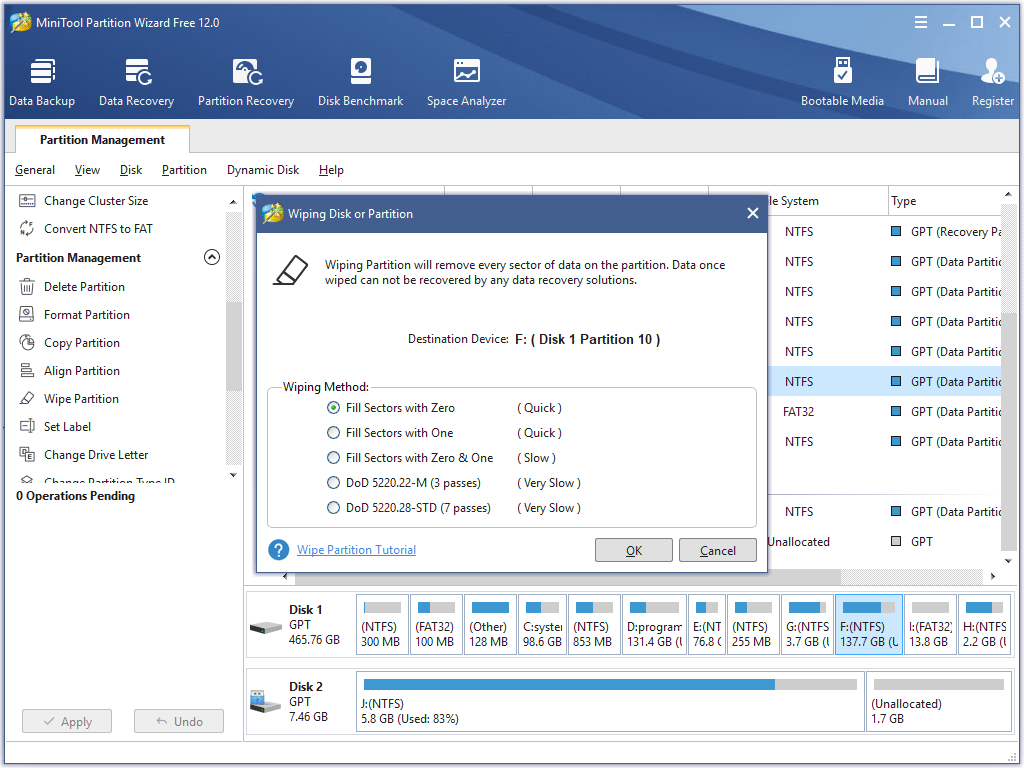
Step 3. There are 5 wiping methods in total. From the top to the bottom wiping effect strengthens but more and more time should be cost. Here we suggest choosing the last one namely DoD 5220.28-STD though it is the most time-consuming method, because it is the safest way. Then, click OK to go back to the main interface.
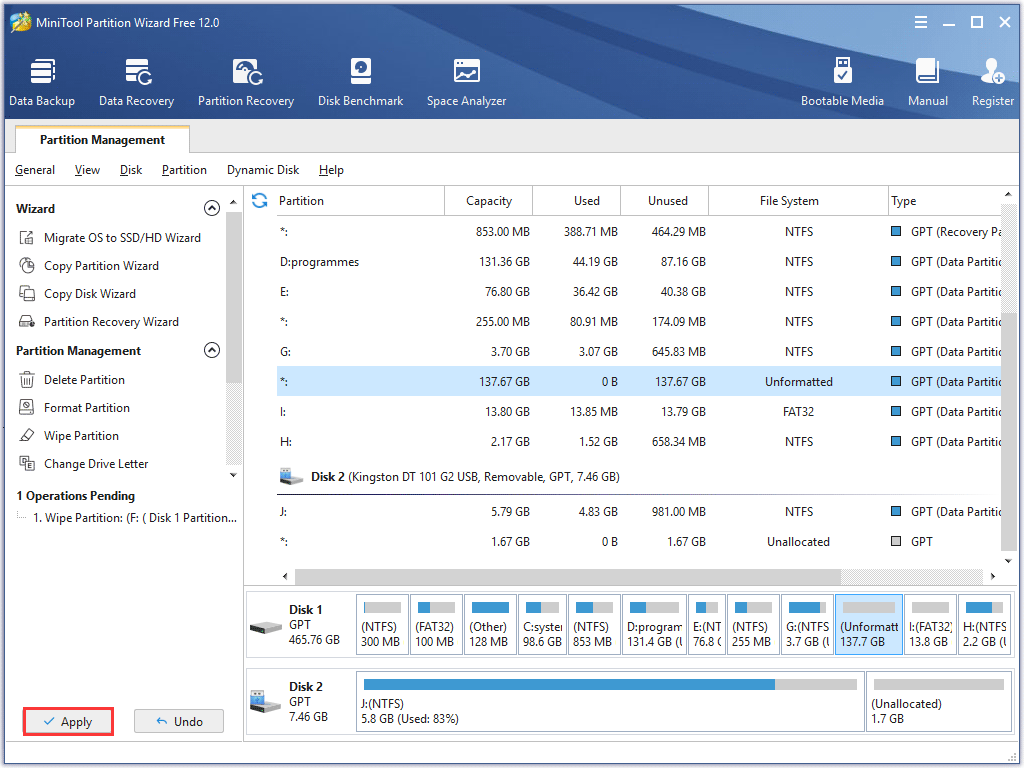
Step 4. From this interface we can see used space of the selected drive becomes 0B, and it is unformatted now. At this time, as long as we click Apply button on the top, all changes will be performed. Of course, if you want to erase the entire hard disk, the function Wipe Disk is available.
Bottom Line
These are 5 ways to protect our important or confidential information, and I hope one or some of them are useful for you. However, if you think no solution here is available for you, you can encrypt your storage device by using professional encrypting software, but this may be troublesome and chargeable.
Of course, you can also purchase a hard disk employing hardware encryption technology and save private and valuable data on it.
If you have any question about how to protect important data in Windows 10/8/7 with MiniTool Partition Wizard Free Edition, you can leave a message in the following comment zone and we will reply as soon as possible. If you need any help when using MiniTool software, you can contact us via [email protected].
Protect Important Data in Windows FAQ
- Hide some important files or folders on your PC via Task Manager.
- Hide hard disk drive via Disk Management or third-party software.
- Create a password for your computer.
- Encrypt the drive with BitLocker.
- Erase useless but confidential data with MiniTool Partition Wizard.

User Comments :