It’s annoying to hear an echo while you are talking with your friends in a party chat or just playing certain games on Xbox. Why does an echo appear on your Xbox? Well, it may be caused by various reasons and the following are some of them:
- Faulty connection: If you connect the headset to your Xbox improperly, like using a damaged cable, you may hear the echo.
- Low battery level: If you are using a microphone that has a low battery, it’s possible to hear an echo.
- Poor Internet connection: It’s also a factor that may lead to echoing on your Xbox.
- The built-in microphone: If you are using your Xbox console’s internal microphone, an echo will be caused when the microphone captures the speaker’s sound.
- Loud speakers: An echo might be caused when you or others speak loudly.
When an echo is generated on your Xbox, it really affects your gaming experience. Therefore, it’s necessary to stop Xbox from echoing. If you don’t know how to fix echo on Xbox, you can follow this guide below.
Method 1: Turn Down the Volume of Your Headset
The Xbox echo issue may appear if the volume of your headset is set too high. In this case, you can attempt to stop Xbox from echoing by simply turning down the volume. Or you can just take your headset a little far from yourself. That may also help. If the echo persists, you need to go on with other solutions.
Method 2: Reconnect Your Headset
If you have no idea about how to fix echo on Xbox, you can try removing your headset and then connecting it back. It can always easily help you solve temporary glitches.
If you are using a wired headset, it’s recommended to clean the headset cable with a clean and dry cloth before you connect it back to your Xbox controller. And you ought to make sure your headset plug is fully inserted into your Xbox controller.
Method 3: Check Your Battery
If the headset you are using is wireless, you are likely to hear an echo when the battery level of your headset is low. Do you know how to fix an echo on Xbox on this occasion? Well, you can resolve the echo issue simply by charging your headset’s battery. In addition, if the battery has been used for a long time, you should replace it with a new one.
Method 4: Check Your Internet Connection
In some cases, a poor Internet connection may lead to the Xbox echo issue as well. Therefore, if you don’t know how to fix echo on Xbox, it’s a good way to check your network connection.
To make sure your Internet connection is stable, you can try restarting your router. If the Internet status is good but the echo is still heard, you need to try the next methods.
Method 5: Power Cycle Your Xbox Console
Sometimes, performing a power cycle may help if you have no idea how to fix an echo on Xbox. The following are detailed steps.
Step 1: Press and hold the Xbox button for about 10 seconds to turn off your console completely.
Step 2: Remove all the power cables from your console. Then wait for several minutes.
Step 3: Reconnect these power cables and then turn on your Xbox console.
After that, go to check if you stop Xbox from echoing successfully.
Method 6: Change the Xbox Chat Output Settings
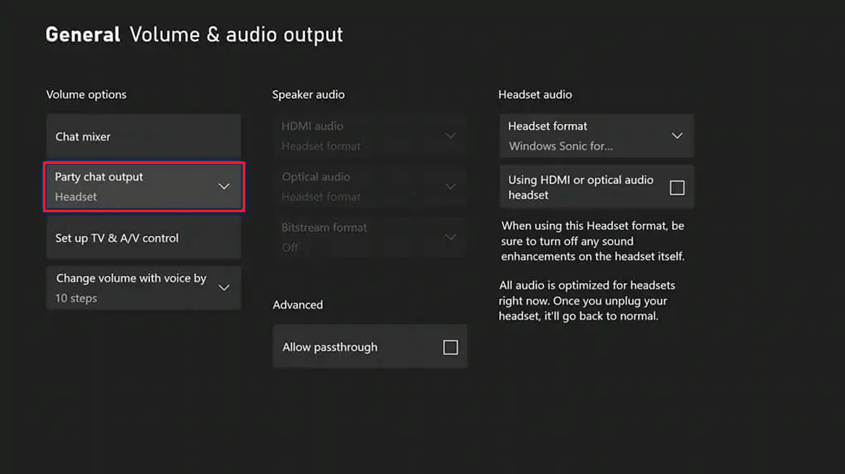
If you configure the Xbox Chat Output settings incorrectly, both your headset and speakers will generate audio. As a result, you will hear an echo. So, to stop Xbox from echoing, you need to adjust your settings.
Step 1: Press the Xbox button on your controller to open the guide.
Step 2: Go to Profile & system > Settings > General > Volume & audio output.
Step 3: Hit Party chat output and then select Headset from the drop-down menu.

After you finish the operation, the echo might be resolved.
Method 7: Update Your Xbox Controller
The Xbox echo issue may come out if your Xbox controller is outdated. As for this, to stop Xbox from echoing, we recommend you update your Xbox controller.
Step 1: Connect your Xbox controller to your console with a micro-USB cable.
Step 2: Navigate to Profile & system > Settings > Devices & connections > Accessories.
Step 3: Select the controller you want to update. Then click the three-dots icon to check the firmware version of your controller.
Step 4: If there are any updates available, you will see “Update”. Just select Firmware version and then follow the on-screen instructions to update your controller.
Once the update completes, you will not hear an echo anymore.
Method 8: Update Your Console
If you fail to resolve the Xbox echo issue with the above solutions, you can attempt to update your console. It may help you solve the issue. To update your Xbox console, there are two ways available for you.
Way 1: Update Your Console via the Internet
If your console is connected to an Internet that is working perfectly, you can simply update your console following the steps below.
Step 1: Press the Xbox button on your controller to open the guide.
Step 2: Go to Profile & system> Settings > System > Updates & downloads > Update console.
Step 3: If any updates are available, you will see the message “It’s time to update” on the screen. Just select Start update and then press the A button to start the update process.
Way 2: Update Your Console Offline
If your console is not connected to the Internet or you fail to update your console via Way 1, you can try an offline update. To do this, you need to follow the three stages below.
Stage 1: Prepare a Compatible USB Flash Drive
If the USB flash drive is not compatible with your Xbox console, your console cannot recognize the USB drive and the update won’t succeed. Therefore, to begin the system software update, you need to prepare a USB flash drive with at least 6 GB and NTFS file system.
To format the USB drive, you can use File Explorer and Disk Management on your Windows PC. But sometimes when you use the two tools, you may fail to carry out the formatting process with some issues, like the “Windows was unable to format removable disk” issue.
Therefore, to make sure the operation can be executed successfully, we recommend you use a third-party piece of software – MiniTool Partition Wizard. It is a comprehensive partition manager that enables you to manage your disk and partitions better with many convenient features. And Format is one of the basic features you can execute easily.
How to format the USB flash drive with MiniTool Partition Wizard? Follow the steps below, please.
Step 1: Download and install MiniTool Partition Wizard on your Windows PC.
MiniTool Partition Wizard FreeClick to Download100%Clean & Safe
Step 2: Connect the USB flash drive to your computer and then launch MiniTool Partition Wizard to enter its main interface.
This process will erase all the data in the USB drive, so you’d better back up the important files before you start the operation.
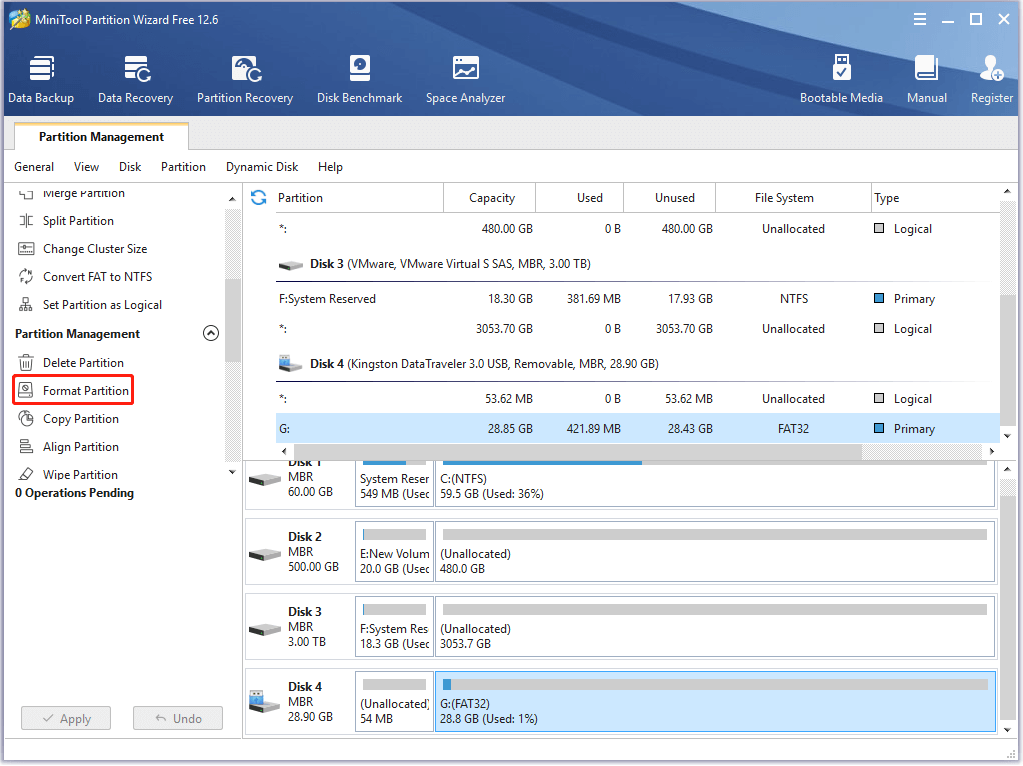
Step 3: Click the partition on the USB flash drive and then select Format Partition from the left action pane.

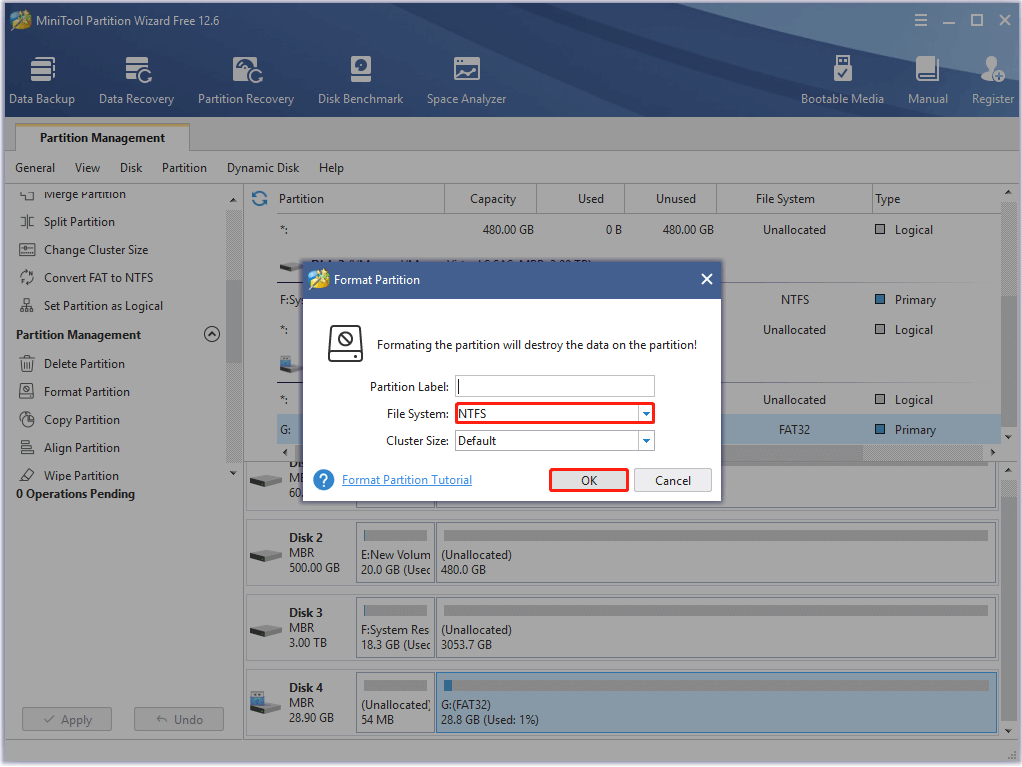
Step 4: Select NTFS as the file system and then click OK.

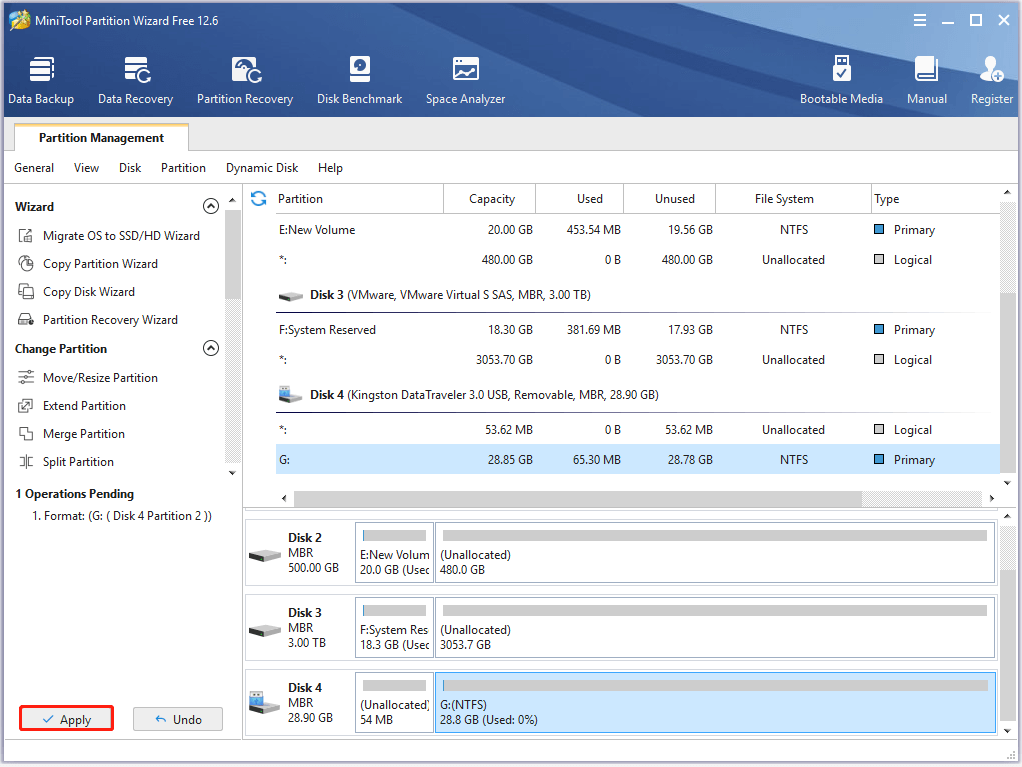
Step 5: Finally, click Apply to execute the operation.

Stage 2: Download and Unzip the Update Files
After you format the USB flash drive to NTFS, you should start downloading the updated files.
Step 1: Download the Offline System Update file OSU1.
Step 2: Once the file is downloaded, open File Explorer. Then right-click the file and select Extract all to unzip it.
Step 3: In the unzipped folder, find the file named $SystemUpdate and copy it to your USB flash drive.
The file should be copied to the root directory, or your console cannot recognize it.
Step 4: Remove the USB drive from your computer safely.
Stage 3: Install the Update
It’s time to update your console after you save the update file on the USB drive.
Step 1: Turn off your console and then unplug the power cord to ensure that your console is totally powered off.
Step 2: Wait for about 30 seconds, and then plug the power cord back into your console.
Step 3: Press and hold the Pair and Eject buttons on your console. And then press the Xbox button.
Step 4: Hold the Pair and Eject buttons for 10-15 seconds until you hear the second “power-up” tone.
Step 5: The console will power up and get into the Xbox Startup Troubleshoot screen directly.
Step 6: Connect the USB flash drive that contains the Offline System Update file to your Xbox console.
Step 7: After that, you should press the D-pad and A buttons on your controller to select the Offline system update option on the screen. Then the update will start with the file on your USB drive.
Step 8: After the update is completed, the console will restart automatically. And you can go to check if the Xbox echo issue is repaired.
Bottom Line
All these methods mentioned in this post are available. If you are worried about how to fix echo on Xbox, you can try them one by one until you solve the issue. If you have any other good ideas about how to fix echo on Xbox, you can leave a message in our comment part below.
If you have any problems while using MiniTool Partition Wizard, you can contact us via [email protected].

User Comments :