RAM speed impacts how fast our computer can run. However, not many people know how to check RAM speed. Do you know how to check RAM speed Windows 10? This post from MiniTool will show you two different methods to check RAM speed on Windows 10.
RAM is short for Random Access Memory. It is the physical working memory used by your PC to temporarily stores computer data. Your PC stores all open applications, files, and other data are stored in RAM for quick access.
The more RAM you have installed, the more programs you can run at the same time. And the RAM speed is vital too. RAM speed is measured in megahertz (MHz). The faster RAM is, the faster computers can store and retrieve the data stored in local memory.
Many people know how to check How Much RAM Do I Have Windows 10 but don’t know how to find out the RAM speed on Windows 10.
How to check my RAM speed Windows 10? If you don’t know, don’t worry. The following contents will show you detailed steps to check RAM speed on Windows 10.
Check RAM Speed via Command Prompt
Command Prompt, also known as CMD, is a command-line interpreter available in Windows operating systems. It can help users solve various Windows issues via commands. And many users don’t know that they can check RAM speed via Command Prompt.
The command to check RAM speed is very simple. If you don’t know how to check RAM speed via Command Prompt, you can try the following steps.
Step 1. Type cmd in the Windows 10 Cortana search box and then click the best match Command Prompt and hit Enter.
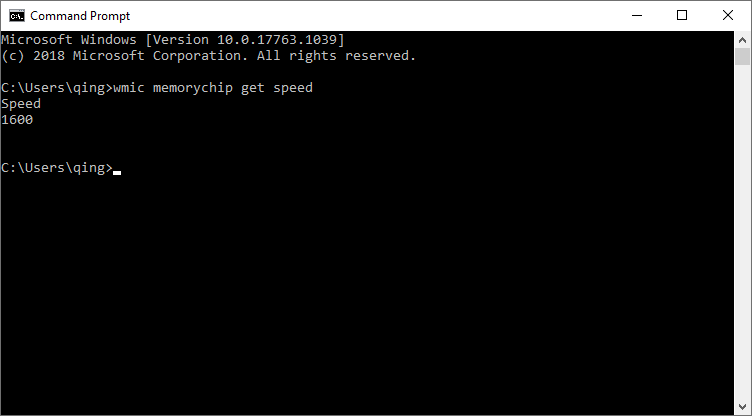
Step 2. Type the following command into the Command Prompt window and hit Enter. This is to check your RAM chip’s speed.
wmic memorychip get speed
Step 3. When the command is executed successfully, you can get your ram speed test result.

You may be interested in this post: 10 Command Prompt Tricks that Every Windows User Should Know
Check RAM Speed via Task Manager
You can check the RAM speed via Task Manager. The Task Manager will show you a lot of useful information about the CPU, RAM and disk usage information. If you don’t know how to check RAM speed via Task Manger, you can follow the steps below:
Step 1. Open Task Manager on Windows 10. You can right-click your taskbar and select Task Manager to open it.
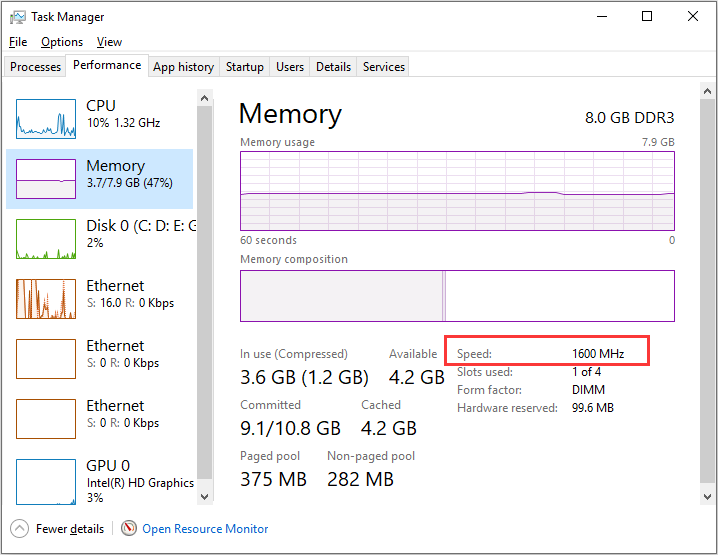
Step 2. Switch to the Performance tab and select Memory in the left pane.
Step 3. From here, you can see the total amount of RAM that you have installed. The Task Manager also tells you speed, slot used, form factor and so on. So you can check the RAM speed listed here is 1600 MHz.

Note that the Task Manager on Windows 7 doesn’t show you this useful information. If you want to check the total amount of RAM on Windows 7, you can go to Control Panel > System and Security > System page. If you want to check the RAM speed on Windows 7, it is recommended to download and install the RAM speed test utility CPU-Z.
Besides, if you have some spare slots on your PC, you can install more RAM on the computer. If you want to install or upgrade RAM on your PC, here is a post for your reference:
Conclusion
Now you should know how to check RAM speed on Windows 10. Does this post help you? Do you have better solutions? We are glad to have you share it with us.


User Comments :