Many users complain that their monitor has yellow tint. What causes the monitor yellow tint? How do I fix yellow tint on my monitor? With this post of MiniTool, you will fix this vexing problem easily.
Many users reported that they encounter the computer screen yellow tint issue after Windows 10 updates. Why is my screen yellow? Many factors including hardware issues, outdated Graphics card driver, and display settings are responsible for the yellow tint.
So, how do I fix yellow tint on my monitor? After analyzing many user reports, we explore the following 4 effective methods. You can try them one by one until this issue is fixed.
Fix 1. Add a New sRGB Virtual Device Model Profile
When searching on “how do I fix yellow tint on my monitor”, you will find one of the most common ways is to add a new default color profile. This method has been proven by many users to be useful. It’s worth trying. For that:
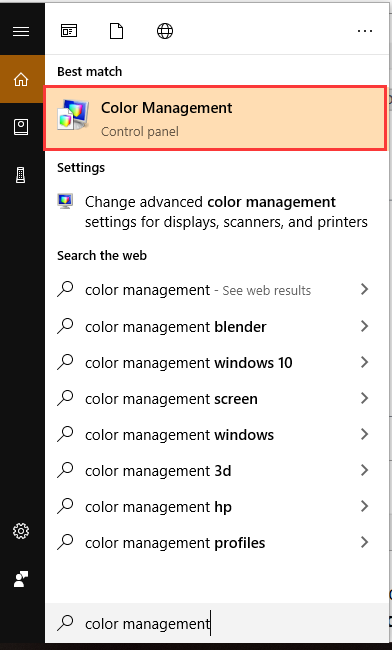
Step 1. Type color management in the Cortana search box and select the Color Management app from the best match.
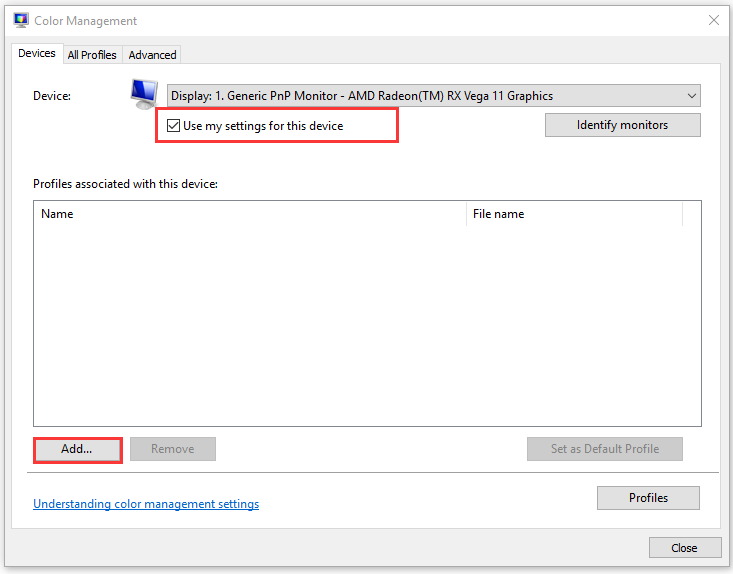
Step 2. Select the checkbox for the Use my setting for this device option, and then select the monitor has yellow tint from the Device drop-down menu.
Step 3. Click on the Add button at the bottom of the window.
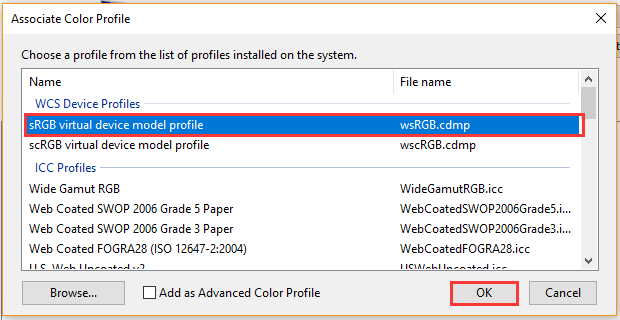
Step 4. In the pop-up window, click on the sRGB virtual device model profile under the WSC Device Profiles section. After that, click on the OK button.
Step 5. In the Color Management window, select the sRGB virtual device model profile and click on Set as Default Profile button.
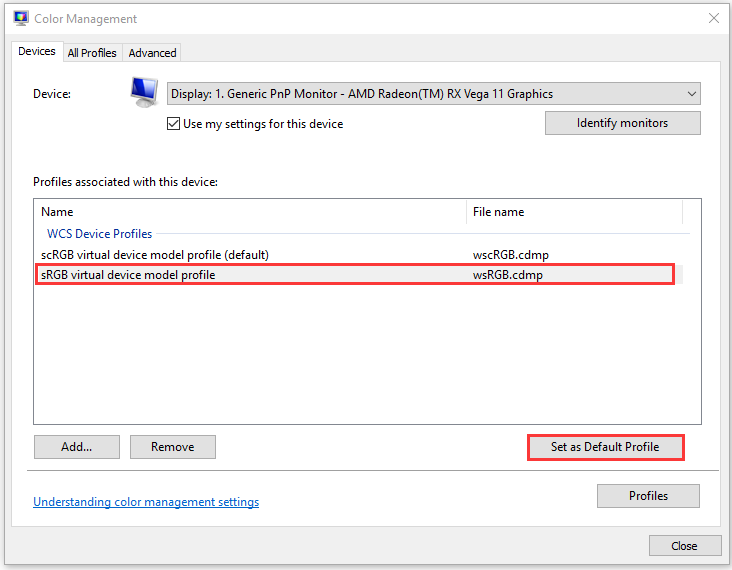
Now, restart your computer and check if the monitor yellow tint disappears.
Fix 2. Turn off Night Light Option
Another common way is to turn off the Night Light option on your Windows 10 PC. Here is a simple guide for you.
Step 1. Type display in the Cortana search box and select Change display settings option from the context menu.
Step 2. Scroll down the right pane, and toggle the Night light option Off under the Color section.
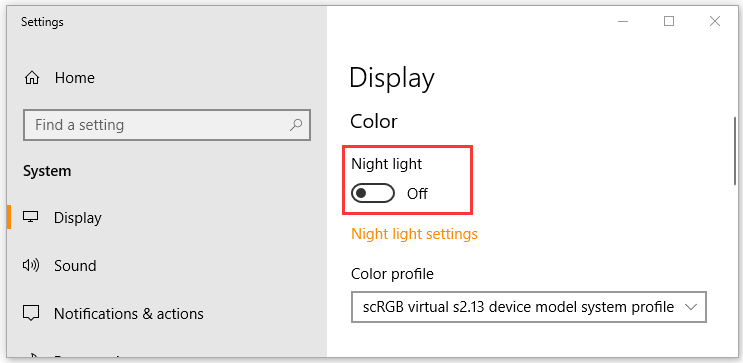
After that, you can check whether the monitor has yellow tint.
Fix 3. Update Your Graphics Card Driver
As mentioned above, the outdated or corrupt Graphics card drivers are also responsible for Windows 10 yellow tint. To fix this issue, you can check if there are any updated Graphics card drive available and install it on your Windows 10 PC.
You can follow the steps below to update the Graphics card driver automatically.
Step 1. Press the Win + R key to open the Run dialog box, and then type devmgmt.msc in the box and hit Enter.
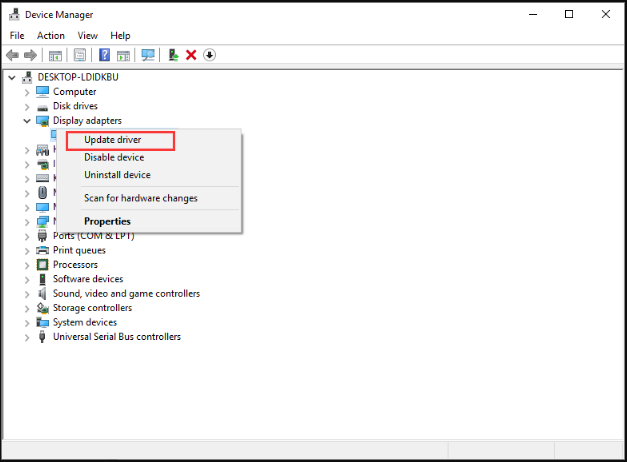
Step 2. Expand the Display adapters category, and then right-click the graphics card driver and select Update Driver.
Step 3. Then select Search automatically for updated driver software option to update the driver automatically.
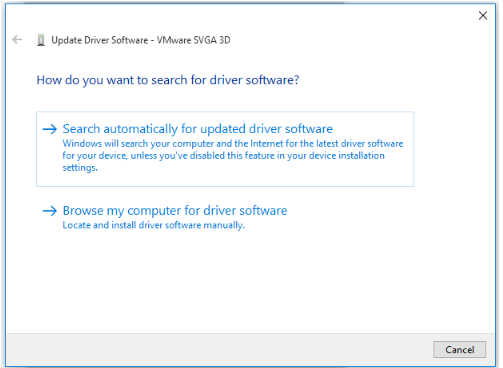
Step 4. Wait for some time, Windows will detect any updated Graphics card driver automatically and you can follow the on-screen instruction to update the driver. Then you can check if the computer screen yellow tint still persists.
Alternatively, you can install the updated Graphics card driver manually by searching on its official website or utilize some professional software.
Fix 4. Reset Color Profile Settings to Default
If the above 3 methods fail to work, you can try resetting color profile settings to default. It can revert the changes that you have made on color settings, why may fix the monitor yellow tint issue. Here’s how:
Step 1. Open the Color Management window by repeating the steps in Fix 1.
Step 2. Select the monitor has yellow tint from the Device drop-down menu.
Step 3. Then click the Profile button at the bottom of the window and select Reset my settings to the system defaults option.
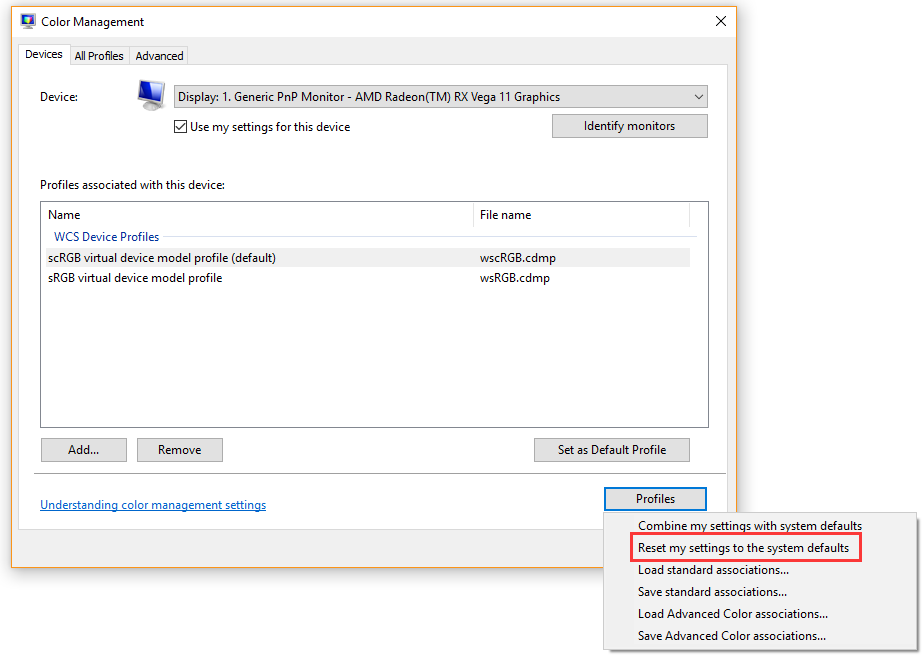
After finishing the above steps, the monitor settings will revert to its default color profile and then you can check if the monitor yellow tint disappears.

![How to Move Game to Other Monitor on Windows 10 [Full Guide]](https://images.minitool.com/partitionwizard.com/images/uploads/2020/07/how-to-move-game-to-other-monitor-thumbnail.jpg)
![How to Set up Steam Launch Options Windowed Mode [Full Guide]](https://images.minitool.com/partitionwizard.com/images/uploads/2020/07/steam-launch-options-windowed-thumbnail.jpg)
User Comments :