Some users reported their headphones are not showing up in playback devices. There are 4 solutions to fix it. If you have more problems about devices like hard disks, MiniTool Partition Wizard provides detailed information on this issue.
You may have encountered with the problem: when you are trying to listen to audio using headphones on your computer with Windows 10 system, you can’t hear any sound, nor do the headphones appear in playback devices.
Read more: 3 Solutions Quickly Fix the Requested System Device Cannot Be Found.
Reasons for Headphones Not Showing up
The causes of headphones not showing up in playback devices are usually associated with some bugs or non-related activities you may have done. Please check out the list below:
- Realtek HD Sound: For some reason, this sound manager was to blame and the problem went away after you uninstalled it.
- Drivers are old or outdated: Old drivers are always a common cause of problems, so you can take updating them into consideration.
- Headphones are disabled by default: Sometimes your headphonesare disabled in Playback devices. Please make sure you check there and enable them.
Fixs for Headphones Not Showing up
The issue is quite common in Windows 10. Before you start to solve it, you need to make sure there is no hardware issue with the headphones by connecting them to other device. If the headphone works, you can take reference from the following ways to resolve the issue.
1. Update the Audio driver
If your headphones can’t work, you can try to update the audio driver to solve headphones not showing up issue.
Step 1: open Run window by pressing Win + R key, and type the command “devmgmt.msc”to open the Device Manager.
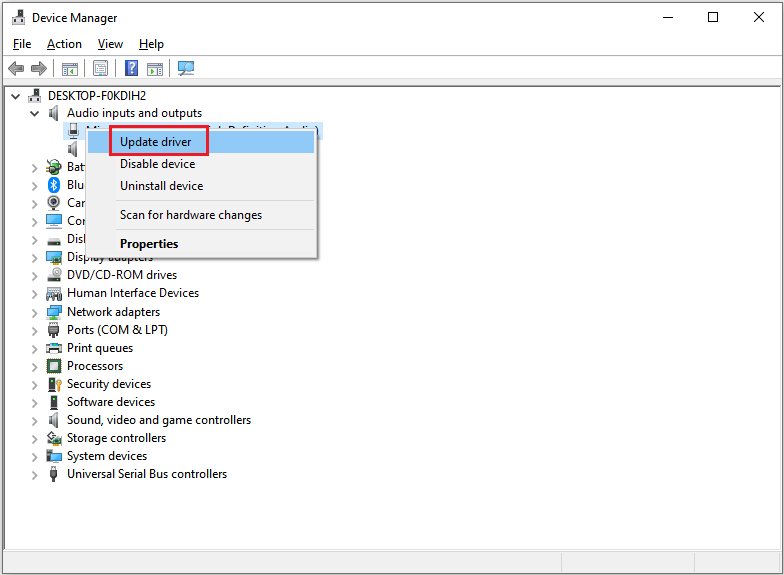
Step 2: Right-click the driver associated with your headphone in the list of Audio inputs and outputs, and choose Update driver.
Related article:
- Windows Update Stuck on Checking for Updates;
- 9 Fixes to Display Driver Stopped Responding and Has Recovered.
2. Uninstall Realtek HD Sound Software
As a great audio manager, Realtek High Definition Audio Diver is highly appreciated. But some users have reported that their headphones can’t work if they don’t uninstall this piece of software. You can do it as the following steps:
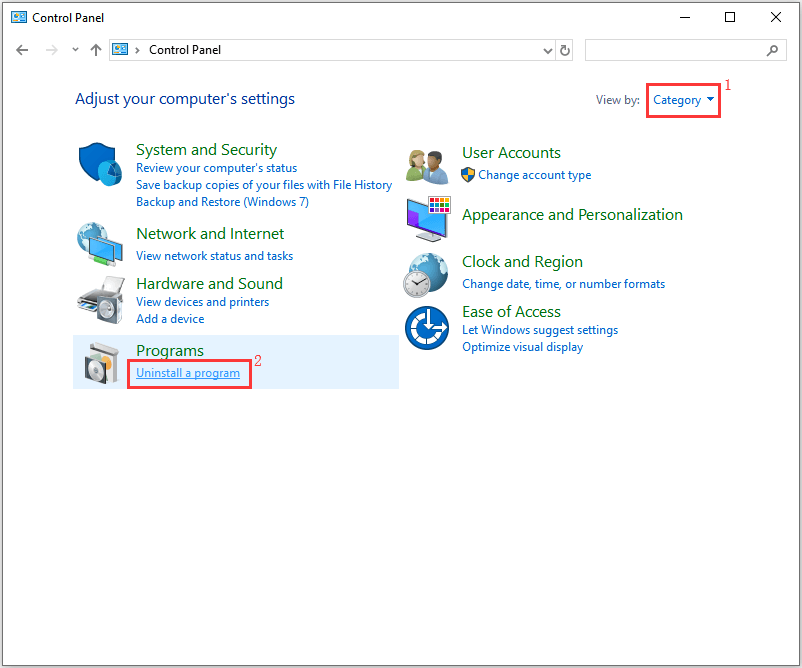
Step 1: Open Control Panel with the search section of your task bar. Then choose view by Category and click Uninstall a Program under the Programs section.
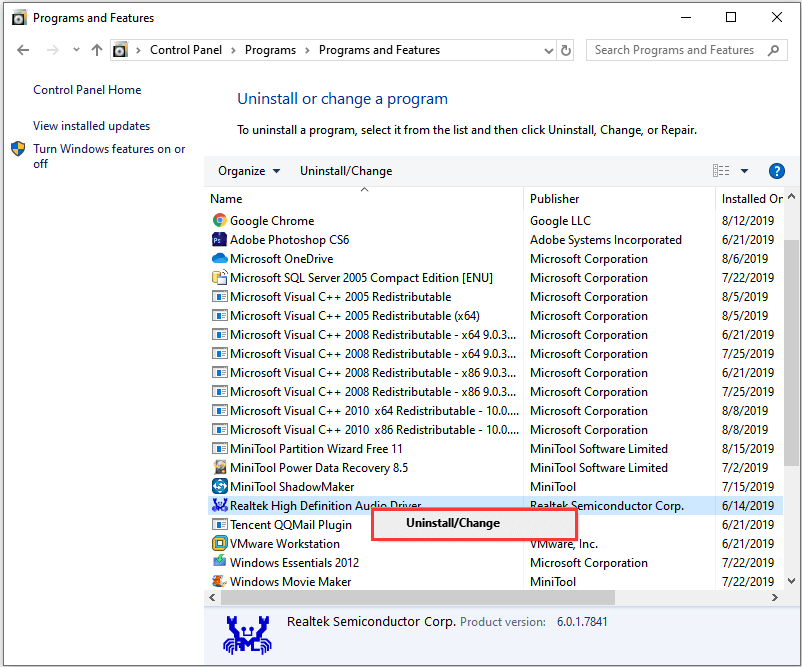
Step 2: Right-click Realtek High Definition Audio Diver and choose Uninstall/Change.
Step 3: Click Finish when the process is completed and restart your computer.
Related article: 4 Easy Methods for You to Uninstall Windows 10 Update.
3. Enable the Headphones from the Playback Devices
When you have the problem headphones not working, you can also try to enable them from the playback devices.
Step 1: Type the command “mmsys.cpl” in Run window to open Playback devices.
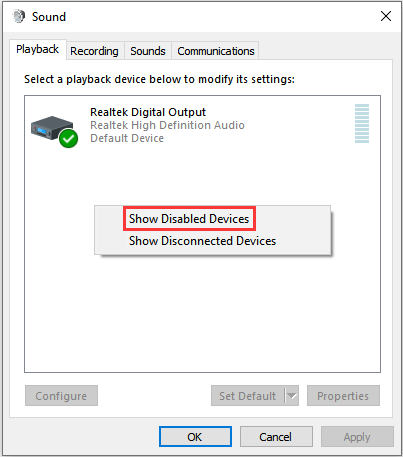
Step 2: Right-click anywhere in the middle of the window and check the boxes for Show Disabled Devices and Show Disconnected Devices. Then you can see your headphones in Playback devices.
Step 3: Right-click your headphones and enable them if they are disabled.
4. Run the Playing Audio Troubleshooter
Problems related to audio playback can be checked and fixed by Playing Audio troubleshooter when your computer can’t read the headphones.
Step 1: Right-click the Start button and choose Settings. Then go to Updates and Security.
Step 2: In Troubleshoot, choose Playing Audio and run it.
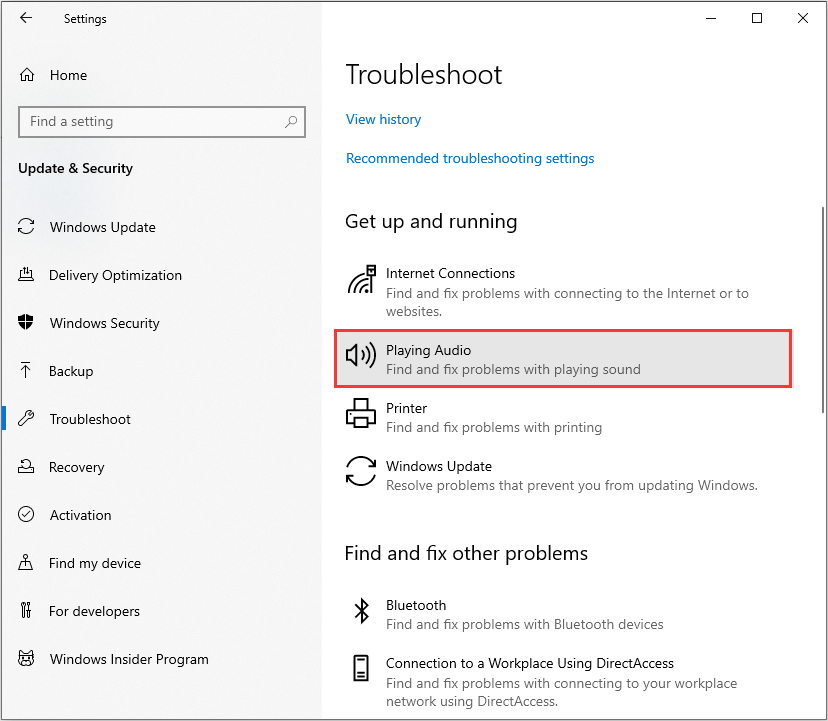
Step 3: Restart your system.
Try those four methods to fix your headphones not showing up in playback devices.

User Comments :