Hard drive become RAW? If your hard drive suddenly become a RAW drive, don't worry! Here are useful tips from MiniTool that can help you recover data from RAW drive and then convert RAW to NTFS quickly.
In the daily use of computers, many users encounter “hard disk became raw” issue. See an example below:
All hard drives are working properly but one of my hard drive types became raw instead of NTFS file system type and it is not opening… plz help me.–from tomshardware
Have you ever encountered “hard disk became RAW”? Have you finally remove the RAW file system? If you are among the users who are eager to know the solution to raw hard drive recovery, this article may be helpful to you.
Hard Disk Partition Suddenly Became Raw
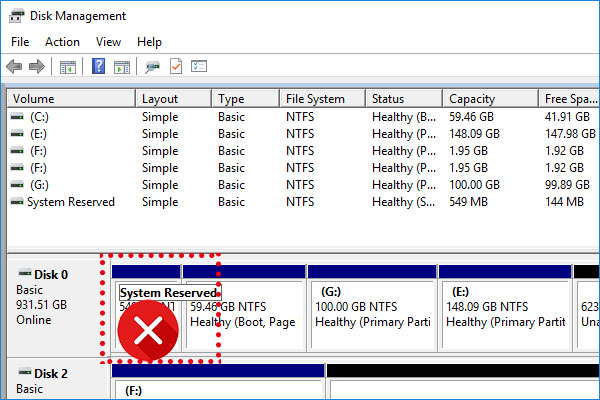
Sometimes a damaged volume may lose its file system type and is shown as RAW in Disk Management. RAW means the hard drive partition is not formatted with file systems including FAT12, FAT16, FAT32 and NTFS/NTFS5. When any of your drive partitions becomes RAW, you will not be able to access the data in it.
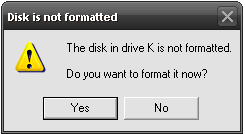
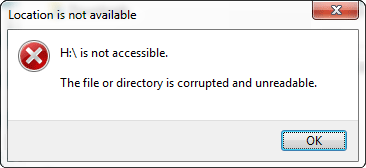
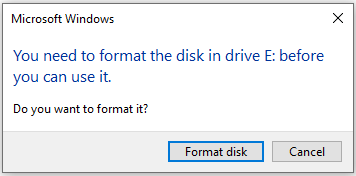
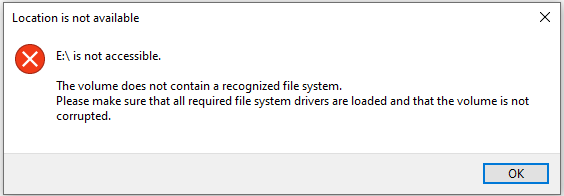
There are many symptoms when your hard drive partition became RAW, as shown in the following.
1. The disk in drive X: is not formatted. Do you want to format it now?
2. X: is not accessible. The file or dictionary is corrupted and unreadable.
3. You need to format the disk in drive X: before you can use it. Do you want to format it?
4. X: is not accessible. The volume does not contain a recognized file system.
If you receive one of these messages, how can you overcome it? Right here in this post, I am going to explain how to recover RAW partition easily using MiniTool software.
According to many user feedbacks, there are 3 typical cases:
- RAW drive is shown as unallocated
- RAW drive is shown as NTFS
- RAW drive is shown as Other/Unformatted
Want to know the best part? Here we go!
Case 1: It Shows Unallocated in Partition Wizard
If the RAW hard drive is shown as unallocated in MiniTool Partition Wizard, you can make use of its Partition Recovery feature. However, this is a paid feature in MiniTool Partition Wizard. So you need to pay for a license.
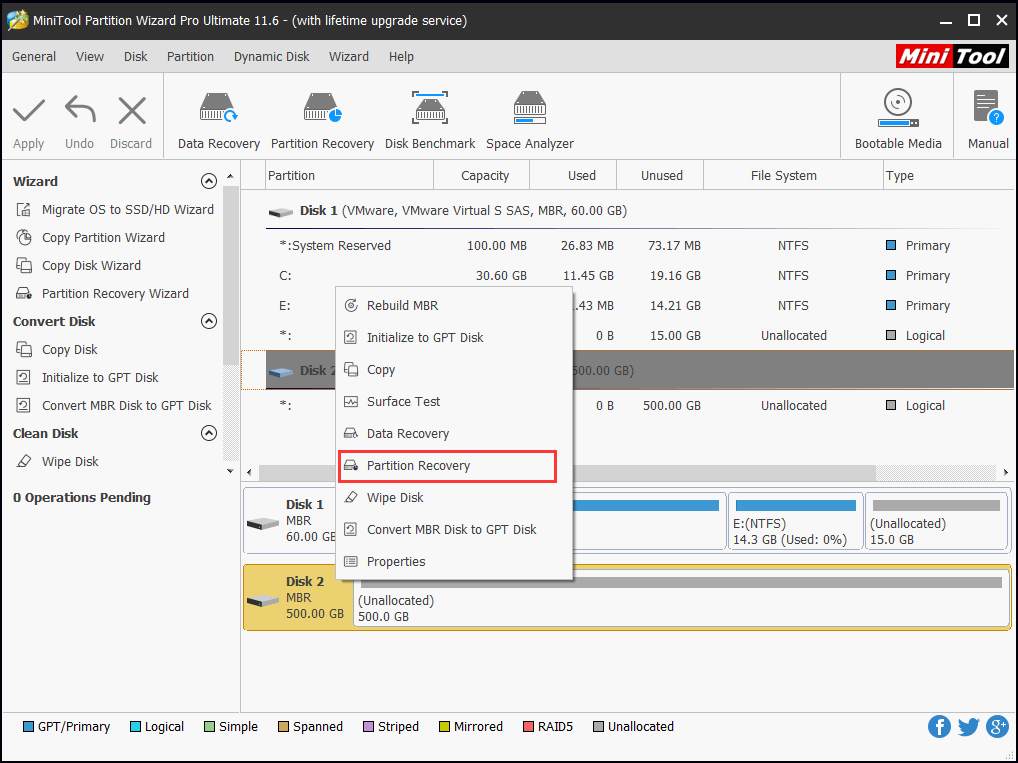
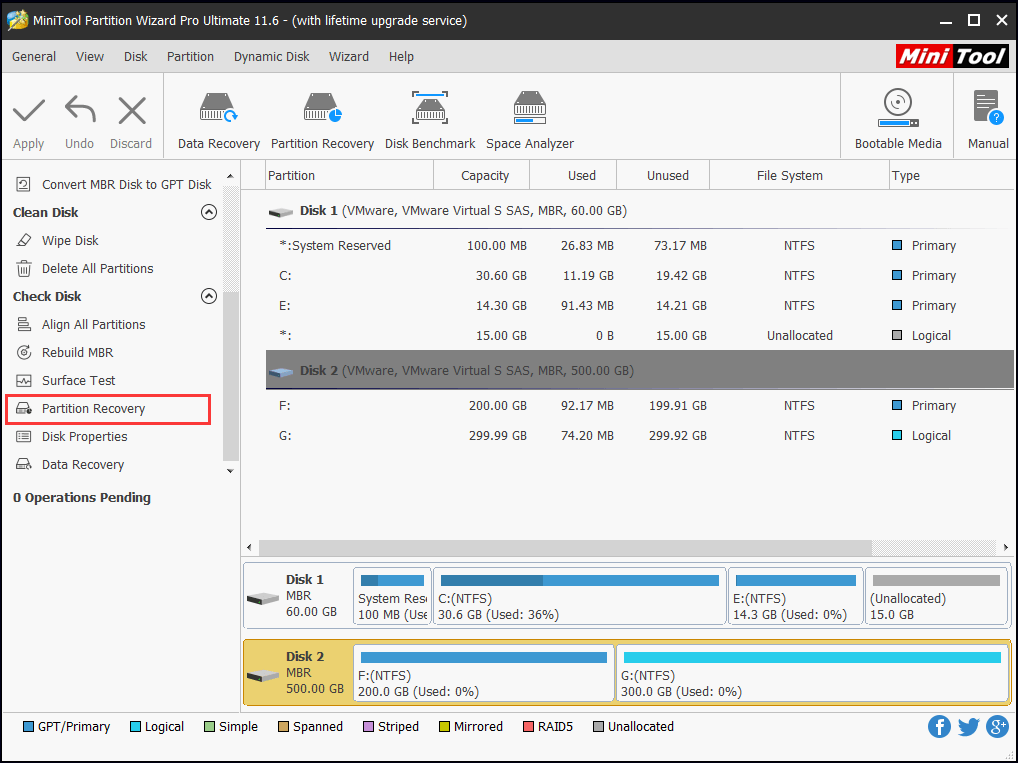
Step 1. Run MiniTool Partition Wizard, select the target unallocated disk and choose Partition Recovery from the left panel. Or you can right click the target disk icon and choose Partition Recovery from the pop-up menu.
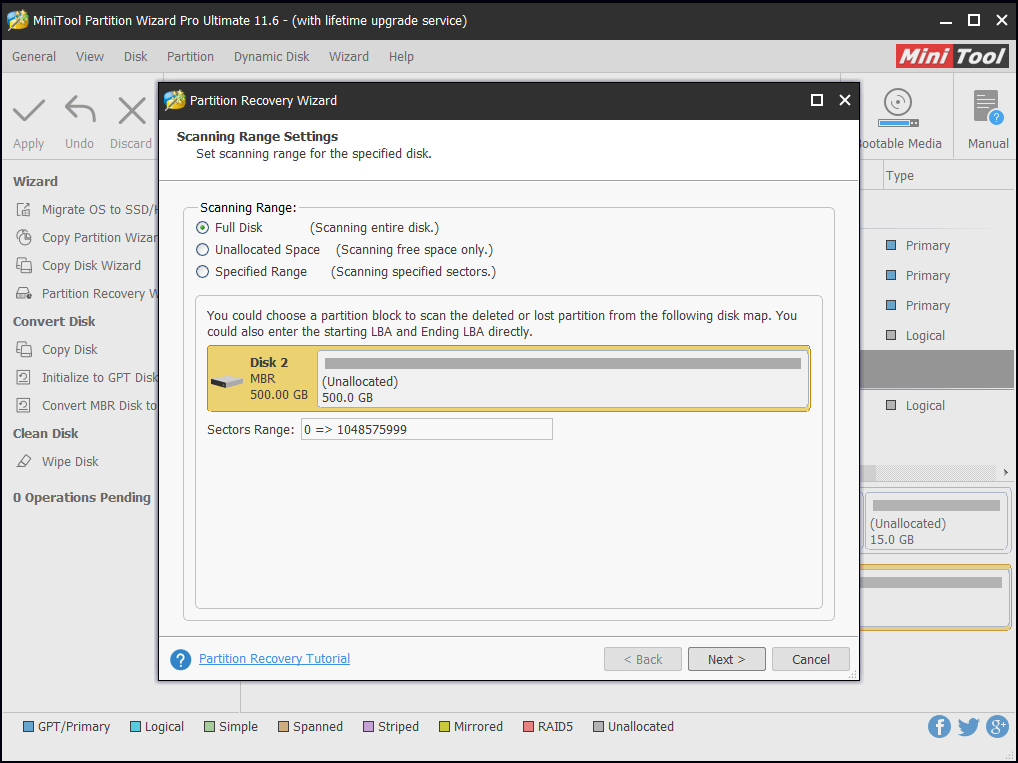
Step 2. Set the scanning range you would like to let MiniTool Partition Wizard scan and click Next. My suggestion is to choose Full disk.
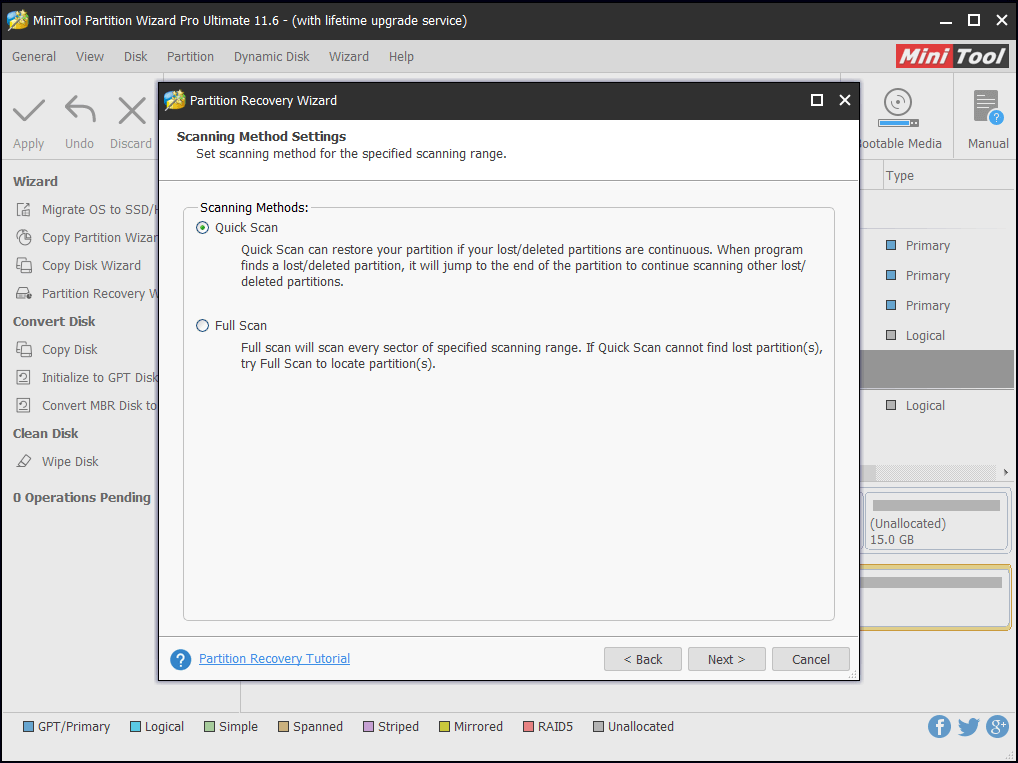
Step 3. Now set the scanning method. Usually, it is recommended to choose Quick Scan. If it fails, choose Full Scan to try again. Then press Next.
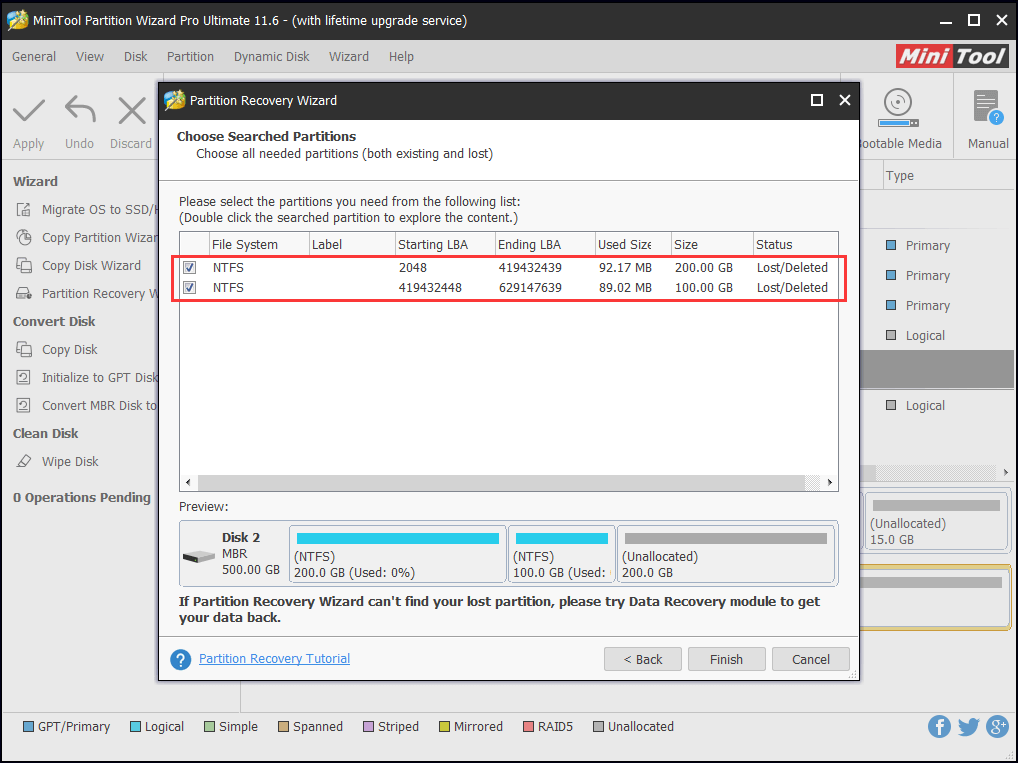
Step 4. After the scanning, you can see the partition(s) MiniTool Partition Wizard finds. Please check all needed partitions and hit Finish. Note that partitions not checked will be removed. You can double click a partition in the list to explore its contents so that you know it is the right partition or not.
Step 5. Now at the main interface, click Apply to start the recovery.
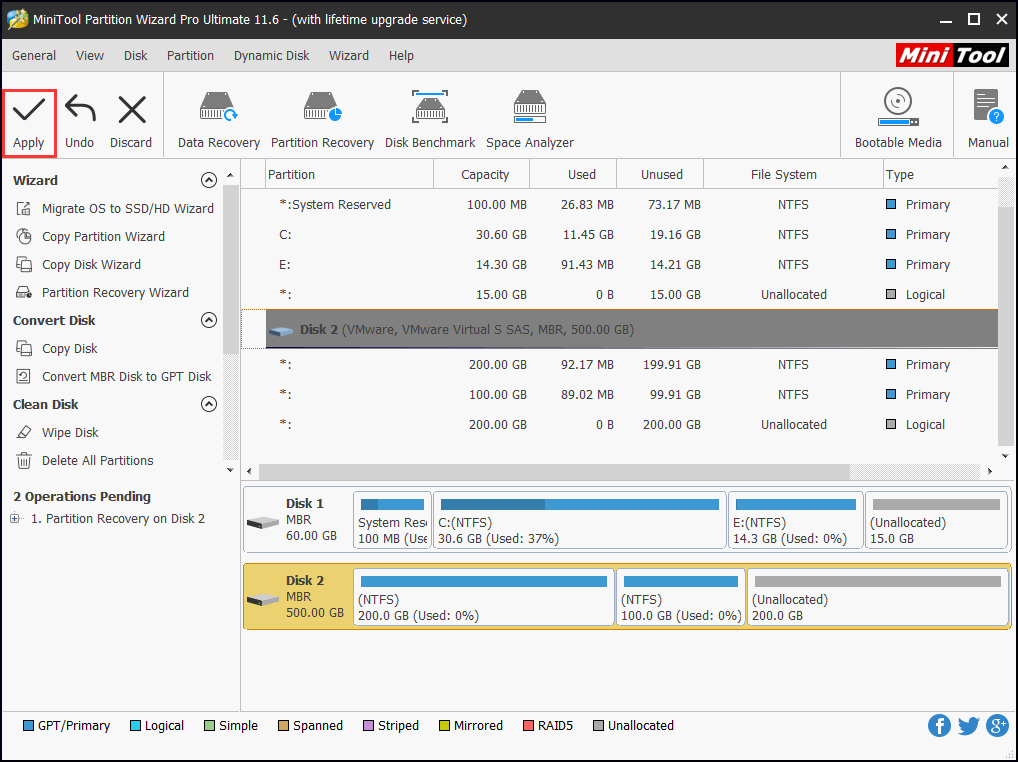
Step 6. When MiniTool Partition Wizard finishes, do not hurry to access the recovered partition(s), because partitions without drive letter will not show up in Windows Explorer. At this time, select the recovered partition and choose Change Drive Letter. In the pop-up window, select a drive letter and press OK. Finally, press Apply.
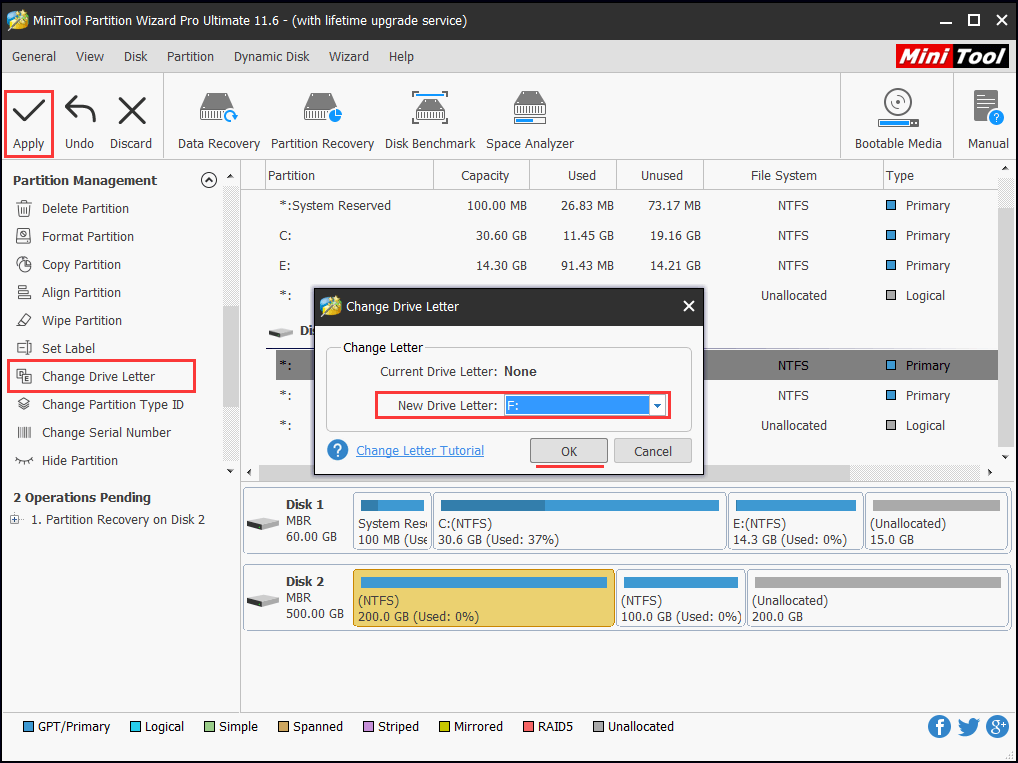
Now all is done.
Case 2: It Shows NTFS in Partition Wizard
If the RAW drive is shown as NTFS in MiniTool Partition Wizard, here are 3 options for you.
Solution 1. Check File System
The first trying is to check and fix RAW file system. This is a free feature in MiniTool Partition Wizard; hence you can download the free edition to start.
MiniTool Partition Wizard FreeClick to Download100%Clean & Safe
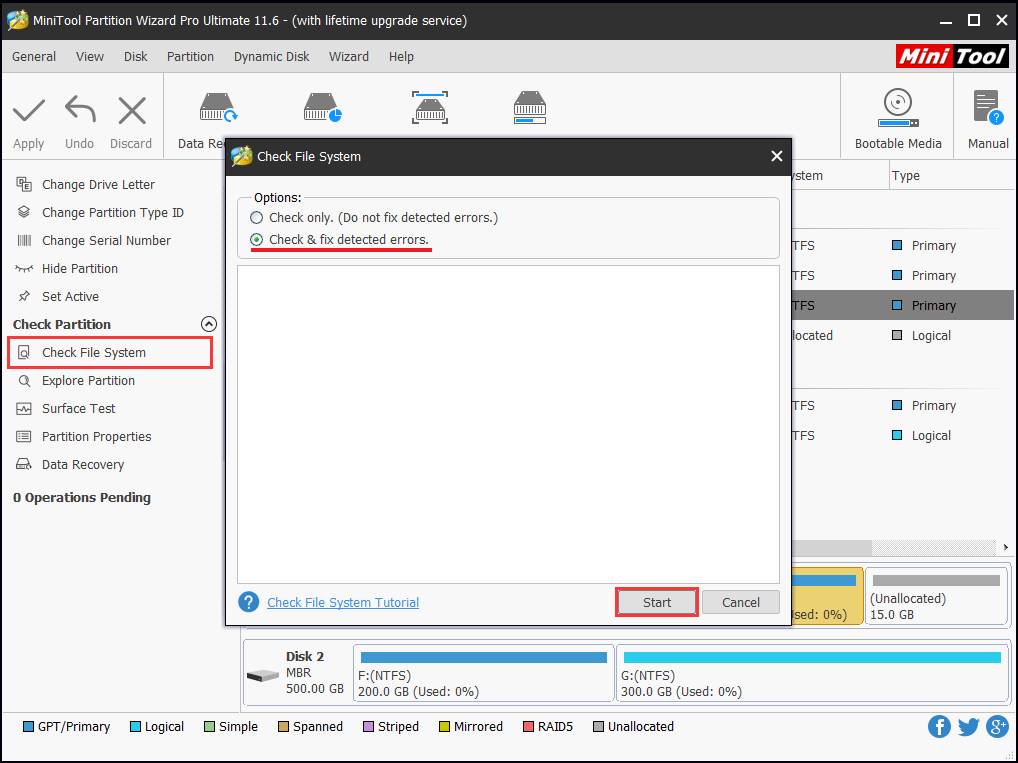
Step 1. Launch MiniTool Partition Wizard to the main interface, select the target partition and choose Check File System.
Step 2. In the pop-up new window, select Check & fix detected errors. Then click Start button and wait until it finishes.
Solution 2. Shrink Partition
The second trying is to shrink the partition. This is because when you shrink partition using MiniTool Partition Wizard, it rewrites the file system information and corrects errors. Now just do the followings:
MiniTool Partition Wizard FreeClick to Download100%Clean & Safe
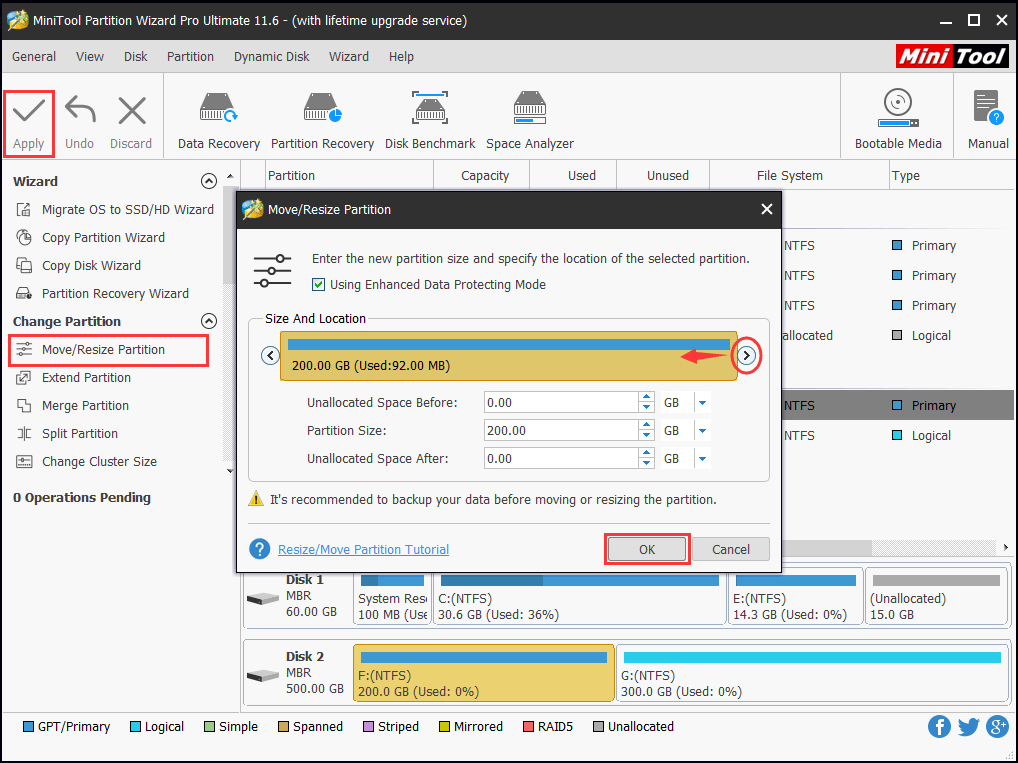
Step 1. Launch MiniTool Partition Wizard to the main interface. Then select the target partition and choose Move/Resize Partition from the left panel, or right click the target partition and choose Move/Resize from the pop-up menu.
Step 2. In the new window, drag the slider to shrink its partition size. Then click OK to go back to the main interface.
Step 3. Click Apply button to execute this change.
Solution 3. Recover Partition
The third trying is to do Partition Recovery (paid feature). I have demonstrated the detailed steps in Case 1, hence I am not going to repeat here. Please follow the guide, it is easy.
Case 3: It Shows Other/Unformatted in Partition Wizard
If the RAW drive is shown as “Other” (for hard drives) or “Unformatted” (for removable disks), you had better do the followings:
Recover RAW Drive Data First
Although you are suggested to format your hard drive by Windows, you should know you can’t format the RAW partition directly because you still have important files in it. In this case, what should you do to fix raw partition?
Probably you are suggested to fix RAW file system by using CHKDSK. The fact is that you are 90% likely to see the following error message “The type of the file system is RAW. CHKDSK is not available for RAW drives.”
So what’s the real story? Well, you’d better head to find reliable RAW drive data recovery software to help you in this case.
What is raw drive data recovery software? To put it simply, it is a kind of software that can restore data from RAW internal/external hard drives without bringing any damage. As formatting will delete all data on RAW drives, it is highly recommended for you to extract data or files from the RAW partition before formatting using a professional data restore utility…
My personal tip is using MiniTool Partition Wizard also, which is really a great solution when you are faced with RAW hard drive recovery issue. In my experience, it works great on blank SD card, USB data recovery, deleted files recovery, and more. In short, it is read-only software when performing RAW drive data recovery.
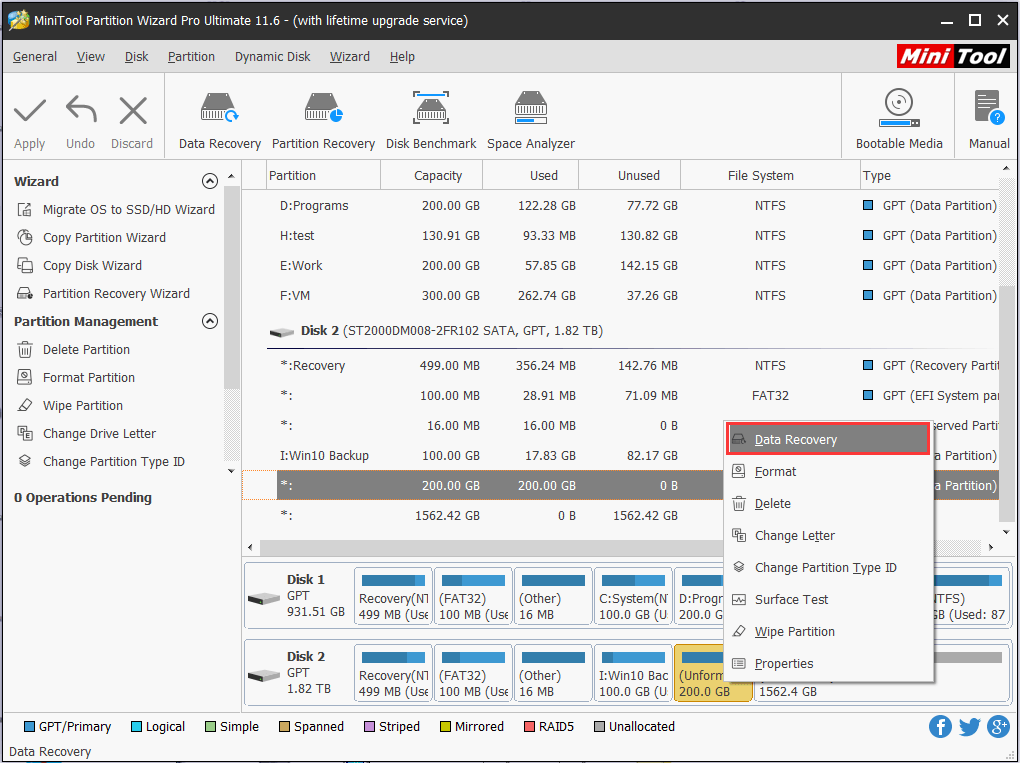
Step 1. Run MiniTool Power Data Recovery, navigate and right-click the RAW drive, then select Data Recovery which works great on RAW hard drive recovery.
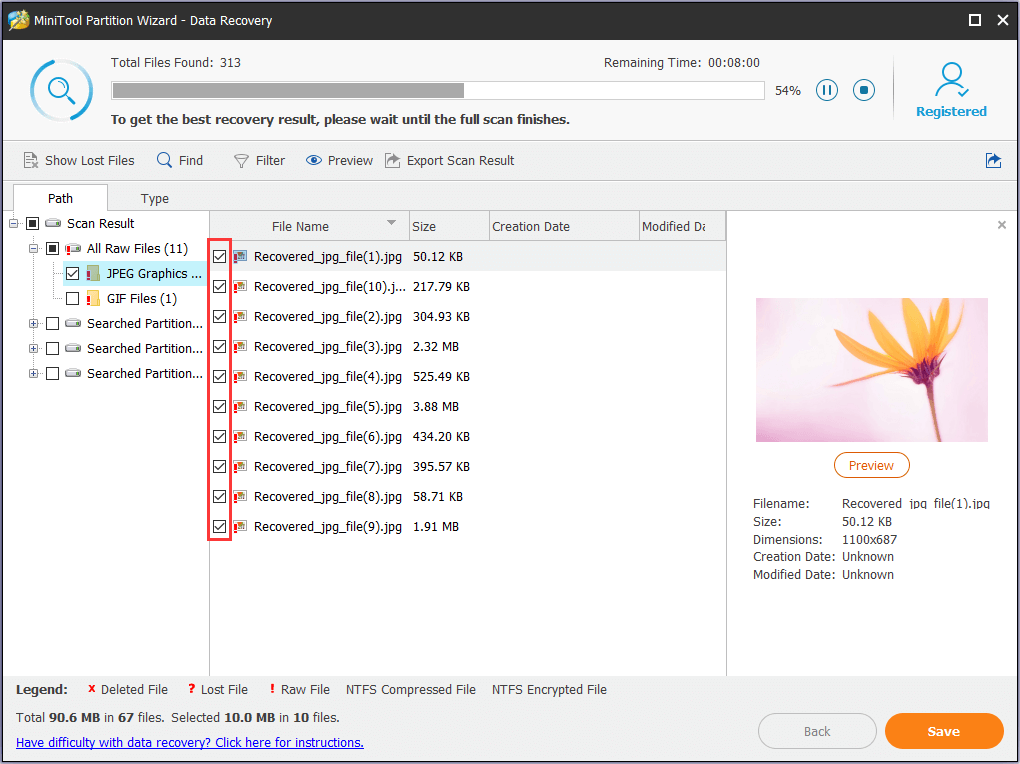
Step 2. Data Recovery will quickly scan the drive and list all partitions it has found (Each time at most 10 partitions are displayed. If these partitions do not offer files you need, click Show More Partitions to select other partitions for a check.). Then you just unfold each partition to check the file, select the ones you need and click Save button to save the needed files to a safe location (should be different from the original data location).
Convert RAW to NTFS after Data Recovery
Here is what to do next: convert the RAW partition to NTFS. Why choose NTFS? As we all know, NTFS (New Technology File System) is the default file system adopted by Windows, providing better performance and higher security than the FAT family. Hence, it has gradually become the tendency of today’s file system.
How can you easily convert RAW to NTFS? In fact, there is no real RAW file system converter, but formatting can help you get rid of this issue. (Since you already saved data in the RAW drive, you don’t need to worry about formatting.)
MiniTool Partition Wizard is the best choice to convert RAW to NTFS. The reason why I list it as the top recommendation is that it not only works for the conversion but also offers the best user experience to finish each task easily. It is worth saying that even the free edition is competent in this aspect. Download this free disk format tool now!
MiniTool Partition Wizard FreeClick to Download100%Clean & Safe
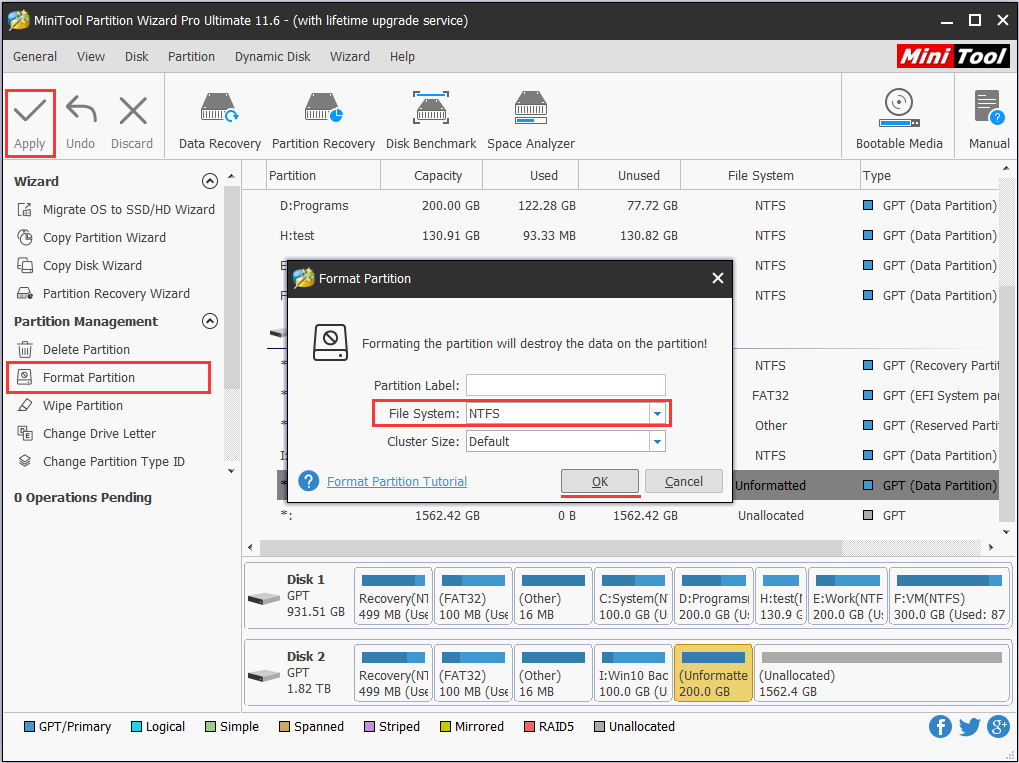
Step 1. Launch MiniTool Partition Wizard to the main interface. Then select the RAW partition which is marked as “Other” to choose Format Partition from the left pane, or right click the RAW partition and choose Format from the pop-up menu.
Step 2. Immediately you see a Format Partition box where you can customize the Partition Label, File System, and Cluster Size. You can also observe that there are many other file systems offered in the drop box, in case that users may require the others. Then click OK to go back to the main interface.
Step 3. At this window, you can preview what is going to happen by viewing the Operations Pending. Finally, press Apply on the top left corner to start the formatting.
For Your Info: Reasons for Hard Disk Became RAW
Knowing how to deal with “hard disk partition became RAW”, I want to share the reasons for hard drive became RAW. RAW drive can be caused by a number of reasons such as virus infection, format failure, accidental shutdown, power outages, etc. Here I will expose 6 primary reasons for this issue, hoping they can help you avoid RAW drives.
- Bad Sectors: If there are bad sectors in the key area of the hard drive, the hard drive will definitely work abnormally, and RAW file system is one of the many phenomena.
- File System Structural Damage: As we all know, RAW hard drive is surely involved with RAW file system. Hence, if the file system suffers structural damage, hard disk partition may become RAW.
- Partition Table Corruption: If the partition table of the drive is corrupted, the hard drive may become RAW drive. What caused partition table corruption? Failed disk conversion, file system damage, hard disk failures, etc. are the main causes.
- Power Outage: If power outage happens, hard drive is likely to go wrong, leading to many hard drive issues including partition loss and RAW file system.
- Virus/Malware Attack: Virus attack or malware attack can damage the partition table that carries the partition information. Partitions that suffered from virus/malware attack can easily become RAW. Hence, it is better for you to run anti-virus software regularly.
- Improper Operations: Also, if you unplug an external hard drive or USB drive without selecting “safely remove hardware and eject media” option while the drive is still performing disk I/O operation, probably you will get a RAW drive.
What Do You Learn?
Having said all of the above, I guess you must have a general understanding of what is a RAW drive, how to recover RAW partition, how to recover data from RAW hard drive as well as how to convert RAW to NTFS for reuse. Now it is your turn to roll up your sleeves and have a try on the solutions we have mentioned in this post.
In addition, we also listed the main causes for hard disk became RAW, guess you can learn something from this part and avoid “internal/external hard drive became RAW” in the future days.
If you have any questions or suggestions on the subject of using MiniTool software to cope with “Hard Disk Become RAW”, let us know by typing your questions in the comment section below. Or you can contact us via [email protected]. All ideas are welcome.

User Comments :