A great many gamers are troubled by the Halo Infinite connection issues. Why Halo Infinite lost connection to server? How to fix it? Now, let’s explore the answers together with MiniTool.
Halo Infinite is a widely popular first-person shooter game published by Xbox Game Studio. This game is now available for Microsoft Windows, Xbox One, and Xbox Series X/S. However, many players complain that the Halo Infinite connection issues always occur when trying to join a multiplayer match.
What causes the Halo Infinite connection lost issues? According to many gamer reports, the main reason behind the problem is related to a poor internet connection. Of course, other factors like offline server, limited bandwidth, DNS settings, and NAT type are also responsible for the issues.
# 1. Check the Server Status of Halo Infinite
Before you proceed with the following fixes, we recommend you check the Halo Infinite server issues first. If there is something wrong with the game servers, Halo Infinite can’t connect to server. Here you can check the Halo Infinite server status via the official support Twitter or the Downdetector site.
# 2. Restart Your PC or Console
If Halo Infinite can’t connect to server, the simple and quickest way is to perform a restart of your PC or console. By doing so, all the temporary cache and glitches can be cleared.
For PC:
- Click on the Start menu at the bottom left corner of your screen and select the Power
- Select the Restart option from the pop-up menu.
- Relaunch the game and see if Halo Infinite not connecting to server issue gets solved.
For Xbox:
- Press the Xbox button at the front of your console for about 10 seconds to turn it off.
- Unplug the power cable and wait for 30 seconds.
- Re-plug the power cable and press the Xbox button to turn on the console.
# 3. Check Your Internet Connection
The Halo Infinite connection issues are often related to network connections. If you have a weak internet connection, then the game may fail to connect to its servers. So, we recommend you check the internet connection.
Step 1. Unplug the internet router from the wall socket.
Step 2. Hold the Power button on the back of your router for about 15 seconds until the router is turned off completely.
Step 3. Then wait for at least 30 seconds, re-plug the router into the socket and press the Power button to restart it.
Step 4. If it still doesn’t work, use a wired connection or contact your ISP to optimize the network connection.
# 4. Close All Bandwidth-heavy Apps and Services
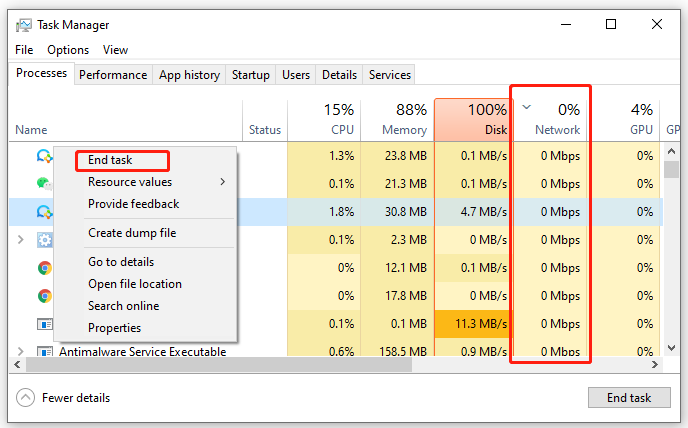
If the “Halo Infinite disconnected from local network” issue still occurs, you can try closing all bandwidth-hogging apps and services in Task Manager. Here’s how:
Step 1. Right-click the empty space on the taskbar and select Task Manager from the context menu.
Step 2. Navigate to the Processes tab and click on the Network column to sort the active processes.
Step 3. Find the bandwidth-hogging apps, browsers, and services. Right-click them one by one and select End task.
# 5. Try a VPN
As it’s well known, the Internet Service Provider may limit your bandwidth during peak hours and trigger some connections issues and lag spikes like Halo Infinite connection lost. In this case, you can consider using a VPN.
To do so, you can click the Network icon at the bottom, and then select the VPN that you want to use, and click on the Connect button. If there isn’t a VPN on your computer, you can add one by reading the post “How to Set up a VPN on Windows 10 PC.”
# 6. Switch to a Different DNS Server
Some users reported that they managed to fix the Halo Infinite connection issues by changing the DNS server. Here you can try switching to Google Public DNS. For that:
Step 1. Open your Control Panel, and then change the View by type to Category and navigate to Network and Internet > Network and Sharing Centre > Change adapter settings.
Step 2. Right-click your current network and select Properties.
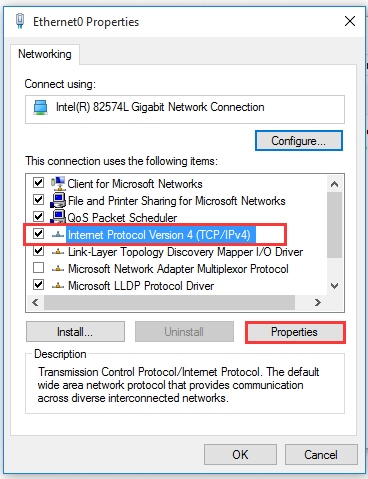
Step 3. Navigate to the Networking tab and select Internet Protocol Version 4 (TCP/IPv4), and then click on Properties.
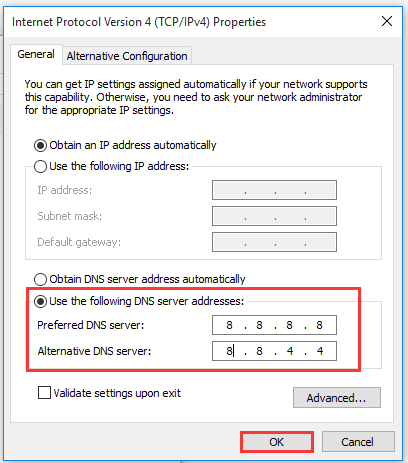
Step 4. Select the Use the following DNS server addresses option, and then set the Preferred DNS server to 8.8.8.8 and Alternative DNS server to 8.8.4.4. After that, click on OK to save the changes.
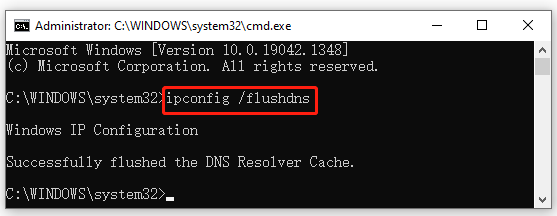
Step 5. Type cmd in the search box, and then right-click the Command Prompt from the top result and select Run as administrator. In the elevated Command Prompt, type the ipconfig /flushdns and hit Enter to clean up the DNS cache.
Now, you can restart the game and see if the “Halo Infinite unable to join multiplayer” problem is fixed.
# 7. Check the NAT Type
If you find the “Halo Infinite not connecting to server” issue occurs when the NAT type shows “Teredo is unable to qualify”, you need to change the NAT type to Open. Here’s how:
Step 1. Press the Win + I keys to open the Settings app and select Gaming.
Step 2. Select Xbox Networking from the left-side panel, and then Windows will automatically detect the connection status.
Step 3. Scroll down the right sidebar to the Xbox Live multiplayer section, and then check if the NAT Type status says Open. If not, you may encounter the “Halo Infinite disconnected from local network” issue. Click on Fix it to troubleshoot the problem.
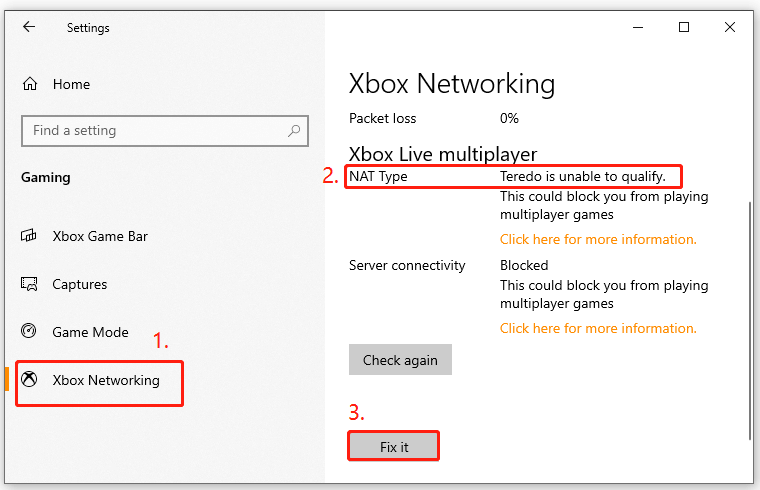
Step 4. If it still doesn’t work, you can open the elevated Command Prompt window like Step 5 in #7, and then type the following commands in order and hit Enter after each one.
- netsh int teredo set state disable
- netsh int teredo set state type=default
- netsh int teredo set state enterpriseclient
- netsh int teredo set state servername=teredo.remlab.net
Once done, check if the NAT Type is open and the Halo Infinite lost connection to server issue gets resolved.
# 8. Reinstall the Game
If the Halo Infinite server issues persist after you try all the above fixes, you may have to consider reinstalling the game. Right-click the Start menu and select App and Features or Programs and Features, and then select the game from the list of installed programs and click on Uninstall. Once uninstalled, you can re-download a fresh package from the game’s official website and install it on your PC.

![How to Fix Halo Infinite Crashing Mid Game on PC? [8 Ways]](https://images.minitool.com/partitionwizard.com/images/uploads/2022/02/halo-infinite-crashing-mid-game-thumbnail.png)
![Fix: Dev Error 6034 in Warzone/Modern Warfare [PC/Xbox One]](https://images.minitool.com/partitionwizard.com/images/uploads/2022/03/dev-error-6034-thumbnail.jpg)
User Comments :