Why can’t GeForce Experience optimize my games? How to fix GeForce Experience not optimizing games? If you are still trying to figure these questions out, this post of MiniTool is what you need.
Why Can’t GeForce Experience Optimize My Games
Nvidia GeForce Experience is a powerful software that can help users update Nvidia drivers, optimize graphics settings, optimize the installed games on your PC, and so on. Sometimes, however, this program can run into various issues such as GeForce Experience not finding games, GeForce Experience scanning failed, and the one discussed here.
According to user reports, we find the issue can occur after a motherboard change or a GPU driver update. Why can’t GeForce Experience optimize my games? The main reason behind the error is related to corrupted user configuration files. Besides, other factors like improper game settings, antivirus or firewall blocks, corrupt graphic card drivers, and even DNS settings can trigger the error.
MiniTool System Booster TrialClick to Download100%Clean & Safe
How to Fix GeForce Experience Not Optimizing Games
To fix the issue, you can restart your computer or try resetting the game in GFE first to check if it works. If a simple restart/reset can’t resolve the “GeForce Experience not optimizing games” problem, try the following 6 fixes.
Fix 1. Use the Recommended Optimal Settings
Many users reported that they managed to fix the “GeForce Experience game cannot be optimized” issue by enabling the Recommend Optimal settings in GFE. Here’s how to do that:
Step 1. Launch your NVidia GeForce Experience client and go to the Preferences tab from the top menu.
Step 2. Select Games from the left action panel, and then tick the checkbox next to Recommend optimal settings and save the change.
Now, you can restart your PC and see if the NVidia game cannot be optimized problem gets solved.
Fix 2. Delete the User Configuration Files
Sometimes GeForce Experience won’t optimize games when the user configuration files get corrupted. In this case, you can fix it by deleting all the user configuration files in your C drive.
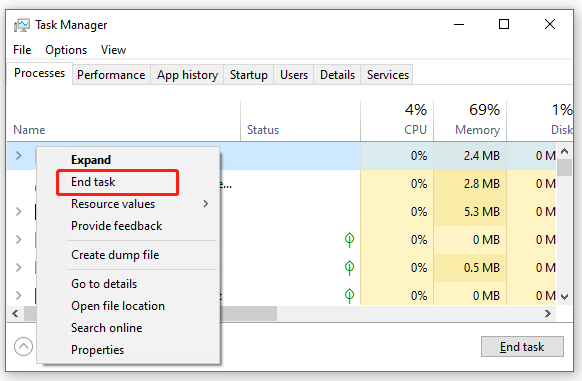
Step 1. Press Ctrl + Shift + Esc keys to open your Task Manager, and then right-click any GeForce Experience-related processes and select End task. Make sure all processes related to the app are not running before proceeding further.
Step 2. Press Win + R keys to open the Run dialog box, and then type %appdata% to it and hit Enter.
Step 3. Inside the pop-up folder, navigate to Local > NVIDIA Corporation > GeForce Experience directory.
Step 4. Open the GeForce Experience folder and delete the CefCache in it permanently.
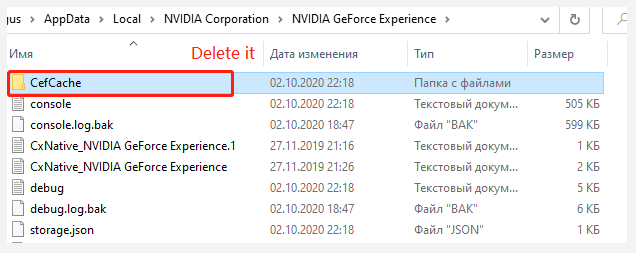
Once done, reboot your PC and check if the GeForce Experience not optimizing games error persists.
Fix 3. Allow the Program Through Your Firewall or Antivirus Software
Another common reason why the GeForce Experience game cannot be optimized is your Firewall or antivirus interference. To fix it, you can try allowing the app through your Firewall or antivirus. For that:
Step 1. Type firewall in the search box and then select Windows Defender Firewall from the top result.
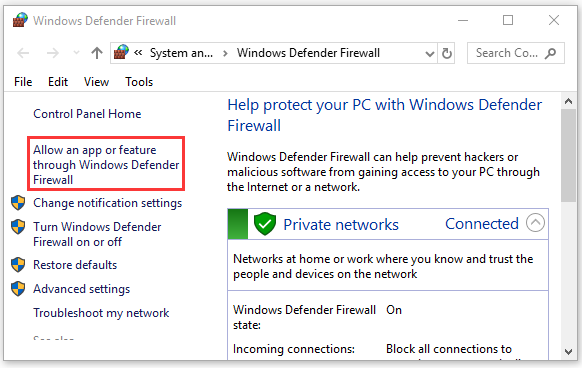
Step 2. Click on Allow an app or feature through Windows Defender Firewall from the left pane.
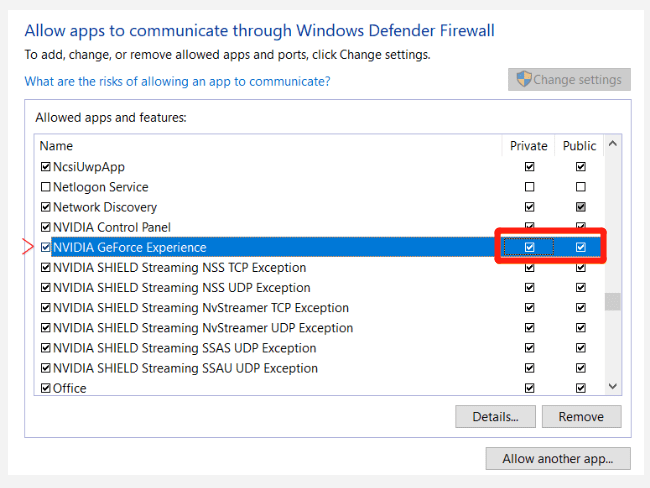
Step 3. Scroll down and select the checkbox for NVidia GeForce Experience from the list of programs, and then tick the checkbox for both Private and Public networks, and click OK to save the change. If you can find the game in the list, you can click on Change settings > Allow another app.
If the “NVidia game cannot be optimized” problem still occurs, you may consider disabling your Windows Defender Firewall temporarily.
Fix 4. Switch to Google DNS
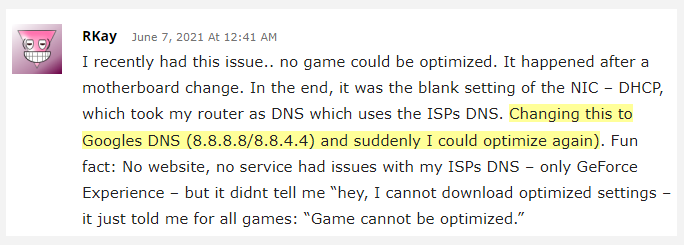
Some users reported that the GeForce game cannot be optimized problem can be resolved by changing their DNS server to Google. It seems strange but really works. Let’s have a try.
Step 1. Open your Control Panel from the Start menu.
Step 2. Change the View by type to Category, and then navigate to Network and Internet > Network and Sharing Centre > Change adapter settings.
Step 3. Right-click the active network and select Properties.
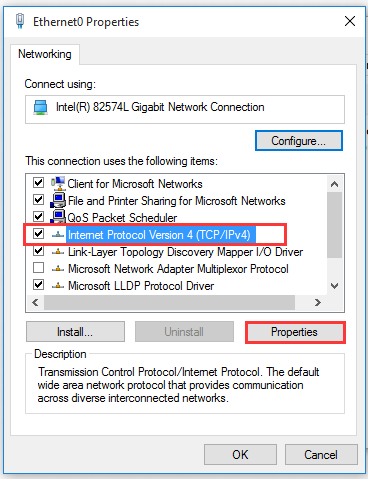
Step 4. Navigate to the Networking tab, and then select Internet Protocol Version 4 (TCP/IPv4) and click on Properties.
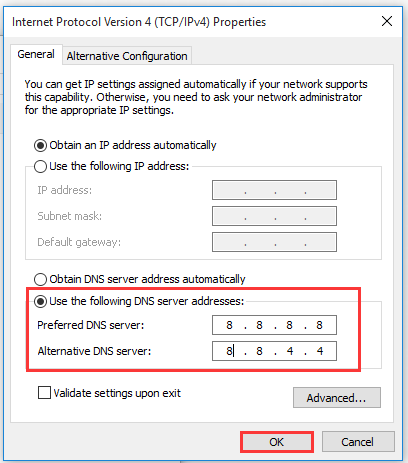
Step 5. Select the Use the following DNS server addresses option, and then set the Preferred DNS server: 8.8.8.8, Alternative DNS server: 8.8.4.4. After that, click on OK to save the changes.
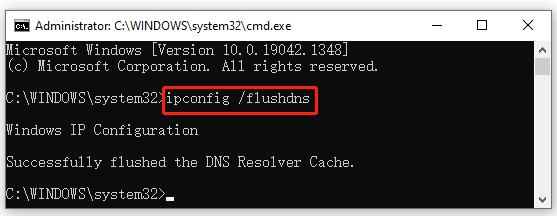
Step 6. Type cmd in the search box, and then right-click the Command Prompt from the top result and select Run as administrator. In the elevated Command Prompt, type the ipconfig /flushdns and hit Enter to clean up DNS cache.
Now, restart the application and see if the “GeForce Experience game can’t be optimized” issue is fixed.
Fix 5. Reinstall Your Graphics Card Driver
As mentioned above, the game cannot be optimized GeForce Experience due to corrupted or outdated graphics card drivers. Here you can try reinstalling your GPU driver and see if it works.
Step 1. Open the Run dialog box again, and then type devmgmt.msc in the box and hit Enter to open this program.
Step 2. In the Device Manager window, expand the Display adapters categories, then right-click the graphics card driver and select Uninstall device. Then follow any on-screen prompts to complete this uninstallation.
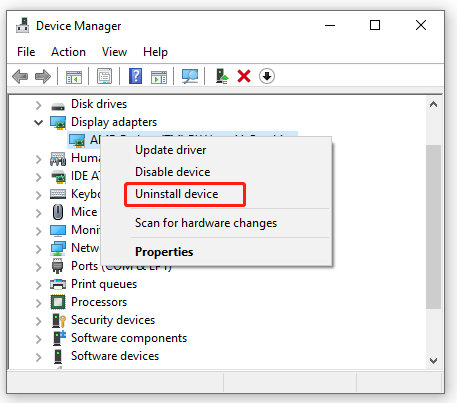
Step 3. Restart your computer and then Windows will automatically install a default graphics card driver for you. Alternatively, you can visit its manufacturer’s website and install the latest driver manually.
Fix 6. Reinstall GeForce Experience
If none of the above methods work, you may have to consider installing a fresh version of NVidia GeForce Experience. To do so, you need to uninstall it first and download it from the official website.
Step 1. Type appwiz.cpl in the Run dialog box and hit Enter.
Step 2. In the Programs and Features window, scroll down the list of installed programs to find NVidia GeForce Experience, and then right-click it and select Uninstall. Then follow the on-screen instructions to complete the process.
Step 3. Once uninstall, download the newest version from the GeForce Experience official website and install it accordingly.

User Comments :