After downloading the latest Windows update, many users have reported that the computer does not recognize Garmin USB devices. There is a problem connecting them to a USB port. The Garmin device shows up in Device Manager and as a connected drive in Windows File Explorer, but users can’t access it. When attempting to access the device, users receive the following message:
Please insert the disk. The directory name is invalid.
This issue occurs because Garmin devices formatted with the FAT12, FAT16, or FAT32 file system are not recognized as mass storage devices by computers or devices running Windows 10.
Well, how to fix a Garmin USB device not recognized? Keep reading. Before trying the following methods, you should try to restart your PC or use another USB port. If not working, go ahead with the methods below.
Fix 1. Update the USB Driver
Outdated USB drivers can be another significant cause of the above issue. You need to regularly update all installed drivers including USB drivers to keep your system free from various issues. Here are the steps:
Step 1: Press the Win + X key, and then select Device Manager from the context menu.
Step 2: In the Device Management window, expand the Universal Serial Bus controllers.
Step 3: Right-click on the first USB Root Hub device and click on Update Driver.
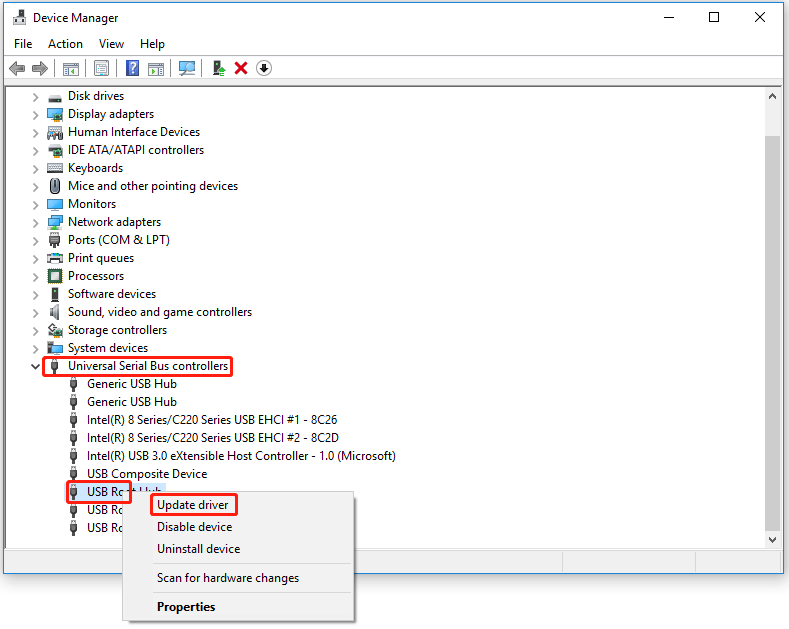
Step 4: Follow the on-screen instructions to complete the update process. Repeat the process for other USB Root Hubs as well.
Fix 2. Download the Latest Garmin USB Driver
If you are using an older version of the Garmin USB drive, you should also get the latest version of it. Here are the steps to download the latest Garmin USB drivers on Windows 11/10.
Step 1: Go to Garmin’s official website and look for the latest driver available.
Step 2: Click on the Download button and follow the on-screen steps to install it on your computer.
Step 3: Once done, connect the Garmin USB device and check if the problem persists. If yes, try the next solution.
Fix 3. Change the Power Management Settings
You can try changing your power management settings to resolve the issue. The steps are as follows:
Step 1: Press the Win + X key, and then select Device Manager from the context menu.
Step 2: In the Device Management window, expand the Universal Serial Bus controllers.
Step 3: Right-click on the first USB Root Hub device and click on Properties.
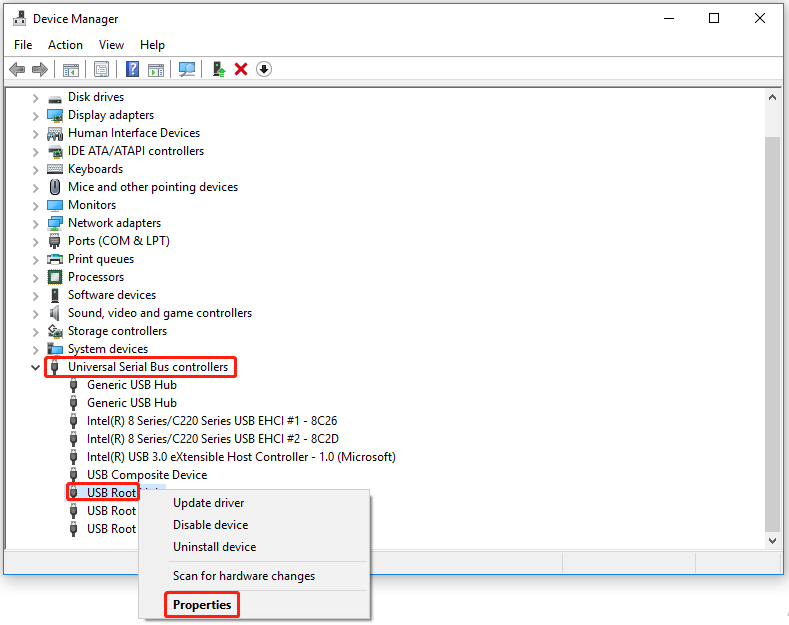
Step 4: Switch to the Power Management tab, and uncheck the Allow the computer to turn off this device to save power box.
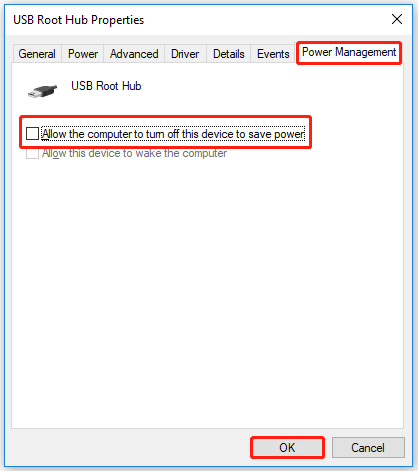
Step 5: After that, click on OK to save it and repeat the process for all the installed USB Root Hubs.
Fix 4. Format the USB to Other File Systems
As mentioned above, this issue occurs because Garmin devices use the FAT12, FAT16, or FAT32 file system and are not recognized by Windows 10/11 computers. So, you should format the USB drive to other file systems like NTFS or exFAT.
Formatting will destroy all data, so you should back up files on Windows 10/11.
To format the USB drive in the Windows operating system, it is recommended to use the free USB formatter MiniTool Partition Wizard.
MiniTool Partition Wizard is a professional and reliable partition manager that can help you resize partitions, extend partitions, convert FAT32 to NTFS, migrate OS to HD/SSD, and so on.
MiniTool Partition Wizard FreeClick to Download100%Clean & Safe
Step 1: Download and install MiniTool Partition Wizard on your computer. Then launch it to enter its main interface.
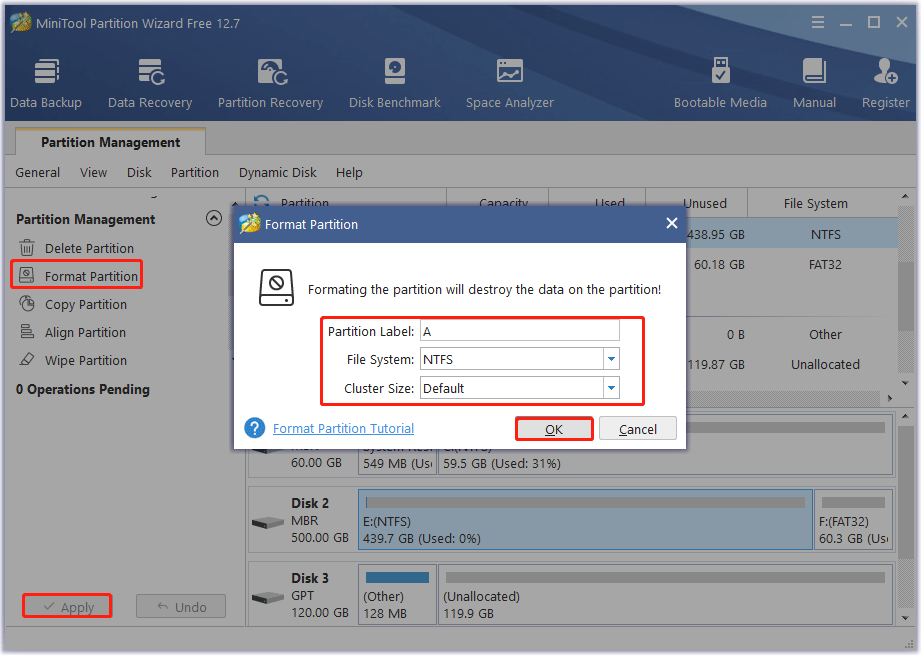
Step 2: Select the USB drive you want to format and select Format Partition from the left action panel.
Step 3: You can set the Partition Label, File System, and Cluster Size. Then click on OK to continue.
Step 4: Click Apply to confirm these changes.
Now, you have successfully formatted the USB drive. Then connect the Garmin USB device and check if the Garmin not recognized problem persists. If none of the above solutions help, the last thing you can try is to contact Garmin customer support.

![[Tutorial] How to Recover Data from Spy Pen Camera](https://images.minitool.com/partitionwizard.com/images/uploads/2024/05/spy-pen-camera-data-recovery-thumbnail.png)
![[Solved] The Specified Disk or Diskette Cannot Be Accessed](https://images.minitool.com/partitionwizard.com/images/uploads/2024/05/the-specified-disk-or-diskette-cannot-be-accessed-thumbnail.png)
User Comments :