Have you ever encountered the “Fire TV Stick keeps losing connection” issue when using the Amazon Fire TV Stick? If so, you can find solutions in this post, which is provided by MiniTool Partition Wizard.
The Amazon Fire TV Stick is a media streaming device that can let your normal TV become a Smart TV. It can let you stream videos, install apps, play music, etc. However, some users have encountered the “Fire TV Stick keeps losing connection” issue when they use it.
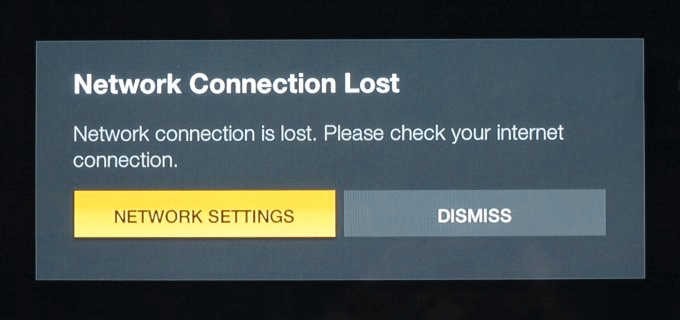
What are the causes of this issue? What solutions can help you solve this issue? All the reasons and solutions are listed below. You can continue to read to learn all this.
Causes of Fire TV Stick Keeps Losing Connection
The Amazon Fire TV Stick can lose connection for many reasons, but the Internet is the main one. In addition to the Internet, the “Fire TV Stick keeps losing connection” issue can also be caused by the Fire TV Stick’s hardware and firmware errors. The following are some of the most common causes of the Fire TV Stick’s losing Internet connection.
- Physical impediments to Internet access
- Poor Internet connection
- Weak Internet signal
- Poor router configuration
- Software issues with the Fire TV Stick
- Outdated Fire TV Stick version
- Wrong IP address
After knowing the reasons for the “Fire TV Stick keeps losing connection” issue occurring, let’s see the solutions to this issue below.
How To Fix The “Fire TV Stick Keeps Losing Connection” Issue?
The Amazon Fire TV Stick was released by Amazon on November 19, 2014. It is a smaller dongle version of the Fire TV that plugs into an HDMI port. It has all the functions of a Fire TV. Thanks to its portability, it is popular with users.
But nothing is perfect. You can also encounter many issues when you use it, such as the “Fire TV Stick keeps losing connection” issue. If you want to fix the Fire TV Stick Internet issue, you can try one of the following solutions.
Solution 1. Reduce the Distance Between Your Wi-Fi Router and Fire TV Stick
You need to have a high-speed Internet connection to keep your Fire TV Stick running. The faster the Internet speed is, the better the loading speed of the Fire TV Stick and apps will be.
So, if your Wi-Fi router is too far from your Fire TV Stick or there are too many devices between your Wi-Fi and Fire TV Stick, the Wi-Fi signal may be weak and the Internet connection of your Fire TV Stick can be broken off easily. To exclude all the influencing elements, you need to move the Wi-Fi router closer to your Fire TV Stick.
Solution 2. Check the Internet for Issues
If there is something wrong with your Internet, you can also experience the “Fire TV Stick keeps losing connection” issue. So, you can check the Internet connection to solve this issue. Here’s the way:
- Use your remote to go to Settings on your Fire TV Stick home screen.
- Then select Network.
- In the new page, scroll to your Wi-Fi network, and then press the play/pause button on your remote to check your network status.
- Next, you can see your network details displayed here. If it shows a good to very good signal status, your device is receiving an excellent Wi-Fi connection.
If your Internet on Fire TV Stick is working, you need to try the next solution. If not, you need to do the steps below to check your Wi-Fi status:
- Examine your router’s light. A green light means you have a solid network, while a red or orange light means there is something wrong with your Internet connection.
- Check all the wires that connect to your router. You need to connect all the wires properly to the router and replace the damaged wire.
- Check your Internet speed at speedtest.net. It is an online speed test tool that is free to use.
Solution 3. Restart the Router
If your Wi-Fi is still disconnected from your Fire TV Stick, you can do the following steps to restart your router:
- Turn off your router and modem.
- Then unplug the cables of your router and modem from the power outlet.
- Wait for 30 seconds.
- Put the router and modem’s cables back into the power outlet again.
- Turn on the router and modem.
- Wait for the router to show a green light and connect the Fire TV Stick to Wi-Fi.
- Once done, check if the connection error is fixed.
Solution 4. Use Ethernet Adaptor
If you want your Fire TV Stick to have a stable Internet connection, you can use an Ethernet adaptor for it. The Ethernet adaptor is a wired connection that will be very fast compared to the wireless network.
Although the Amazon Fire TV Stick doesn’t have a dedicated ethernet port, it provides a feature to connect an Ethernet adaptor, but you have to buy it separately.
To add Ethernet to your Fire TV Stick, you need to buy an adapter online first. Next, you need to connect the Micro USB connector to your Fire TV Stick, and then connect the Ethernet cable to the RJ45 port. Last, plug the USB cable into the power adapter. There is a schematic diagram below.
Solution 5. Restart Your Fire TV Stick
Sometimes, restarting the Fire TV Stick can work for the “Fire TV Stick keeps losing connection” issue too. So, you can have a try. To restart the Fire TV Stick, there are two ways you can choose from.
One is to unplug your Fire TV Stick from power source, and then plug it back in after waiting for one minute. After that, your Fire TV Stick will be restarted. The other way is to use the remote to restart it. Here’s the guide:
- Long press the home button on your Amazon Firestick remote.
- Select the Settings menu.
- Then choose the My Fire TV option.
- Select Restart.
- Once done, your Fire TV Stick will restart. You need to check if the Fire TV Stick Internet issue still occurs.
Solution 6. Update Your Fire TV Stick
Most Fire devices receive over-the-air updates to automatically get Fire OS updates, but your Fire TV Stick may be unable to update automatically for some reason. In this case, update your Fire TV Stick with the USB flash drive with these steps.
Stage 1. Format Your USB Flash Drive to FAT32
Before you update the Fire TV Stick, you have to prepare a compatible USB flash drive first. As the Fire TV Stick only supports the FAT32 file system, you need to format the USB flash drive to FAT32.
To format your USB flash drive, you can use MiniTool Partition Wizard to help you to finish it. MiniTool Partition Wizard is a useful tool for formatting a USB flash drive or hard disk and so on.
Download and install MiniTool Partition Wizard on your computer and then follow the steps to format your USB flash drive.
MiniTool Partition Wizard FreeClick to Download100%Clean & Safe
Tip: Please back up all your data on this USB flash drive before you format it. Otherwise, you will lose all your data.
Step 1. Connect the USB flash drive to your computer and then launch MiniTool Partition Wizard.
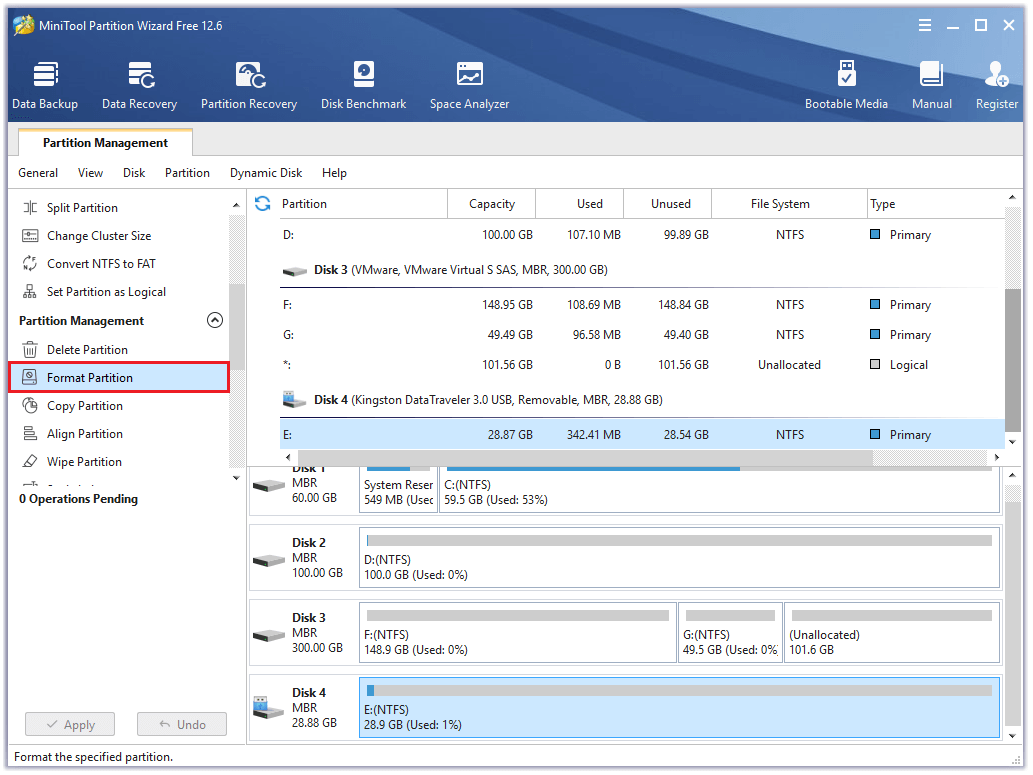
Step 2. Highlight the connected USB flash drive and then select the Format Partition option from the left panel.
You can also right-click the target partition and select the Format option from the menu.
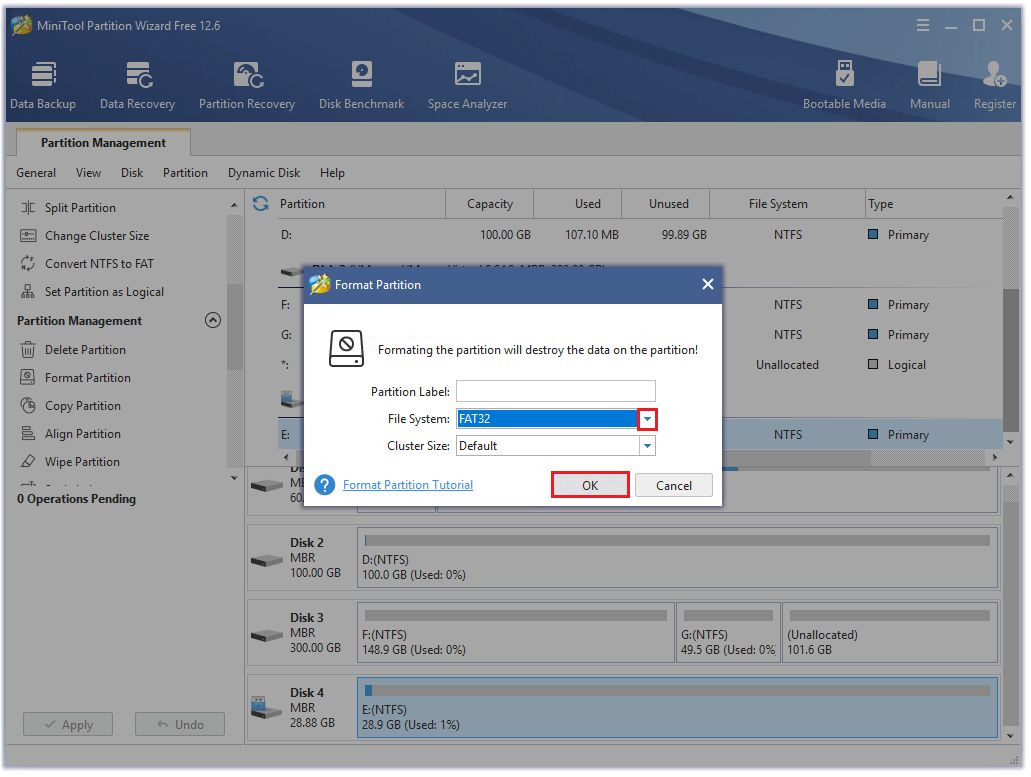
Step 3. In the next window, click the arrow down to expand a drop-down menu and select FAT32. Then click OK.
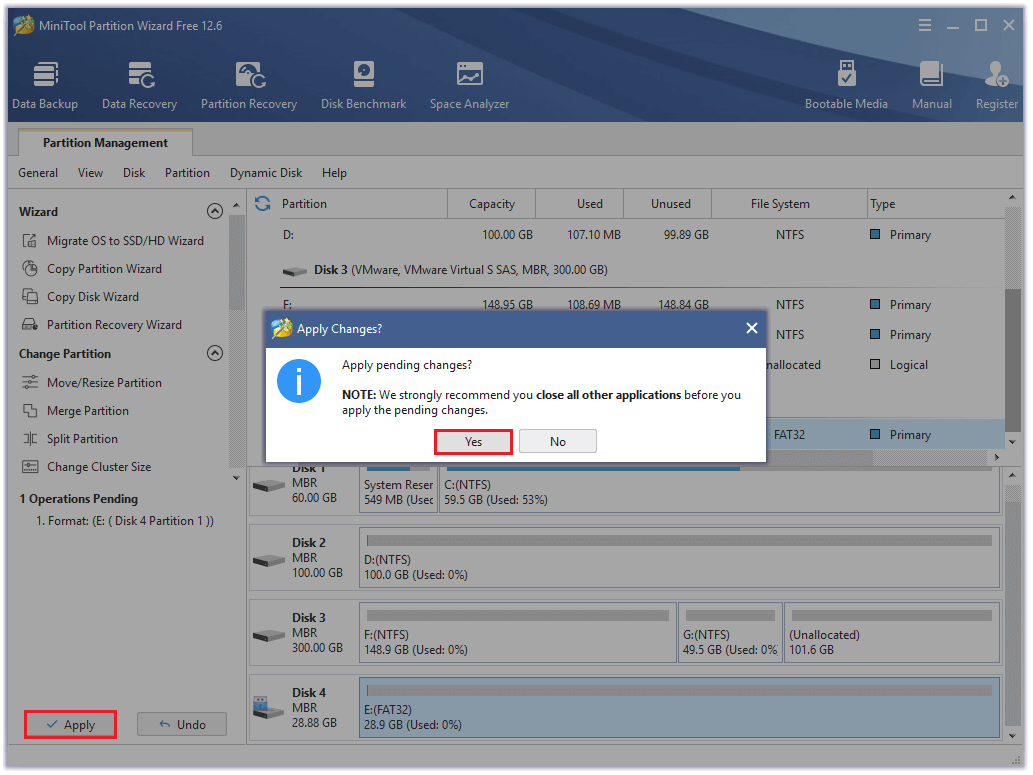
Step 4. Click Apply to carry out the operation, and then click Yes to confirm.
Stage 2. Download firetvedition_update.zip
After you format the USB flash drive into the FAT32 file system successfully, you need to download the “firetvedition_update.zip” file into the USB flash drive from the official website.
Step 1. Click this link to download “firetvedition_update.zip”.
Step 2. Next, connect the USB flash drive to your computer and then extract the “firetvedition_update.zip” zip file to the USB flash drive.
Step 3. Once done, you can eject the USB flash drive from your computer.
Stage 3. Install the Firmware via USB Flash Drive
If you have completed all the steps above, you need to connect the USB flash drive to your Fire TV Stick. However, the Fire TV Stick only has two ports. The HDMI plug is used to connect the TV for picture output while Micro-USB port can be used to connect the power source and the USB drive.
Therefore, you need to use a three-port OTG to help you complete this connection and then update the system software.
Step 1. Unplug any external devices from your TV and then unplug the TV’s power cord.
Step 2. Connect the USB flash drive to the Fire TV Stick with the OTG cable. At the same time, plug the Fire TV Stick and the last port of the OTG cable to your TV.
Step 3. Plug the TV’s power cables to the outlet on the wall.
Step 4. Then the TV will turn on by itself and begins installing the update.
Step 5. During this process, the TV will reboot.
Step 6. If prompted, press the power button on the front of your TV to finish the reboot process.
Step 7. Once done, you can update your Fire TV Stick successfully.
Solution 7. Change DNS Settings Of the Fire TV Stick
Sometimes changing DNS configuration can help you to fix the “Fire TV Stick keeps losing connection” issue. You can change DNS settings on your Fire TV Stick manually by following the steps below:
- Press the menu button on your remote.
- Go to the Network > Network Status > IP Settings > DNS Settings.
- Select Enter manually and put your DNS address 8.8.8.8.
- Once done, check if the issue is fixed.
Solution 8. Reset Fire TV Stick to Factory Defaults
Resetting the Fire TV Stick is a useful way to remove any technical problem on your Fire TV Stick. You can do as follows to reset your Fire TV Stick:
- Press Home button on your firestick remote.
- Go to Settings.
- Select My Fire TV.
- Scroll down to select Reset to Factory Default.
- Once done, you can reset your Fire TV Stick successfully.
Bottom Line
After reading this post, you can know how to fix the “Fire TV Stick keeps losing connection” issue. You can leave your comments to discuss any problems that bother you a lot. In addition, if you have any questions about MiniTool Partition Wizard, please send us an email via [email protected].

![How to Add Storage to Fire Stick OS 7/6/5 [A Full Guide]](https://images.minitool.com/partitionwizard.com/images/uploads/2022/07/add-storage-to-fire-stick-thumbnail.jpg)


User Comments :