Have ever met the Far Cry 6 texture bug on your PC? When you meet this bug, you will find that the texture of Far Cry 6 is pixelated and blurry. In this post, MiniTool Partition Wizard introduces some solutions for you to solve this bug.
Far Cry 6 is very popular around the world and the graphics in it is also very beautiful, and most of the players like them very much. If you like these graphics too, the Far Cry 6 texture bug may make you feel annoyed.
System Requirements:
Before fixing this Far Cry 6, you’d better check for the system requirements of this game. If your computer can’t satisfy the minimum or recommended requirements, you will meet many errors including texture bugs when you install and run it.
Minimum requirements (30 FPS)
- Operating System: Windows 10 (20H1 version or newer, 64-bit versions)
- Processor: AMD Ryzen 3 1200 @ 3. GHz or Intel Core i5-4460 @ 3.1 GHz (AVX, AVX2, and SSE 4.2 support required)
- RAM: 8 GB (Dual-channel mode)
- Video card: AMD RX 460 (4 GB) or NVIDIA GeForce GTX 960 (4 GB)
- DirectX: DirectX 12
- Hard Drive: 60 GB available storage
Recommended requirements (60 FPS)
- Operating System: Windows 10 (20H1 version or newer, 64-bit versions)
- Processor: AMD Ryzen 5 3600X @ 3.8 GHz or Intel Core i7-7700 @ 3.6 GHz (AVX, AVX2, and SSE 4.2 support required)
- RAM: 16 GB (Dual-channel mode)
- Video card: AMD RX Vega 64 (8 GB) or NVIDIA GeForce GTX 1080 (8 GB)
- DirectX: DirectX 12
- Hard Drive: 60 GB available storage
Solution1. Disable/Uninstall the HD Texture Pack
Many players have found that the HD texture pack can cause blurry texture problems. And Ubisoft has pointed out that the minimum requirement for running the HD Texture Pack for Far Cry 6 is 12GB of VRAM.
So, if you install and run the HD texture pack under a lower VRAM, you may meet a performance problem.
In this case, if you have already installed the HD texture pack and meet the Far Cry 6 texture bug, you can disable or uninstall the HD texture pack and restart the game to solve this issue.
Solution2. Run As Administrator
Running as an administrator is one of the ways to solve this Far Cry 6 texture bug, if you meet this issue, you can have a try. Here’s the way:
- Find the Far Cry 6 game folder on your PC.
- Right-click the .exe file and select Run as administrator from the menu.
Solution3. Update Your Graphics Driver
Sometimes the outdated graphics driver may cause errors and affect the game performance. Keeping your graphics driver up to date all the time can avoid many game errors.
To update your graphics driver, you can do the following steps:
- Click the Search icon on the toolbar and type “device manager” in the search box.
- Then click Open on the right of the window to open the Device Manager.
- Expand the Display adapters category.
- Right-click on the graphics card name and select Update Driver Software… from the menu.
- Select Search automatically for updated driver software. Then the Windows will automatically install the driver.
You can also choose to go to the manufacturers’ official websites (NVIDIA, Intel, AMD, ASUS), and then download and install the newest version compatible with your Windows system.
Solution4. Turn on High Graphics Performance Setting for the Game
You can run the Far Cry 6 in high graphics performance to make the game use the GPU fully. And you can choose the most suitable mode for the game by switching to the different modes. You can do as follows:
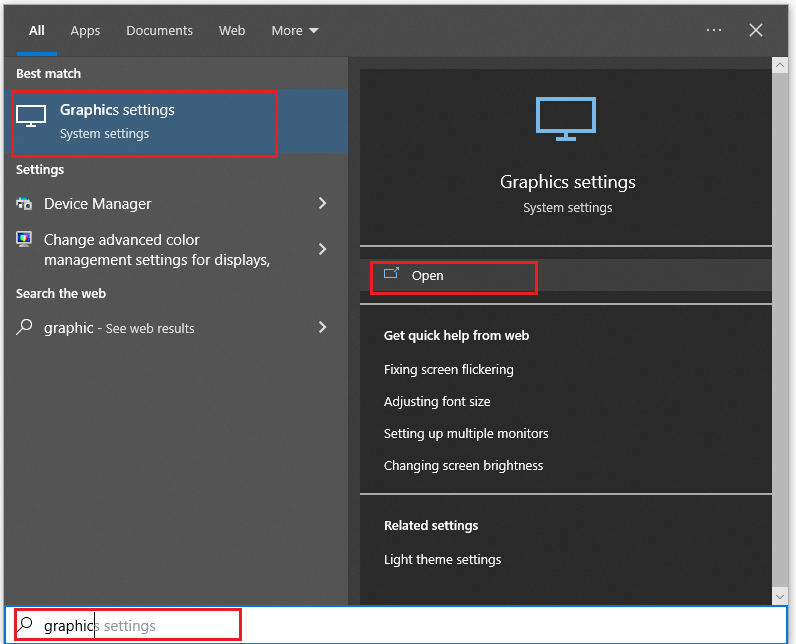
- Click the Search icon on the toolbar and type “graphics” on the search box.
- Click Open to enter the Graphics settings.
- Click Browser to add exe to the list. The default installation location should be: C:\Program Files (x86)\Steam\steamapps\common.
- After that, click Options and select High performance on the next page.
- Click Save.

Solution5. Clean the DirectX Cache
You can also clean the DirectX cache to solve the Far Cry 6 texture bug. You can do the following steps:
- Press Windows and R keys at the same time to open the Run window.
- Type “cleanmgr” on the Open: box and click OK.
- Click OK.
- Then check the box in front of DirectX Shader Cache and other DirectX cache. Once done, click OK.
- Click Delete Files.


![How to Fix Halo Infinite Crashing Mid Game on PC? [8 Ways]](https://images.minitool.com/partitionwizard.com/images/uploads/2022/02/halo-infinite-crashing-mid-game-thumbnail.png)
User Comments :