Printer is a necessary assistant in workplace but some related issues have been reported. In this article from MiniTool, you will get the methods to remove error printing message that is one of the common printer errors.
When you are trying to print a document, the task will appear in the printing queue. But sometimes, the printer might run into certain problems and the pending printing tasks might be in error printing status. This issue might occur due to USB driver issue and some other factors.
What can you do if you keep getting the error printing message? Commonly, most printer issues can be removed by a simple restart of the printer. If this doesn’t work in your case, you can try the following solutions.
Fix 1: Run Windows Printer Troubleshooter
Windows Troubleshoot is a built-in utility that can help to troubleshoot various computer problems, including printer issues. This is a quite easy operation and you can follow the steps below:
Step 1: Press Windows + I to open Windows Settings.
Step 2: Choose Update & Security and click Troubleshoot section.
Step 3: In the right pane, select Printer and click Run the troubleshooter button.
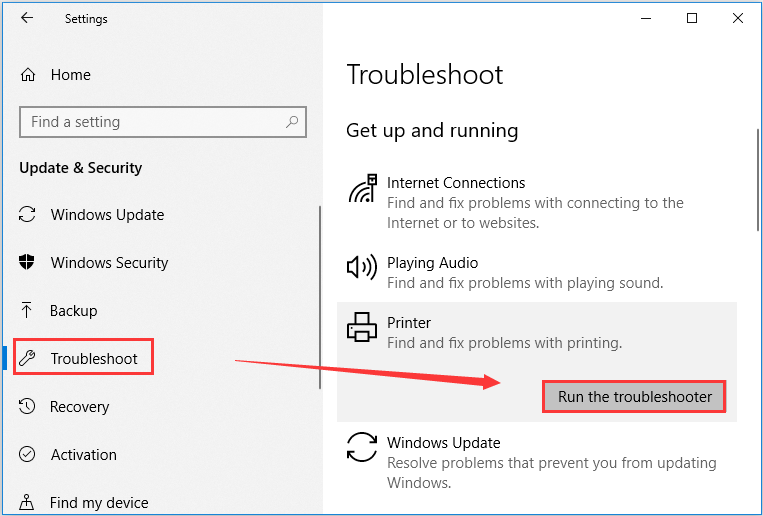
Step 4: If you have multiple printers connected to your computer, all the detected printers will be listed. Just choose the one that gives error printing message and hit Next button.
This tool will start detecting problems with the selected printer. If any issues are detected, click Apply the fix to fix them. Then, try starting your printing task again and check if the error printing message has disappeared.
Fix 2: Clear the Print Spool Folder
Some users also recommend clearing the printer spool folder, and you can also have a try. To do that, you need to:
Step 1: Press Windows + R to invoke Run dialog. Input services.msc and click OK button to open Services window.
Step 2: Locate the Print Spooler service among the list. Right-click it and choose Stop.
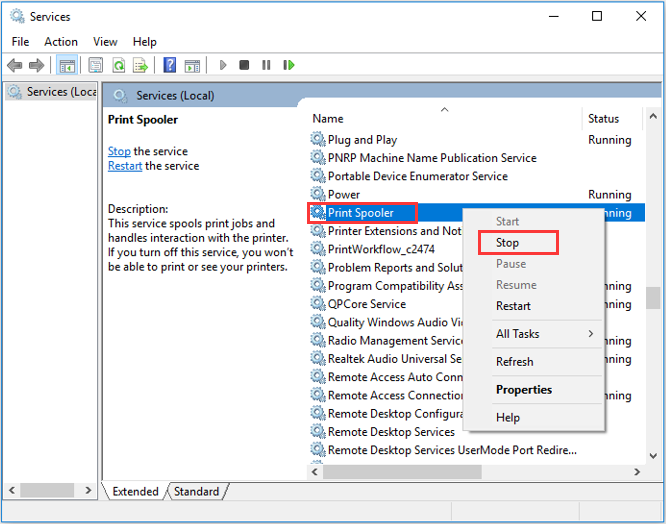
Step 3: Press Windows + E to open File Explorer. Input %WINDIR%system32spoolprinters in the address bar and press Enter key. This will open a folder named PRINTERS
Step 4: Delete all the files in this folder and then exit File Explorer.
Step 5: Go to Services app again and restart the Print Spooler service by right-clicking it and selecting Start.
Fix 3: Update USB Driver
As mentioned before, the USB drive might be the culprit of the printer error in our case. If the USB driver related to the printer is corrupted or outdated, the printer will malfunction definitely.
If the problematic printer works fine in another computer, you should pay attention to your USB driver and take action to update it.
Step 1: Right-click the Start button and choose Device Manager to open it.
Step 2: Double-click Universal Serial Bus controllers to expand the category.
Step 3: Right-click your USB controller driver and choose Update driver.
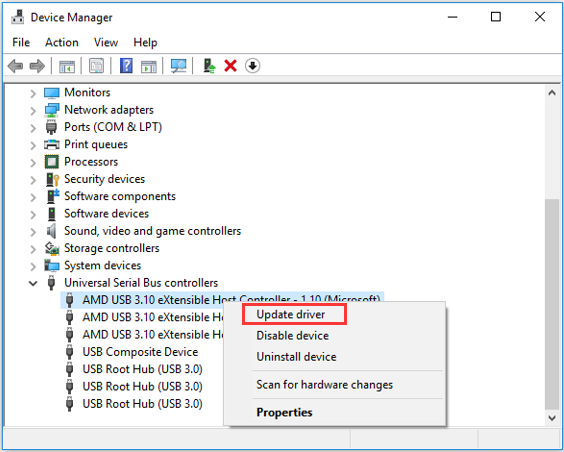
Step 4: Choose Search automatically for updated driver software to continue. This will make your Windows search your computer and the Internet for the latest driver for your device.
Following the onscreen instructions to install any found updated. Then, you can check if the printer can work properly on your computer without the error printing message.
Related article: How to Update Device Drivers Windows 10 (2 Ways)
Fix 4: Check the Port Settings of the Problematic Printer
Finally, you should check if the port used by your printer is selected in the related settings. Here’s how to do it.
Step 1: Open Control Panel and go to Hardware and Sound > Devices and Printers.
Step 2: Under Printers section, right-click the problematic printer and choose Printer properties.
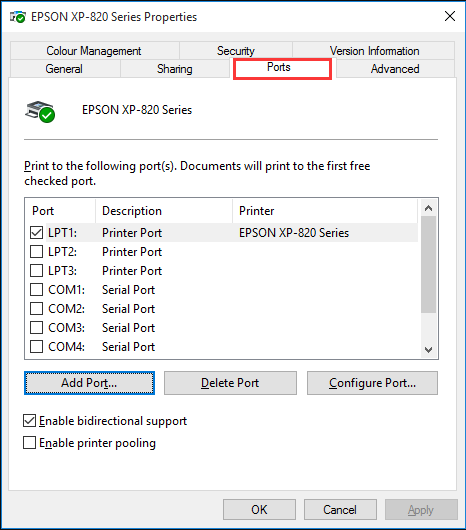
Step 3: Switch to the Ports tab and make sure the port you plug the printer into is selected here. If not, check the right port and click Apply and OK to save changes.

User Comments :