Have you ever heard “Error applying Hard Drive changes”? This article shows what you can do about this error. By the way, if you are seeking a program to help you manage the partition saving your virtual machine, you can try MiniTool Partition Wizard.
Error Applying Hard Drive Changes
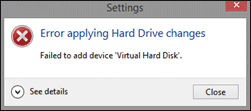
According to the Microsoft blogs, one Hyper- V user reported that he ran into “Error applying hard Drive Changes” when he tried to attached a virtual hard disk to a generation 2 virtual machine. The error prompt looks like the following picture.

Computer users may feel frustrated when running into this Hyper-V error as not being able to modify the Virtual Machine settings means that they are stuck with the original setup of their VMs.
But please cheer up, and the following content will show the solutions to fix the Hyper-V error. And it is important to note that please follow the fixes in this article carefully in case other complications happen.
Fix 1: Check Whether Other VMs Are Using the Same Hard Drive
Please note this fix is applied when you are using multiple VMs from the same hard drive.
In this fix, you are required to check the virtual hard drives linked with each of your virtual machines to make sure that there is no conflict among them.
To do that, please follow the steps below.
Step 1: Open your Hyper-V Manager via Cortana’s search box.
- Open Start menu and type hyper.
- Cortana will immediately show Hyper-V Manageras the Best match, and you just need to click it.
Step 2: Select the guest machine of which hard drive you want to check right-click it, and select Hyper-V Settings.
Step 3: After getting the new pop-up window, please check the location of your virtual HDD (you also can click Browse to modify it if needed)
Fix 2: Change iSCSI or IDE Controller Settings
Fix 2 requires you to change iSCSI or IDE controller settings to fix “Error applying Hard Drive changes”. To do that, please refer to the following tutorial.
Step 1: Open your Hyper-V Manager. (To open this virtual machine, you can refer to the Step 1 in Fix 1)
Step 2: Right-click the host machine, and then select Hyper-V Settings.
Step 3: Under the section iSCSI Controller or IDE Controller from the right-side menu, please right-click HDD and choose Properties.
Step 4: Under the Controller section, drag the drop-down menu and choose another option. Please note that the exact options will vary depending on what your default setting was.
Fix 3: Remove and Re-add DVD Drive from Hyper-V VM
To remove and re-add DVD drive, please do the following steps:
Step 1: Open Hyper-V Manager.
Step 2: Click Start, Administrative Tools, Hyper-V Manager in order.
Step 3: Under the virtual machine name, click Settings inside the Action panel.
Step 4: Select the DVD drive from the left-side panel.
Step 5: Click Remove on the DVD Drive window and click OK.
Step 6: After removing DVD drive successfully, you need to re-add this drive. Open Hyper-V settings, and click the SCSI Controller/IDE Controller option.
Step 7: Select DVD Drive from the options to your right and click the Add button to complete the process.
Now, all the fixes to “Error applying Hard Drive changes” have been displayed. Check whether the error has been solved after trying these fixes.


User Comments :