Running more than one operating system on one PC is no stranger to many users. And now more and more users want to dual boot Windows 7 and 10, as both of them are good-to-use. This article shows you how to dual boot Windows 7 and 10.
About Windows 7 and Windows 10
Windows 7 is a major version of the Windows NT operating system developed by Microsoft. It was released in 2009 and replaced Windows Vista. Six years later, Microsoft released Windows 10, the operating system offering numerous advantages.
Some people choose to upgrade to Windows 10, while some people want to dual boot Windows 7 and 10. Considering the latter demand, this post from MiniTool Partition Wizard offers a detailed tutorial on how to dual boot Windows and Windows 10.
This post shows you how to dual boot Windows 10 and Windows 7 in the case that you have installed Windows 7 first.
If none of the operating systems has been installed, you should install Windows 7 first, and then install Windows 10 to dual boot them. That’s because Windows operating system is backward compatible. The boot.ini file of Windows 10 will overwrite that of Windows 7, which helps to boot both Windows 10 and Windows 7 successfully.
First, Check Whether Your Computer Supports Windows 10
You should first make sure whether your computer supports Windows 10 if this computer is old.
Microsoft released the basic requirements for Windows 10 installation:
- Processor: 1 GHz or faster processor or SoC
- RAM: 1 GB for 32-bit or 2 GB for 64-bit
- Hard disk space: 16 GB for 32-bit OS or 20 GB for 64-bit OS. It had been changed to 32 GB since the May 2019 Update.
- Graphics card: Compatible with DirectX 9 or later with WDDM 1.0 driver.
- Display: 800 x 600
To verify whether your computer meets the above requirements, you can follow the guide below:
If your computer can run Windows 10, dualling boot Windows 7 and Windows 10 becomes possible.
Then, Get Unallocated Space for Windows 10 Installation
Then you need to prepare unallocated space if you want to install Windows 10 alongside Windows 7 on the same hard drive. But if you have two hard drives on your computer and one of them is empty, you can skip this part.
Well, how much unallocated space do you need? It is highly recommended that you prepare 50-100GB of unallocated space for Windows 10 installation.
How to get unallocated space for Windows 10? The easiest way is to shrink the existing partitions. During the shrink process, any ordinary files will be automatically relocated on the partition to decrease the space of the partition and create unallocated space. See: What Does Shrink Volume Do?
How to shrink a partition with ease? You can use the Windows built-in tool Disk Management. But some users reported that this tool is not so convenient for them to resize partitions. So, here is another partition resize tool recommended, and that is MiniTool Partition Wizard.
MiniTool Partition Wizard is a professional partition manager for Windows versions, and its Move/Resizes Partition feature helps you shrink and extend a partition with ease.
For how to shrink a partition with this recommended tool, here are the steps:
Step 1: Launch MiniTool Partition Wizard to access its user interface.
MiniTool Partition Wizard FreeClick to Download100%Clean & Safe
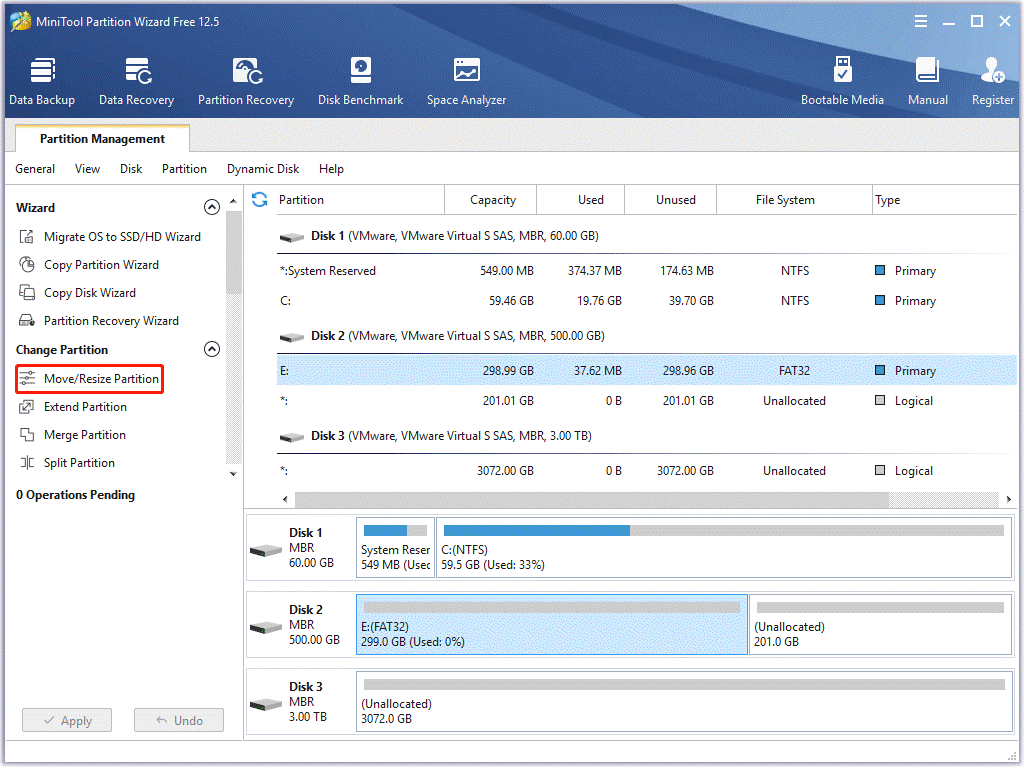
Step 2: Click the partition to be shrunk and then choose the Move/Resize Partition feature from the left pane.
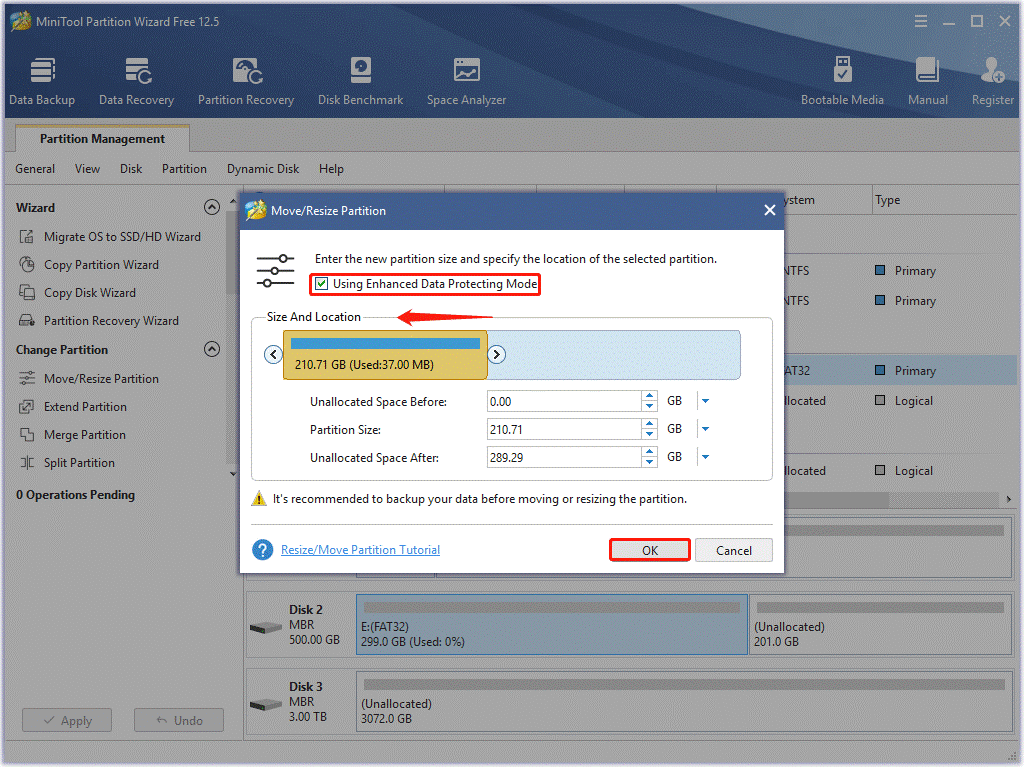
Step 3: You will see a small window. In this window, shorten the blue handle to shrink the partition and then click the OK button.
Step 4: Preview the shrink effects and then click the Apply button.
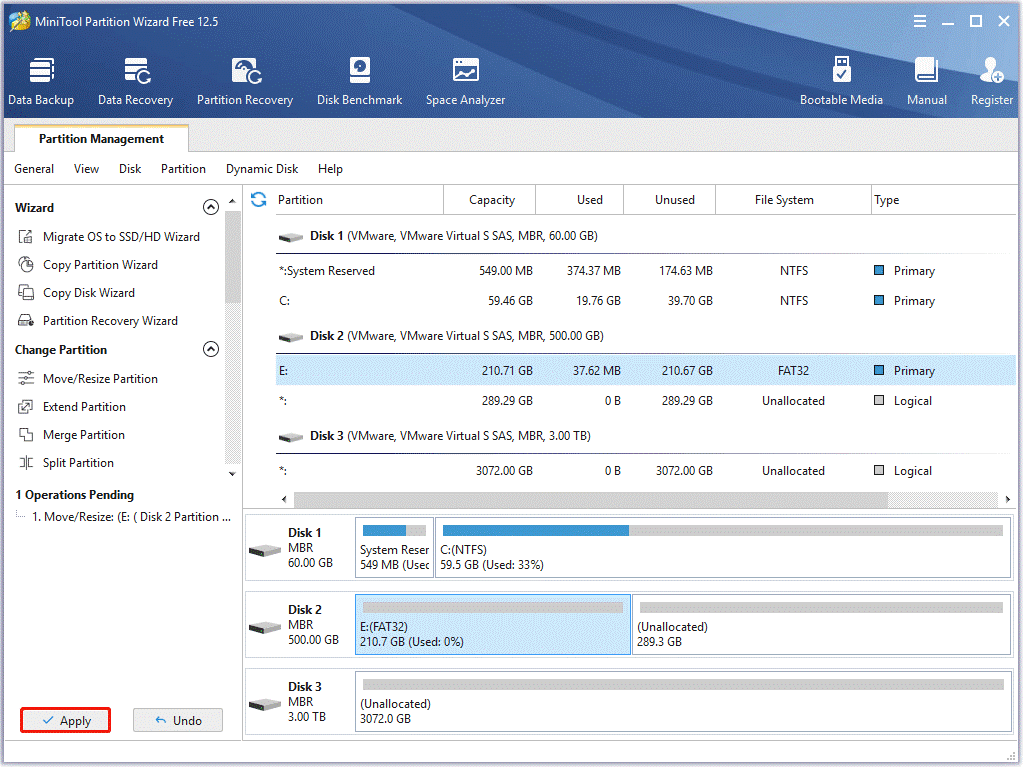
Once you click the Apply button, MiniTool Partition Wizard will start to shrink the partition, and this task will be done quickly.
That’s all about the second part of “how to dual boot Windows 7 and 10”, and let’s check the next part.
Next, Install Windows 10 on Hard Drive
Here comes the last part of “how to dual boot Windows 7 and 10” — Windows 10 installation.
Here is how to install Windows 10 alongside Windows 7 on the same hard drive.
Step One: Create Windows 10 Installation Media
Thanks to Microsoft Media Creation Tool, it is easy to create Windows 10 installation media.
1. Download Windows Media Creation Tool from the Microsoft webpage.

2. Double-click the download to run Microsoft Media Creation Tool.
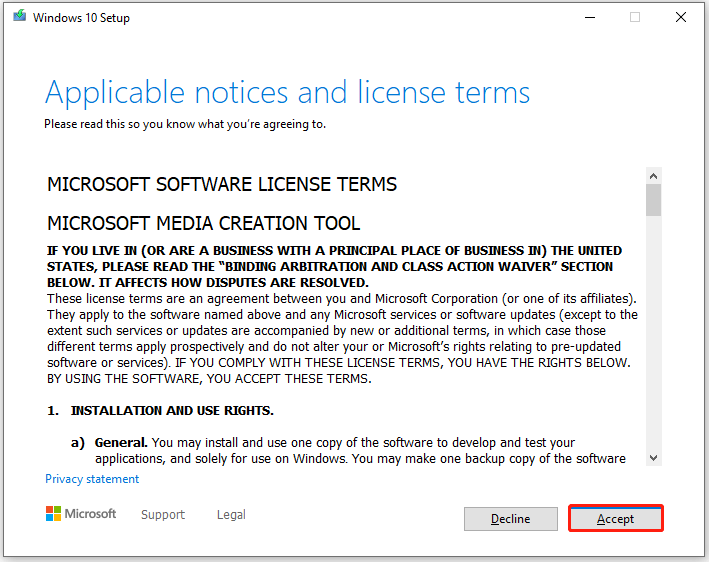
3. Click the Accept button on the pop-up window to accept the Microsoft software license terms.
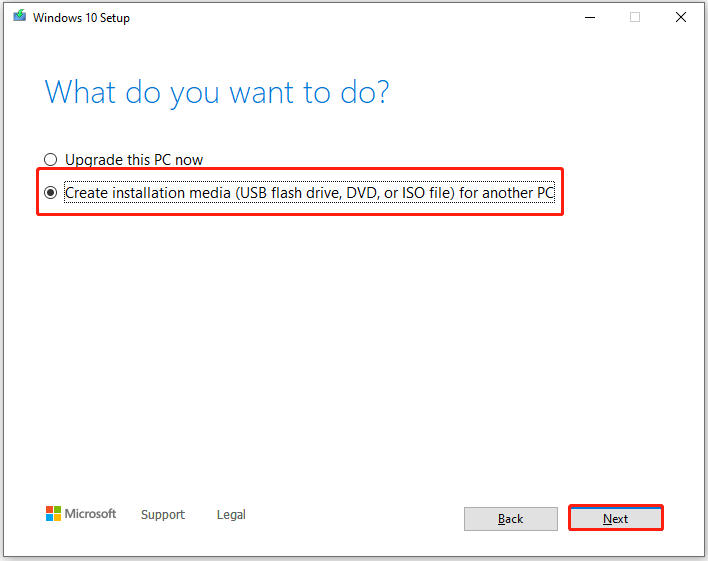
4. Choose the second option Create installation media for another PC and then click the Next button.
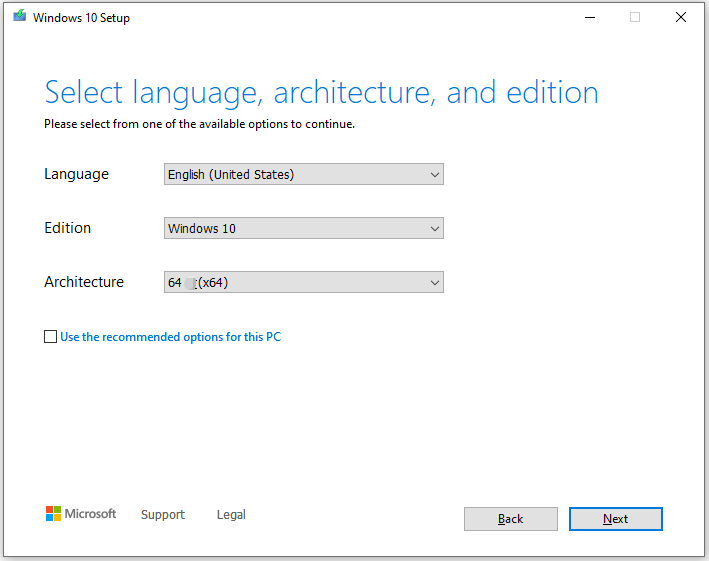
5. Accept the recommended options or refuse those to set your preference and click the Next button.
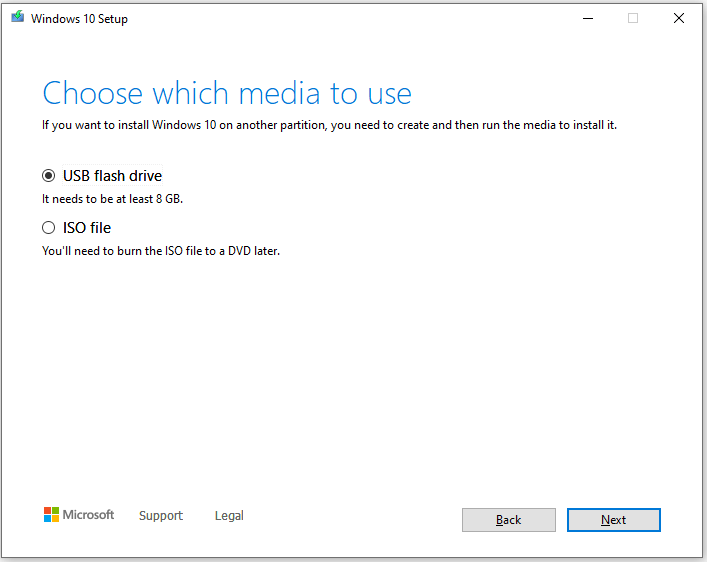
6. Choose to create a Windows 10 installation USB drive or to extract the ISO file and burn it to a DVD later.
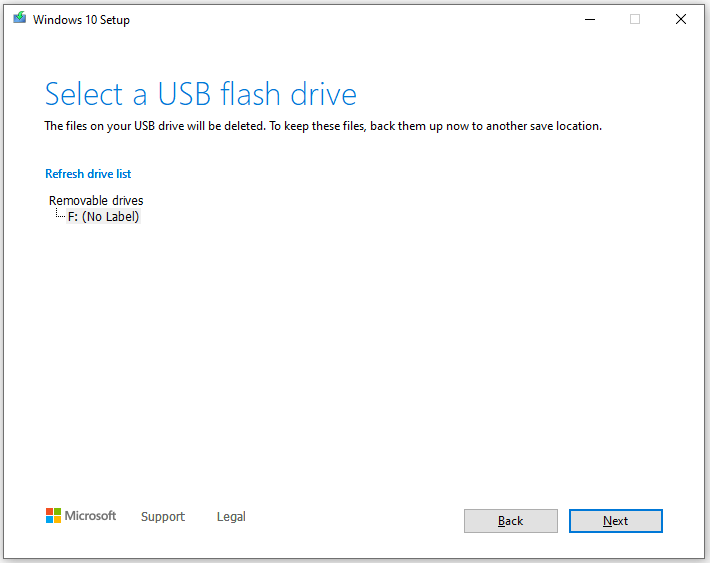
7. (the first way is chosen in the above step) Connect the USB drive to your computer and click the Next button.
8. Select the USB drive and then click the Next button.
9. Wait for this tool to complete downloading Windows 10. When you receive the message saying “your USB flash drive is ready”, you can click the Finish button to exit.
Step Two: Install Windows 10
Now all preparations are done, and it is time to install Windows 10 alongside Windows 7 on the same hard drive.
1. Reboot your computer. It should automatically boot into the Windows 10 installer. If it doesn’t, you need to change the boot order in BIOS.
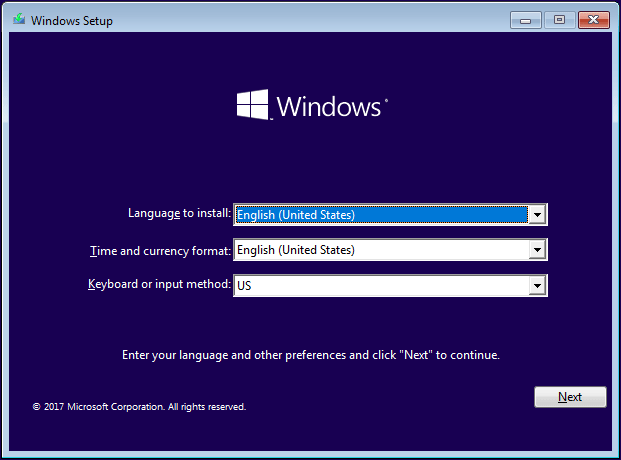
2. You will see a Windows logo and then a window where you can set the language, time, and keyboard. After finishing these settings, you can click the Next button to go on Windows 10 installation.
3. Click the Install now button and click the Next button.
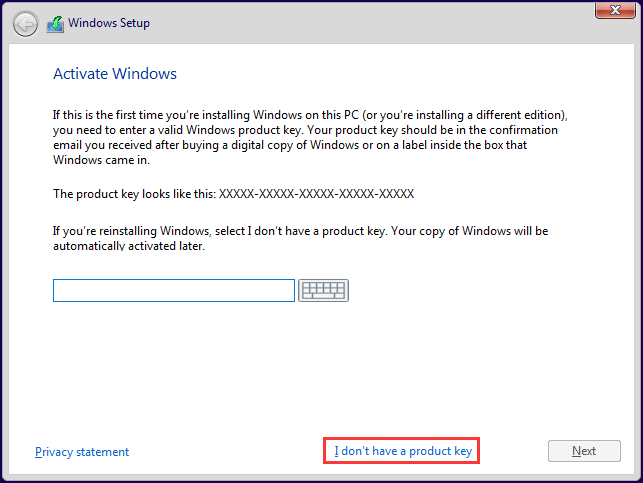
4. Enter the license key or click the I don’t have a product key option. Then, click the Next button.
5. Accept the license terms and click the Next button.
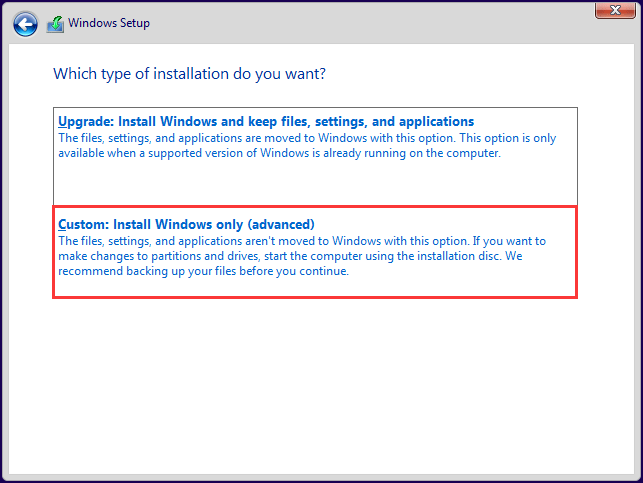
6. Choose the option “Custom: Install Windows only (advanced)”, which allows you to install Windows 10 alongside an existing copy of Windows (here is Windows 7).
7. Select the unallocated space and then click the New option.
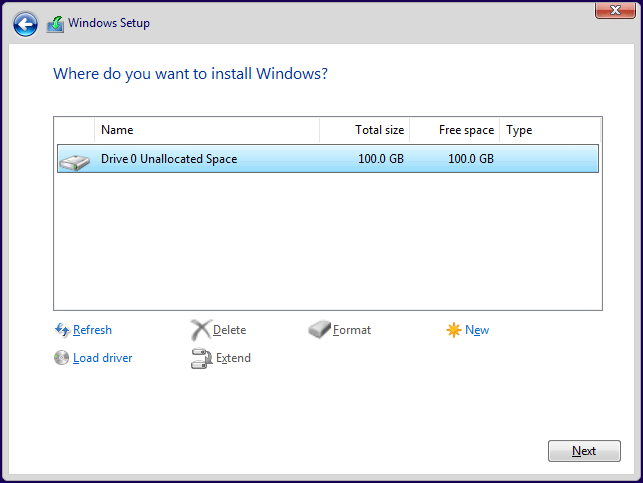
8. Customize how big the partition is and then click the Apply button to create a new partition for Windows 10 installation.
9. Wait for Windows to finish the Windows 10 installation.
Once it finishes the task, you should be able to dual boot Windows 7 and 10.
Finally, Boot from Windows 7 or Windows 10
Now you can check whether you are able to dual boot Windows 7 and 10. How to check? It is easy: just see if you will be required to choose between Windows 7 and Windows 10 when you boot your computer. If you see the Choose an operating system window, it means that you are successful.
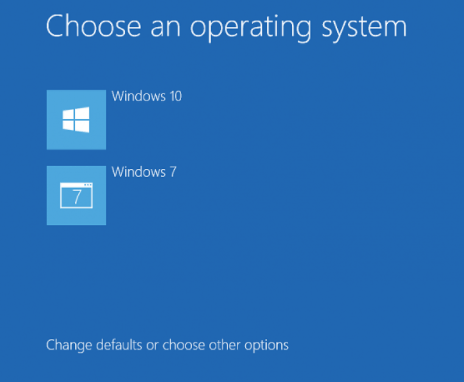
On this window, there is the link Change defaults or choose other options, which is used to set the default operating system and control how long the operating system selection will appear before it automatically boots that default Windows operating system. So, if you have these demands, you can click the link.
After your computer boots, you can go to File Explorer to rename the system partitions.
- Right-click the partition.
- Choose the Rename
- Enter Windows 7 or Windows 10.
- Click the Continue button when you are required to provide administrator permission.

If you want to between Windows 7 and Windows 10, you can restart your computer and select the Windows operating system you want to start.
Windows 11 came out on October 5, 2021. Do you want to dual boot the latest Windows version with Windows 10? If yes, you might need the following guide.
Wrapping Things up
After learning how to dual boot Windows 7 and Windows 10, you can try to install Windows 7 and Windows 10 on the same machine by yourself. Just follow the steps in this post to dual boot Windows 7 Windows 10 now!
If you have any Windows 10 and Windows 7 dual boot problem, you can leave a message on the following comment zone and we will reply as soon as possible. If you need any help when using MiniTool software, you can contact us via [email protected]>.

User Comments :